Print and share
Standard Configuration Reference Guide
Table of contents
- Accessing the Admin Portal
- Understanding & Managing your Main line
- Set Up and Configure Your Business Operating Schedules
- Configure Main line
- Set Up and Configure Your Hunt Group
- Set Up and Configure Your Auto Attendant
- Test Main line and call flow
- Updating User Names
- Reset a User’s Portal Password or Voicemail Passcode
- Setting up Voicemail to email for a user
- Download and Install Webex
- Phones and Voicemail guides
- Set Up Your Disaster Redirect
Welcome to the Standard Configuration Reference Guide for your Spectrum Enterprise Unified Communications (UC) installation. Standard Configuration is a starting point for your service with some settings already set up, based on initial information provided or based on default values. This allows you to enjoy a faster deployment experience and customize your system to your preferences after your Spectrum Enterprise is fully installed.
The installation process for a Standard Configuration is as follows. Please refer to this checklist as you proceed through the steps.
Standard Configuration Installation Steps
|
|
|
|
|
|
|
|
|
|
|
|
|
|
|
|
|
|
A few items to note before you get started:
- The Main line will ring to a Hunt Group with User 1 in it up to 4 rings if the phone is active. After 4 rings, the Main line will transfer to the unconfigured Automated Attendant.
- IMPORTANT: When this happens, the caller will hear a generic Auto Attendant greeting until you set up your custom message.
- In addition to this reference guide, please also consult the Welcome email and Customer Cut sheet you received, as well as reach out to your Spectrum Support team!
Accessing the Admin Portal
The Spectrum Admin Portal can be found at: https://uc.spectrumenterprise.net/
Before you begin, you will be provided an administrator username and password via email. The admin login will be in the form of name.admin. Note that this is not a DID login, as those are for end-users.
If you cannot find your admin credentials, you can contact your project manager or the Spectrum Hosted Voice Customer Care team to reset by dialing 611# from any Spectrum phone in your office.
Login by entering your Username and Password at the link above, then click login. You are routed to the Dashboard where you have access to these areas where most of your business and user configurations will take place:
- Group Profile: View and modify your group-level information such as time and holiday schedules, business hours, and call capacity in this section.
- Group Services: Make changes to your group profile, greetings, auto-attendant, hunt groups, call centers, and call park settings in this section.
Understanding & Managing your Main line
Your Main line is a caller’s first point of contact with your business. When initially setting up your Main line, we recommend starting with a simple call flow first, and adding additional customizations as needed. Your call flow can be as simple or complex as you want it to be.
Standard Configuration for the Main line is to start all callers with a live answer to User 1. If User 1 does not answer, calls will then be forwarded to the Automated Attendant. You can customize your Main line to begin with an Automated Attendant instead, change the call flow based on business operating schedules, and more. We will go over the steps to configure each of these in the sections below.
Set Up and Configure Your Business Operating Schedules
IntroductionTime schedules are used to route incoming calls based on the day of the week and/or time of day. Schedules are classified as either Business Hours or Holiday.
Create Your Business Hours Schedule- From the Dashboard, select the Group Profile tab.
- Next, select the Time Schedules tab.
- Click the Add New Schedule button.
- Enter a name for the new schedule, for example, Office Hours.
- Click Okay.
- To set the time click within each row of the chart and drag from starting to ending time.
- When complete, click Save.
The Office Hours time schedule will now appear in the table.
- From the Dashboard, select the Group Profile tab.
- Next, select the Time Schedule tab.
- Select your time schedule in the chart below.
- Once done, drag the marker until the new desired time is highlighted.
- Click Save when complete.
Note: If you make modifications to your business hours, you need to make edits to the After Hours schedules as well so there are no gaps or overlapping instances.
As an administrator, you can create a Holiday Schedule for any days that your business is closed. Once the Holiday Schedule is applied, the system will send calls to your holiday hours treatment for any days within your Holiday Schedule. To create a Holiday Schedule, follow these steps:
- From the Dashboard, select the Group Profile tab.
- Next, select the Holiday Schedule tab.
- To create a new Holiday Schedule, select the Add Holiday Schedule button.
- Enter a Holiday Schedule Name in the text box.
- To add a new holiday, enter the name of the holiday in a blank field under the Holiday column.
- Next, enter the first date that your office is closed in the Date Start column.
- In the Date End column, enter the date for the final day your office is closed.
(Example: If it is a one-day holiday, the Date Start and Date End will be the same dates. If your office is closed for multiple dates, the Date Start and Date End will be different dates.) - After making the changes, select the Save button.
Note: If a Holiday Schedule already exists, you will see it listed and can modify the existing one.
Configure Main line
When provisioning your system, Spectrum builds a user for your Main line. You can find this user listed among the other users within your company. As a system administrator, you may want to verify or edit where your Main line is pointed. To do this from the dashboard of your admin portal, follow these steps:
- Go to the Users section and select the Settings icon for your Main Line user.
- To view all of the services and details, select VIEW ALL SERVICES and you will be routed to the Calling Features page for your Main line user.
- IMPORTANT: For this type of user, typically one of two Call Forwarding features will be used. Please note how each is used before proceeding with the rest of these steps. Also note that we strongly recommend using Call Forwarding Selective and turning off Call Forwarding Always, but we have provided information for how to manage each.
- Call Forwarding Always: Used when all incoming calls are forwarded to only one destination any time the feature is activate (e.g. after hours). When this feature is turned on you will see the phone number or extension for where calls are forwarded when the Main line is called.
- Call Forwarding Selective: Used when your company has incoming calls going to different destinations during Business Hours versus After Hours or Holidays.
- To edit the destination for Call Forwarding Always, ensure the feature is turned on and type in a new phone number or extension. Then select the SAVE button. The system will now forward all calls to the new phone number or extension.
- To make changes for Call Forwarding Selective, click the VIEW button to see where calls are being forwarded and the criteria for when and where calls are being forwarded. Select EDIT to modify these settings. A pop-up window displays your Business Hours, After Hours, and Holidays.
- Select the Time Schedule field or Holiday Schedule field to edit those rules, if created.
- In the Forward To area, you can choose from the following options:
- User Default Forward Phone Number
- Forward to another phone number
- Do Not Forward
- In the Calls From section, you can determine which type of calls to be forwarded. Options include:
- Any phone number
- Following phone numbers
- If this option is selected, you have options of Any Private Number and Any Unavailable Number. There are fields for specific numbers where you have the ability to enter in specific phone numbers or area codes to be forwarded. If you want all calls from a specific area code to be forwarded, enter in the area code and then Star. The Star acts as a wildcard.
- Once you have made your selections, select the SAVE button.


Set Up and Configure Your Hunt Group
A Hunt Group is used to ring a specific group of users in a predetermined pattern within or across locations when a call is made to the Hunt Group telephone number. As business needs change, the Admin can adjust the following items within the admin portal:
- Hunt Group Name and how it displays on the members’ of the Hunt Groups phones
- Settings for Ring Pattern, Call Forwarding, and Not Reachable scenarios
- Assignment of users to the Hunt Group
Modify the Hunt Group Name
You can rename or edit the name of a Hunt Group or change the way that it appears on the phone display from the admin portal. To make changes to the name of a Hunt Group, follow these steps:
- From the dashboard, go to Hunt Groups.
- Select the name of the Hunt Group you would like to modify.
- Edit the name field with the new name of the Hunt Group.
- In the CLID (Calling Line ID) First and Last Name fields, enter how you would like the Hunt group name to appear on the phone’s display for members of the hunt group when they are receiving a call.
- Select Save to save your changes.
Note: It is required to populate at least one character in both the First and Last name fields. Keep in mind that the longer the name of the Hunt Group, the more space it takes up on the phone’s display, possibly cutting off the caller’s caller ID.

Modify Your Hunt Group Settings
To make changes to the settings of a Hunt Group, such as modifying the ring pattern and no-answer settings, follow these steps:
- From the dashboard, go to Hunt Groups.
- Select the Settings icon next to the Hunt Group you would like to modify.
- To change the ring pattern, choose one of the options under Group Policy. These options include the following:
- Circular - Choose this option to ring the phones one at a time, always ringing the users in the same order. The system notes the last user to answer a call and then rings the next user on the Assigned Users list, in a circular pattern.
- Regular - Select this option to ring the phones one at a time, always starting with the user configured at the top of the Assigned Users list first, followed by the users listed beneath, in sequential order.
- Simultaneous - Rings all assigned users at once.
- Uniform - Select this option to ring the User in the group who has been idle the longest.
- Weighted Call Distribution - Administrators may choose to direct a certain percentage of calls to individual Hunt Group Users. For example, Agent A is designated to receive 20 percent of calls, while Agent B receives 80 percent. To route calls to users in this manner, select this option. If this option is selected, select Edit to assign weights (or percentages) to users. These weight assignments must total 100 percent.
Note: Agents with a zero percent weight assignment will only receive calls when all other agents are on calls delivered to them from the Hunt Group.

To change the No Answer Settings of the Hunt Group, follow these steps:
- Edit the options under No Answer Settings.
- If your ring pattern is something other than Simultaneous, you can check Skip to next agent after (x) rings to skip to the next assigned user after a predetermined number of rings.
- Choose the number of rings before skipping to the next user from the drop-down list.
Hunt Group Forwarding settings are used to forward calls if none of the Hunt Group members are available to answer an incoming call.
- Check Forward call after waiting (x) seconds to enable forwarding.
- Enter the number of seconds before the call is forwarded.
- In the Call Forwards to field, enter the destination where the call will be forwarded to if unanswered.
- Once you have made your changes, select Save.
Note: Every six seconds equals one ring.

If you would like to edit features such as Call Waiting or Not Reachable settings, follow these steps:
- Select on the Detailed Settings link.
- If you would like to turn on Call Waiting for the Hunt Group, check the box next to Allow Call Waiting on agents. This will allow the members of the Hunt Group to receive more than one Hunt Group call at a time. If Call Waiting is enabled and every user has four active calls, the next caller will hear a busy signal.
- Not Reachable Settings are used to forward calls if users within the Hunt Group cannot be reached. For example, if your office loses network connectivity, Not Reachable settings will be activated. Check the box next to Enable Call Forwarding Not Reachable and enter the destination.
- Alternatively, you can choose to Make Hunt Group busy when all available agents are not reachable by checking this box.
- Once you have made your changes, select Save.


Modify Assigned Users to the Hunt Group
To reassign or modify assigned users of a Hunt Group, follow these steps:
- Go to Hunt Groups from the dashboard.
- Select the Settings icon for the Hunt Group you would like to modify.
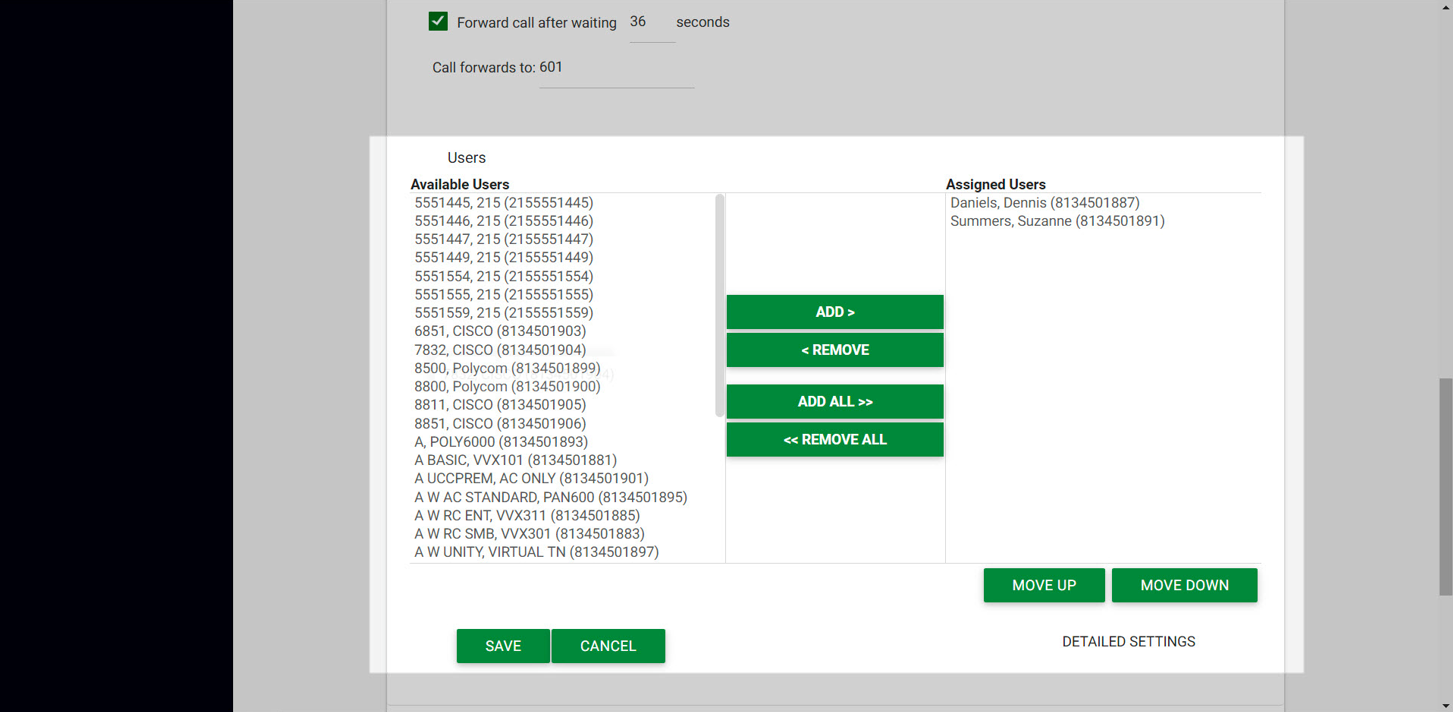
- Under Users, you will see lists for Available Users and Assigned Users. The Available Users list contains people within your organization who are not currently members of the Hunt Group.
- To add users to the Hunt Group, select the user from the Available User list and select ADD. This will place that user at the bottom of the Assigned User list.
- To change the order of the Assigned Users, select the user and select either Move Up or Move Down. The order of users is important, especially when you have a Regular or Circular ring pattern selected as the Group Policy. This determines the order in which calls will be received.
- To remove users from the Hunt Group, select the user from the Assigned User list and select Remove.
- Once you have made your changes, select Save.
Note: If your organization has multiple locations you may see names listed in the Available Users list from those different locations, meaning that people working in different locations can be part of the same Hunt Group.
Set Up and Configure Your Auto Attendant
The Auto Attendant is used to direct calls to various destinations, employees within your company, specific groups of employees, voicemail, or other outside numbers – without the assistance of an operator or receptionist. They also provide callers with your company Greeting and Dialing Menu options.
The Auto Attendant has three modes - one for Business Hours, one for After Hours, and one for Holiday Hours. Each mode allows you to set up options for keys 1 through 9, pound (#) and star (*) to present callers with different choices from which to select.
Recording Custom Auto Attendant Greetings Prior to Installation
Auto Attendant Greetings are the dialing options callers hear when they reach your Auto Attendant. For example: “Press 1 for Sales, 2 for Customer Service.” There are two options to use a custom greeting:
- Record a greeting from the portal
- Upload a WAV file to the portal
Note: All Auto Attendants require you to record an Auto Attendant greeting; please take notice of the following items:
- It is critical to record or upload them prior to going live on the Spectrum Hosted Voice system. If this is not done, callers will receive a default greeting and could potentially think they have a wrong number or that you are no longer in business.
- It is also critical that when recording the greetings they match exactly how the call flow is designed as completed with the Hosted Voice design team.
Here are a couple of sample greetings to get you started:
- Business Hours Greeting
Thank you for calling “ABC Company”, we are currently assisting other callers but your call is important to us. You may reach your desired party directly by dialing their extension at any time. For all other calls, please dial “0” or remain on the line. And thank you again for calling.
- After Hours Greeting
Thank you for calling “ABC Company”. We are currently closed. Normal hours of operation are Monday through Friday from 8:30 am to 5 pm EST. You may leave a message for your desired party by dialing their extension at any time. To leave a general message, which will be returned when we reopen, please dial 0 or remain on the line. And again, thank you for calling.
Once your custom greetings are recorded and uploaded to the Announcement Repository, you can select them as an option to assign to your Auto Attendant Business Hours, After Hours, and/or Holiday Hours. To upload to the Announcement Repository, see Custom Greetings – Uploading to the Announcement Repository.
To select a greeting from the Announcement Repository, follow these steps:
- From the dashboard, find the Auto Attendant you would like to modify and select the Settings icon.
- From the tabs located below the Auto Attendant name, select the schedule you would like to modify the greeting for - Business Hours, After Hours or Holiday Hours.
- Under the Greetings section, you can choose to assign the Default Greeting or a Personal Greeting. The Personal Greeting option allows you to choose one of the custom greetings you have already saved in the Announcement Repository.
- Select the greeting from the Audio drop-down menu.
- Select Save to save your changes.

Set Up and Configure your Dialing Options for your Auto Attendant
The Dialing Menu determines which action the Auto Attendant will take when an incoming caller chooses a particular number or symbol on the Keypad. For example, “Press 1 for Sales. Press 2 for Customer Service.” As an administrator, you can change your Auto Attendant dialing menu options any time it is necessary.
To modify your Dialing Menu, follow these steps:
- From the dashboard, find the Auto Attendant you would like to modify and select the Settings icon.
- From the tabs located below the Auto Attendant name, select the schedule you would like to modify the dialing menu for - Business Hours, After Hours or Holiday Hours.
- Under the Dialing Menu section, check the Enable first-level extension dialing to allow callers to dial the extension of the party they wish to reach without selecting a menu item first.
- Next, enter the Key Description numbers. These can include numbers 0 through 9, star (*), and pound (#). To configure a keypad number, enter the description on the row of the number. For example, “Sales.”
- Then select the action from the drop-down menu. Options include:
- Transfer With Prompt - Callers are sent to a pre-configured user extension or outside number. As soon as the caller chooses this option, a prompt will play a message before the transfer is placed. If transferring to an extension, it will include the user’s name as recorded in the voicemail box.
- Transfer Without Prompt - Callers are sent to a pre-configured user extension or outside number. This option will route the caller as soon as it is selected.
- Transfer To Operator - This will redirect callers to a configured operator, who will either receive calls when that option is selected or receive all calls that “time out” when a caller does not choose an option from the Auto Attendant.
- Transfer To Submenu - This selection takes users to another menu for more specific choices. For example, if you have an option in the Auto Attendant for “Sales,” the submenu may contain options for “New Sales” and “Used Sales.”
- Name Dialing - This action permits callers to dial by recipient name, using the letters on the Keypad.
- Extension Dialing - This action lets callers dial by recipient extension, using the numbers on the Keypad.
- Repeat Menu - If selected, this action will repeat the Greeting and Menu options.
- Exit - This action allows callers to exit the menu system. This will terminate the call.
- In the Details column, enter the destination to which the call should be transferred.
- Repeat these steps for each keypad number you wish to configure for the Auto Attendant dialing menu.
- Select Save to save your changes.
Note: If this option is enabled, your greeting should instruct callers that if they know the extension for the party they are trying to reach, they may dial it at any time.
Note: This does not apply if the Name Dialing, Extension Dialing, Repeat Menu or Exit options are selected.

Test Main line and call flow
Now that you have set up the main features of your system, it’s time to test your Main line function and call flow. Call your Main line and test the various functions. Review your configurations and make edits as needed.
Updating User Names
To edit a user in your group, follow these steps:
- From the Dashboard, select a user from the User section of the Dashboard.
- Edit the Last Name and First Name fields.
- Select Save to save your changes.


Reset a User’s Portal Password or Voicemail Passcode
Although administrators can access user pages, the passwords and passcodes remain private. However, administrators can still reset a user's web portal password or voice portal passcode by issuing a new one.
To do so, follow these steps:
- From the Dashboard, select the Manage Users tab.
- Select the name of the user from the User drop-down menu in the Profile tab.
- Under the Password reset section, enter the new User Password or Voice Portal Passcode. You may also automatically create one by clicking Generate.
- Confirm the password by re-entering it in the Re-type field.
- To keep your changes, click Save


Setting up Voicemail to email for a user
From the Enterprise Admin Portal, you can set up voicemail-to-email settings for a user. To do so, follow these steps:
- From the Dashboard, select the Settings icon next to the user you would like to set up this feature for.
- Then select the View All Services link. A new page will open with additional features.
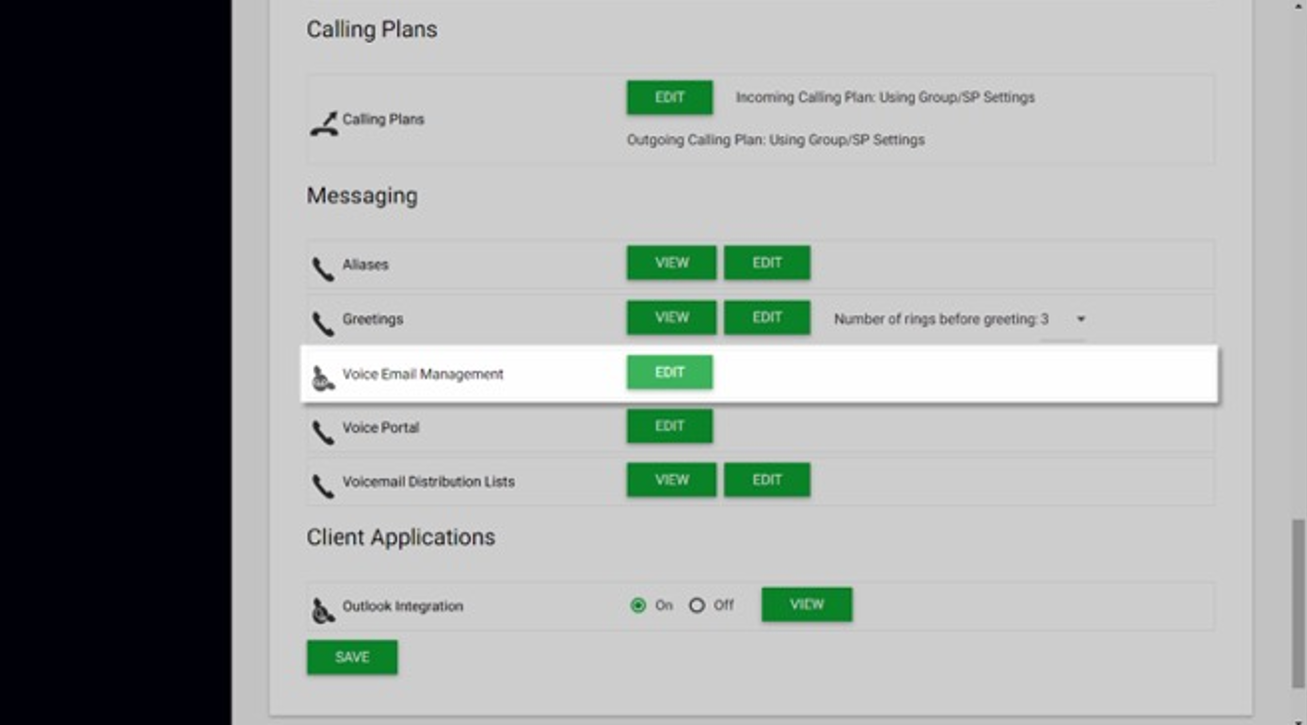
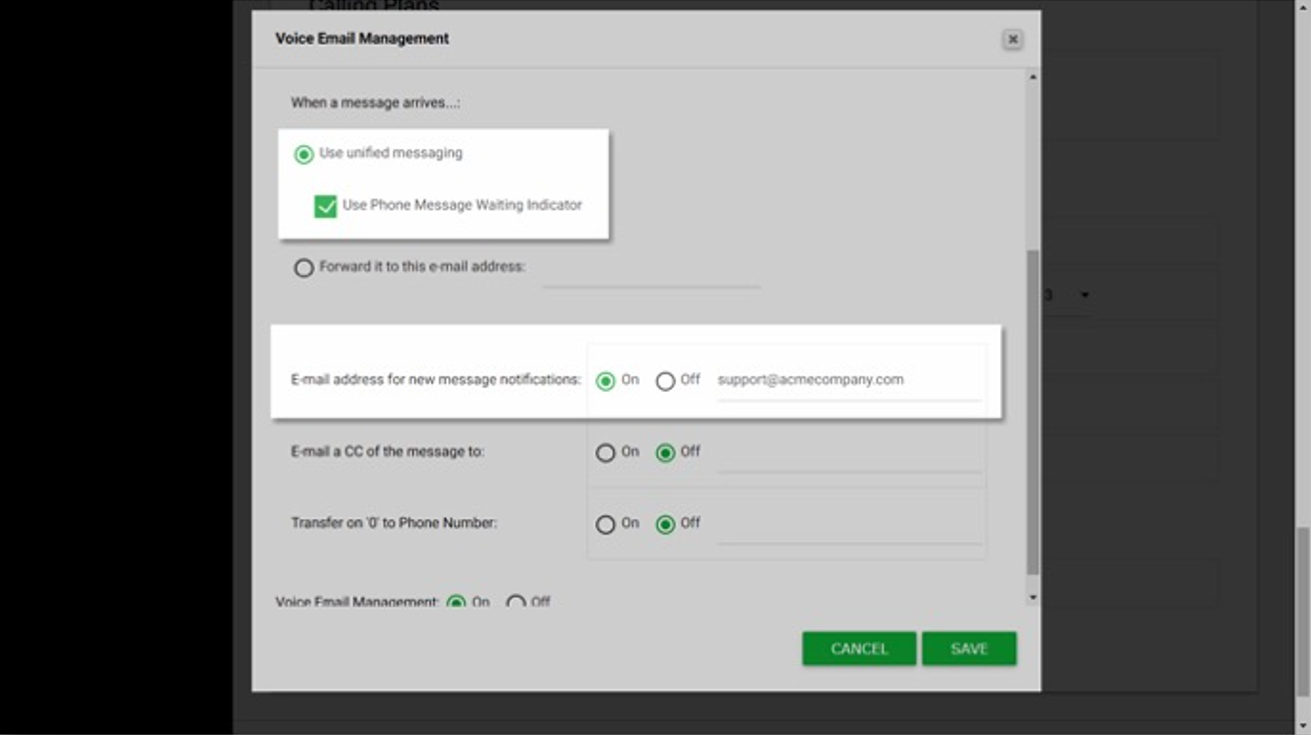
- Scroll to Messaging or choose messaging from the drop-down menu. Select Edit next to Voice Email Management.
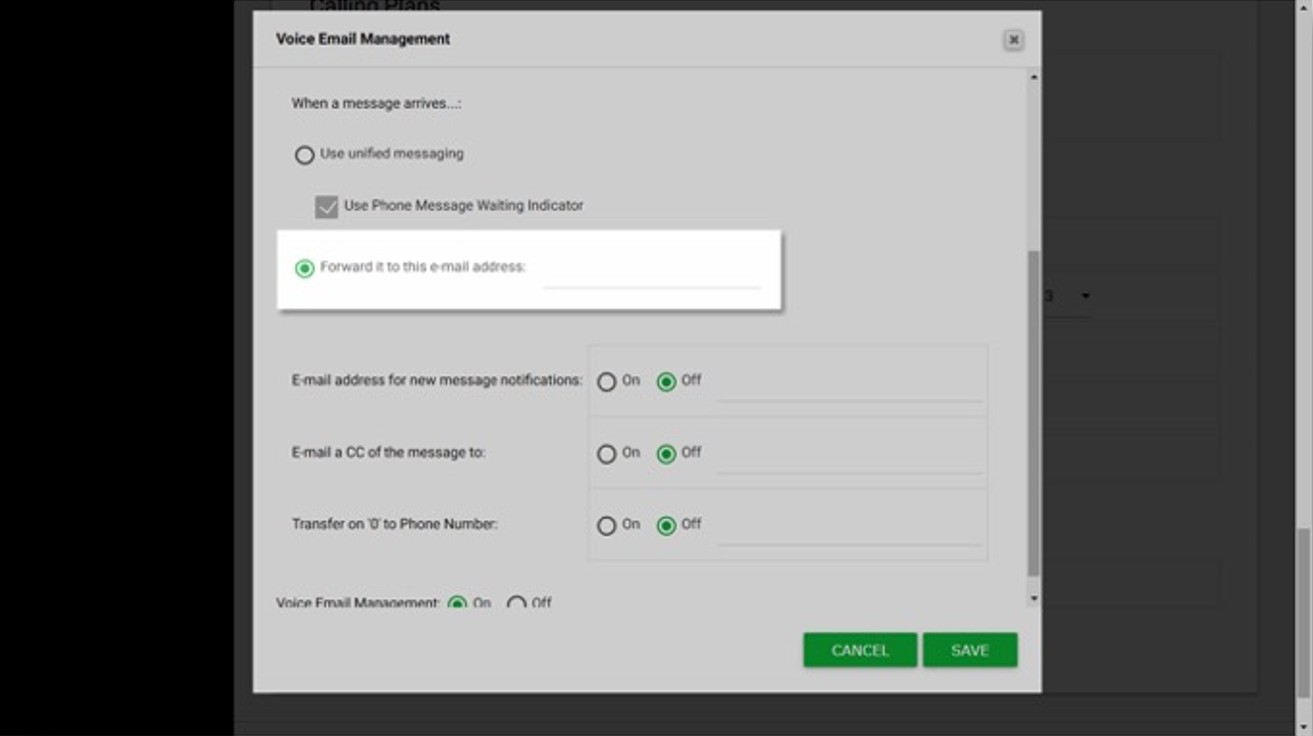
- Select Use unified messaging to allow the user to access voicemail from the voice portal both from their phone and dialing in remotely, via applications such as Anywhere Connect and Unity, as well as email.
- To enable the Message Waiting Indicator light, the red light on the phone alerting the user to new voicemail messages, check the box next to Use Phone Message Waiting Indicator.


There are three commonly used options:
- Only receive email of actual voice message .wav file:
- To have messages only forwarded to the user's email, select Forward it to this e-mail address and enter the user's email address.
- If you choose this option, the user will not be able to access your voicemail messages through the Voice Portal.
- Users will still need to access the Voice Portal to record their busy and no answer greetings.
- Receive email notifications to tell users to retrieve messages via the phone/voice portal:
- If Unified Messaging is selected, the option Email address for new message notifications will send an email notification to the user's email indicating that a message has been left and it should be retrieved. This is just a notification and not the actual voicemail message. If selected, enter the user's email address.
- Retrieve voice messages via phone and receive email of actual voice message .wav file:
- To have the user receive a .wav file of the voicemail to their email, select the option Email a CC of the message to, and enter the user's email address here. They will receive a copy of the voicemail in their email as well as their phone.
Note: This method will never allow the voicemail box to fill up, as the voicemails will never be stored on the voicemail server.
Note: This is particularly useful if this voicemail box is to be accessed by multiple people and the notification is sent to an email distribution list (ex. support@acmecompany.com).
Note: If the user only ever listens to their messages via email, they will need to clear their voicemail box via the voice portal to avoid it filling up. If the user only ever plans to listen via email, they should use option 1, as listed above.
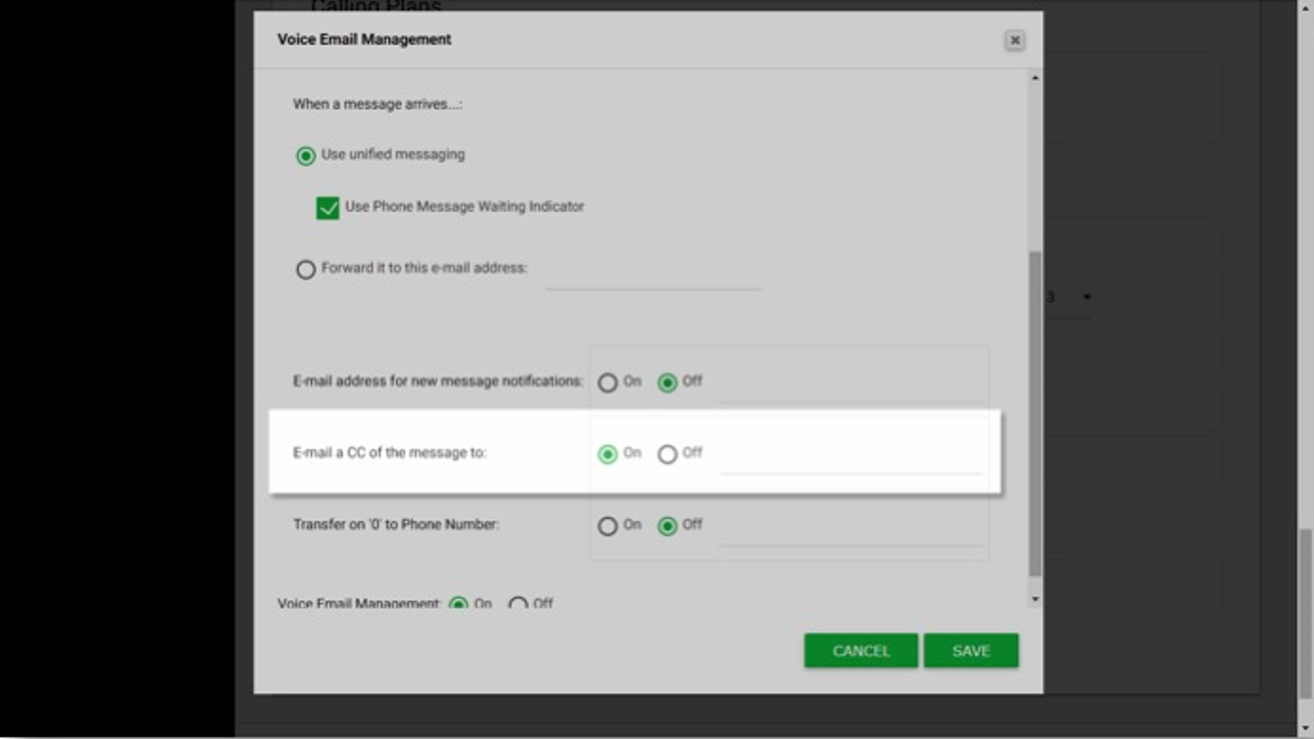
The last option in the Voice Messaging service is Transfer on ‘0’ to Phone Number. This allows callers that reach the voicemail to escape to a different number. To enable, select On and enter the extension or any 10-digit number in this field. Now, if the caller presses “0” during the greeting those callers would be automatically routed to that extension or phone number. It is recommended to have the User record this instruction in their greeting to notify the caller of this option. For example, “I am away from my desk, if you need immediate assistance press 0 to reach the receptionist.” Once done, select Save to save your settings.

Download and Install Webex
To download and install Webex, refer to the Download and Sign In guides found here.
Note that there are two different sets of instructions, depending on whether you are an Activation User. Activation Users are pre-determined and MUST register and log in first in order to allow remaining users to register. To determine who the Activation User is, refer to the Customer Cust Sheet; the user listed directly below the Main Line is the Activation User.
Activation Users can access their guide here.
All other Users can access their guide here once the Activation User has completed their installation process and signed in for the first time. It is up to the Activation User to ensure all other users are provided instructions on how to download and install their Webex softphones.
Note that if a customer or user already has a current Webex account set up, they cannot use the same email address to activate the UC with Webex service. The options are to either discontinue the current Webex account to activate the UC with the new Webex account (preferred) or to use a different email address to activate the UC with Webex service.
Phones and Voicemail guides
Finally, you are nearly ready to begin using your Spectrum Enterprise Unified Communications system! For your convenience, we have provided links to all Spectrum Phones and Voicemail guides so that you have all of your references in one place. You can access these guides here.
Set Up Your Disaster Redirect
Disaster Redirect refers to the ability for sites to continue receiving calls and conducting business even when the most unpredictable situations arise, such as severe weather, local construction activity, large call volumes, or malicious attacks that result in a loss of voice and data connectivity.
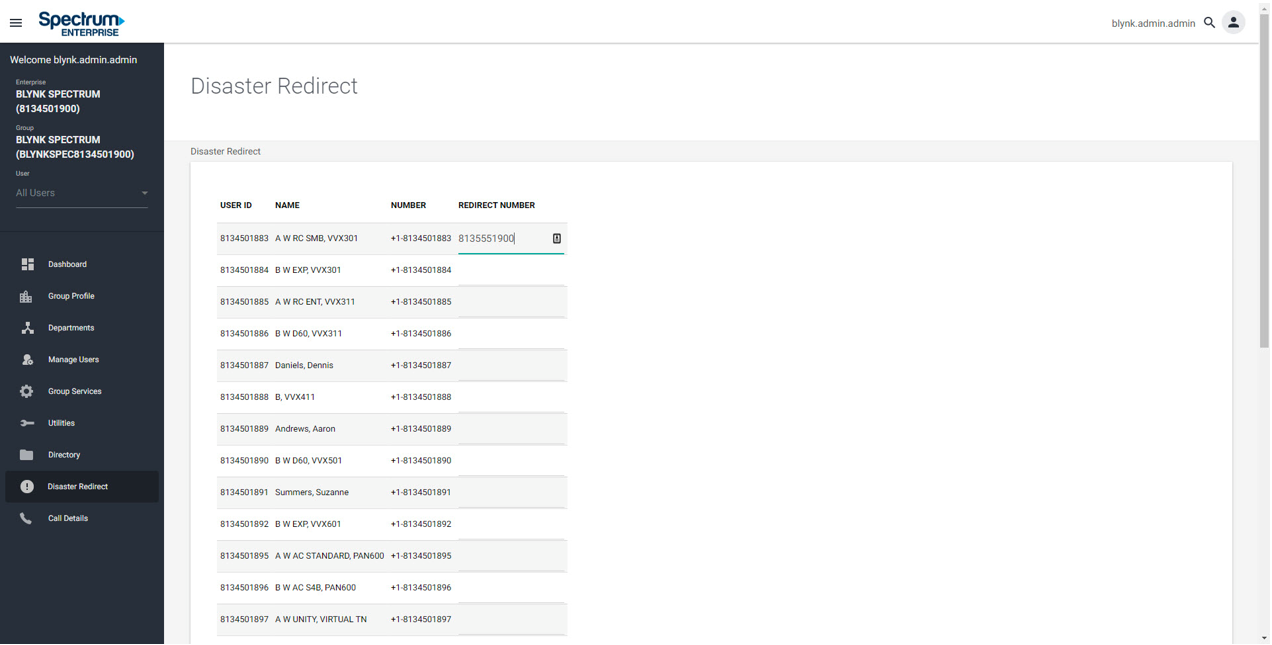
The Disaster Redirect page is accessed from the left-hand navigation in the admin portal. Here you can assign a user with a Redirect Number.
Note: This feature is only available to users who have the premium or plus package. If the primary number becomes unavailable, calls will be redirected to the numbers saved here. Enter the alternate number next to the user and select Save.