


 Print and share
Unity CRM Integration – Zoho CRM
Table of contents
Introduction
This functionality relies on a CRM Integration license being assigned to the user, as shown below. Unity seamlessly integrates with Zoho CRM to facilitate contact lookup and “popping” for inbound and outbound calls, searching for CRM contacts within Unity and click to dial both from within Unity and Zoho CRM.
Note: this license is required in addition to the base license for Unity Desktop, Agent, or Supervisor.
To configure Unity to integrate with Zoho CRM, simply select the CRM platform from the dropdown list and complete the required fields, as outlined in sections below.

Configuring Zoho CRM Integration
Unity requires OAuth access to Zoho data which must be accepted through the Zoho website. In order to request this access please follow the below steps.
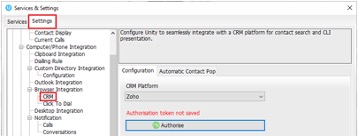
- Go to Unity Settings and click on Settings. Then click CRM.
- Select Zoho from the dropdown list of CRM platforms.
- Click Authorize and select your Zoho CRM region:
- Your default browser will then pop Zoho.com or Zoho.eu (depending on the region selected) and ask you to enter your account login details:
- Once you’ve signed into Zoho, it will ask you to accept the access request from Unity:
- Click Accept. You will then be informed whether the OAuth authorization has been successful or not. If it has been successful, you will see this screen:

- If you clicked Reject in the above webpage, or the authentication failed, you will see this screen and will need to go through the process again:

- Once the authentication has been successful, go back to the Unity client and click Complete Authorization:
- Once saved you can also choose whether to include contacts, leads and/or accounts from Zoho by selecting the boxes shown below:


Unity can also include the record type when showing a contact from Zoho, making is easy to identify if a call is from a Contact or Lead.
Unity allows the user to add a call log entry into Zoho for any call, assuming the remote party was found in Zoho. This feature is outlined further below, but you can also configure Unity to automatically add a call log entry if one hasn’t been added manually. This includes both inbound and outbound calls and even calls that were unanswered.
You can also configure Unity to automatically pop the CRM contact when the phone is answered, as shown below.

You will be able to test the integration by performing a search for a contact within Unity, you should see Zoho records appear in the list as well as from all other directories. If in doubt you may want to activate the “Show record type when searching” setting in order to distinguish between Zoho records in the search results.

Unity CRM Functionality
Contact Pop
Unity will use Zoho to identify inbound and outbound calls and conversations, including queued call center calls.
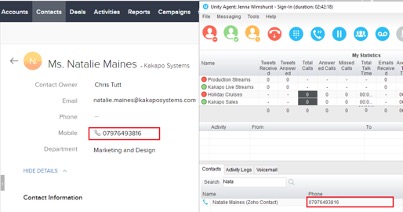
At any time, you can search for CRM contacts from within Unity and perform click to dial to make an outbound call to the contact, or display the contact in the CRM platform (this is referred to as “popping” a contact) as shown below.

You can also right-click a call to pop the record in Zoho using the default browser, as shown below. This assumes the contact was found in the CRM platform rather than another directory (for example an Outlook contacts folder).

You can also click on the call details “toast” notification popup to pop the contact, as below. Again, this assumes the contact was found in the CRM platform.

This feature depends on the appropriate Call Notification setting being activated, as shown below.

Unity can also be configured to automatically pop the CRM contact when the call is answered, which depends on the Automatic Contact Pop tab settings as shown below.

Contact Search
When you perform a contact search, Unity will check all directories such as the group/enterprise phone list, personal directory and Outlook etc, but it will also search Zoho CRM and return the results. You can search on contact name or company name:
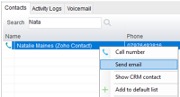
- Simply double click an entry to call that number.
- You can also right-click entries to send an email using the default mail program (if there is an email address set for that Contact or Lead in Zoho).
Note: That you will need to type in a minimum of three letters to search for a CRM contact.
Call log Entry
When integrated with Zoho, Unity can add call log entries on behalf of the user, as outlined below.
Manual Call log Entry
- Right-click on a call and select to add a call log entry, as shown below.
- Unity will enter basic details of the call depending on if the call is inbound or outbound.
- Remember this call log will be stored in Zoho so an outbound call in Unity is an inbound call in Zoho, because we have called the contact.
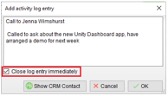
- You can also add further notes manually, then click OK to save the call log entry.
- The call note will be saved against that contact in Zoho, please note that you can specify whether to close the status of the call log task/activity in Zoho or keep it open by ticking the box.

- If you click Show CRM Contact or Cancel the call log will not be saved. You will now see this call log entry in Zoho, as shown below.


Automatic Call Log Entry
Unity can be configured to automatically add a call log entry for any calls where a call log hasn’t been manually created using the steps above. This feature is activated as shown below.

Unity will automatically add call log entries when the call is released (the same time it is removed from the Active Call List in Unity). Only basic information on the call is presented, based on the direction of the call and the Unity user that made or received the call. Zoho will timestamp the call internally.
This shows an unanswered call from the Zoho contact to the Unity user.
This shows an answered call from the Unity client to the Zoho contact.

Troubleshooting
If the Zoho CRM integration has been successfully authorized but is not popping on incoming and outgoing calls, showing any Zoho contacts or updating the call logs in the CRM platform, then the Zoho CRM API permissions may not be enabled for that user.
To enable the API access:
- Go to Zoho CRM.
- Select Setup.
- Proceed to Users and Control.
- Click Security Control.
- Lastly, click on the profile of the affected user and ensure that they have the permission for "Zoho CRM API Access" enabled.
Note: Only Zoho CRM admin users are able change the API permissions.
