Unity Browser-enabled Call Center Desktop Help Guide
Table of contents
- Introducing Unity
- System Requirements
- Web Browser Requirements
- Internet & Firewall
- BroadSoft Platform Requirements
- Connecting using XSI
- Optional Services
- Initial Setup
- Unity Web Client Interface Overview
- Resizing Unity
- Show Remote Party Phone Number
- Override Contact Name Using Number
- Summary Toast Notification
- Browser Integration Through Call Detail Popup
- Appearance
- Main Interface Elements
- Call Control
- Call Control Options
- Active Call Window
- Contacts [Busy Lamp Field]
- Call Logs
- Voicemail
- Call Control
- Making a Call
- Using the Dial Window
- Using the Contacts Panel
- Drag and Drop
- Using Directory Search
- Answer a Call
- End a Call
- Redial
- Send Call to Voicemail
- Retrieving Voicemail Messages via Voicemail Button
- Retrieving Voicemail Messages via Voicemail tab
- Transferring a Call
- Announced Transfer
- Warm Transfer
- Blind Transfer
- Using Contacts Panel Drag and Drop
- Using Transfer Button
- Using Right Click
- Transfer to Voicemail
- Using Contacts Panel Right Click - Voicemail
- Using Drag and Drop
- Transfer to Mobile
- Using Contacts Panel Right Click - Mobile
- Using Drag and Drop
- Call Hold/Retrieve
- Placing a Call on Hold
- Retrieving a Held Call
- Conference Calling
- Starting a Conference Call
- Adding Multiple Parties
- Adding Multiple Parties
- Conference Bridge Integration
- Call Recording
- Changing the Call Recording Option
- Controlling Call Recording
- Active Call Window
- Managing Multiple Calls
- Resizing the Active Call Window
- Drag and Drop
- Make a Call to a User or Number
- Transferring a Call to a User
- Send to Voicemail
- Call Control
- Send New Instant Message
- Add Participant to Existing IM Session
- Transfer Call to IM Participant
- Contacts Panel [Busy Lamp Field]
- Contact Panel Display Options
- Details View
- Column View
- Small Icon View
- User Icons
- Instant Messaging Availability
- Managing Monitored Users in the Contacts Panel
- Performing Call Control Actions in the Contacts Panel
- Call Extension
- Park Call on Extension
- Retrieving Parked Calls
- Camp Call on Extension
- Call Mobile
- Transfer Call to Mobile
- Transfer Call to Voicemail
- Barge into This Call
- View User Details
- Adding Audio Alerts to Monitored Users
- Send Email
- Answer This Call [Call Pick-Up]
- Instant Messaging
- Online/Offline Indicator
- Docking the IM Window
- Sending an Instant Message
- Adding Participants to an Existing IM Session
- Personal Directory
- Add New Entry
- Edit Entry
- Remove Entry
- Dialing Directory Entry
- Contact Search Directories
- Loading Directories
- Contact Search Results Layout
- Call Logs
- My Status
- CommPilot Express Profiles
- Do Not Disturb
- Call Forward Always
- Hot-Desk and Flexible seating
- Out of office assistant
Introducing Unity
Unity Desktop Web is a web-based application that enhances the Hosted PBX solution to provide call control, directory integration, instant messaging, and service configuration. Featuring an intuitive icon-based interface, Unity provides point and click call control within Google Chrome, Safari for Mac, Microsoft Edge, and Internet Explorer. Unity improves workgroup collaboration by bringing users closer to each other and simplifying internal and external communications.
System Requirements
Web Browser Requirements
Unity will run on the following browsers:
- Google Chrome
- Microsoft Edge
- Safari for Mac
- Internet Explorer
Internet & Firewall
The Unity web client is hosted in multiple data centers; therefore, customer firewalls will not need to be configured – access it by going to https://spectrumdesktop.unityclient.com/.
However, any firewalls or Access Control Lists (ACLs) in the system provider core must be configured to allow the below inbound connections:
- TCP port 2208 to the BroadSoft OCI server
- TCP port 8011 (or 8012 if the connection is secured using TLS) to the BroadSoft CTI server
- HTTP/HTTPS access to the BroadSoft XSI server
These connections will be established from one of two logical IP addresses, please ensure both IP addresses are allowed.
Primary IP Address: 185.17.172.185
Secondary IP Address: 85.13.237.8
BroadSoft Platform Requirements
- Unity Desktop is supported on BroadSoft R21 SP1 and above.
Connecting using XSI
The Xtended Service Interface (XSI interface) allows remote applications to integrate with Cisco BroadWorks to perform telephony-related actions and to be notified about telephony events against subscribers hosted in a Cisco BroadWorks-powered network. XSI can be accessed over HTTP/S as well as over CTI interface.
Unity Web Apps can integrate with BroadWorks using XSI over HTTP/HTTPS as well as using XSI over CTI.
XSI-CTI
Default port: 8011 (insecure), 8012 (secure)
XSI-HTTP/HTTPS
Default port:80 (insecure), 443 (secure)
Optional Services
Unity allows many user services to be utilized and configured in Tools>Settings. However, these services are not mandatory, so Unity will remove visibility of them if not assigned to the user. The below services are supported:
Service |
Description |
Anonymous Call Rejection |
Prevent a caller from contacting you if they have explicitly hidden their phone number. |
Call Forward Always |
Automatically forward all incoming calls to a number. |
Call Forward Busy |
Automatically forward all incoming calls to a number when the user is on the phone. |
Call Forward No Answer |
Automatically forward all incoming calls to a number when the call hasn’t been answered after a certain number of rings. |
Call Recording |
Record incoming and outgoing calls, refer to section 5.8 for more information. |
CommPilot Express |
Use pre-configured routing profiles to handle incoming calls based on the current state of the user. |
Do Not Disturb |
Block all incoming calls and reroute to voicemail if available. |
Simultaneous Ring |
Automatically ring another number when an incoming call is received, the call can then be answered through that number or the primary phone. |
Calling Line ID Delivery Blocking |
Hide your phone number when making outgoing calls. |
BroadSoft Anywhere |
Connect mobile or fixed-line devices to the VoIP account, and switch calls between them. |
Call Waiting |
Answer an incoming call when already on a call. |
Hoteling Guest |
Associate the VoIP account to another device so that it is treated as the primary device. Used in a hot-desking environment. |
Call Park Retrieve |
Retrieve a call that has been parked for a specific user. |
Directed Call Pickup with Barge-In |
Automatically join another user’s call. |
Remote Office |
Associate a mobile device to the VoIP account to make or receive calls. |
Flexible Seating Guest |
Users can associate with a Flexible Seating host in Settings or from the drop list in the main Unity UI. |
Voice Messaging User |
Provide voicemail for unanswered incoming calls. |
External and Internal Calling Line ID Delivery |
Provides Calling Line ID information of an incoming call from outside the group. |
Initial Setup
Unity requires an initial configuration to communicate with BroadSoft.
The first-time Unity is started you will be prompted to enter the configuration details, as shown below. Unity can then retain the connection and authentication details for later use.
To do this follow the below steps:
- Enter your Login ID and password as specified by your Spectrum administrator. In some cases, the domain may not be required. You can also set Unity to use the same details each time Unity is started, which is the default behaviour and recommended in almost all scenarios.
- Once you have entered your login details, click Login.
Unity will now display a dialogue box “Logging into Broadworks” as the application opens.
Unity Web Client Interface Overview
Unity is split into three functional areas: Call Control, Current Call List, and Productivity tabs. The contacts tab can be toggled to display Call Logs and the Voicemail tab.
The Active Call Window will display the status of all current calls for the logged in user, which are controlled using the Call Control buttons. These call control buttons will change based on the status of the call.
The Busy Lamp Field list will automatically populate with 30 random users in your group or enterprise when Unity first starts.
Resizing Unity
Unity can be dragged from the bottom right corner to the required size. The Active Call Window resizes independently by dragging the border at the bottom of the list [where the lower red line is in the illustration above].
Show Remote Party Phone Number
This setting will configure to show the remote party number [if available], as shown below. This applies to both internal and external parties.
Override Contact Name Using Number
Unity can also perform a contact search based on the remote party number even if the name was provided by the BroadSoft platform, this is especially useful when the name delivered through the PSTN is incorrect, for example in some cases this may always be “WIRELESS CALLER”.
Summary Toast Notification
The summary notification is presented for hunt group and DID calls, click the notification to open Unity Desktop Webapp and answer the call.
Browser Integration Through Call Detail Popup
Unity can be configured to automatically browse to a URL using the default browser when the user clicks on the Call Detail Popup, this applies to both incoming and outgoing calls. The URL will be pre- configured to use delimiters which are then replaced with values relating to the call.
The URL is specified through Tools>Settings. First the URL that Unity should browse to must be entered, using special values as placeholders which Unity will then replace with the actual values from the call. You can also set Unity to automatically browse to the URL for certain calls regardless of whether the Call Detail Popup was clicked or not.
Appearance
Show missed call count in the call log tab – When enabled Unity will provide a count of the number of missed calls.
Main Interface Elements
Call Control
Call Control buttons provide quick access to common telephone handling commands. Only services that are assigned to the user are displayed. For example, if Call Recording and Voicemail are not assigned then the buttons will not be displayed.
Call Control Options
ICON |
FUNCTION |
DESCRIPTION |
|
Dial |
Click this to dial a number and make a call. Right click it to redial from the |
|
Answer |
This button will appear when a call is ringing. |
|
Release/End |
This button will appear once you have a call active. Click to end the call. |
|
Hold |
This button will appear during a call. Click to hold the call. If you have |
|
Retrieve |
This button will appear if you have a caller on hold. Click the button to |
|
Voicemail |
Click the Voicemail button to send an incoming call to voicemail. Click the |
|
Transfer |
Click this button to transfer a current call to a certain number. Drag and drop the call over a contact to transfer them without entering their |
|
Conference |
Select two or more calls then click the Conference button to start a |
|
Recording |
Click to start, pause or resume recording. |
Active Call Window
This provides a list of all current calls and their state. For example, Ringing, Active or On Hold. The duration of the call is also displayed. This is from the moment the call was first placed and does not reset when a call is Held or Retrieved. Unity will mirror any call handling made on the user’s IP phone. For example, if the call is placed on Hold on the handset, the user will show as being on Hold in the Active Call Window.
Contacts [Busy Lamp Field]
This panel will display up to 30 monitored users, displaying their Do Not Disturb [grey], Available [green], Engaged [red] or Ringing [orange] state as icons.
Call Logs
Toggling the bottom Contacts panel to Call Logs will display Missed Calls, Received Calls and Dialled Calls. Missed Calls will include both direct inwards DID calls and Hunt Group calls. 20 numbers can be stored unless the user has Enhanced Call Logs service assigned. Drag and drop capability means that you can drag the selected call log up to the Active Call Window to make a new call to the remote number.
Call Logs can also be cleared, reloaded, or exported with the icons at top right of the panel.
Voicemail
Clicking the Voicemail tab will display a list of voice messages with the most recent at the top. Double click an entry to play. Right click to save locally or delete. Drag and drop capability means that you can drag the selected voicemail up to the Active Call Window to call the remote number.
For the Voicemail tab to appear, Desktop must be configured for “Use unified messaging” and “Show visual voicemail tab” in Voicemail settings as below.
Call Control
All calls are managed through the call control buttons at the top of the application. These buttons will
change depending on the state of the selected call, or the only call if there is only one call in the Active
Call Window. For example, the Answer/Release 
 and Hold/Retrieve
 buttons toggle as
only one of these options will be valid at any time. When an inbound call is ringing, Answer becomes
the valid option. Once the call is active the icon will toggle to Release as hanging up is the only valid
option.
Making a Call
Using the Dial Window
Click the Dial button  to bring up the Dial dialogue box, as shown below. Using the computer
keypad enter the desired number and press Enter or click OK to make the call. The desk telephone will
default to using hands-free speakerphone. If the telephone does not support speakerphone, you will
need to lift the handset when the call is answered.
Using the Contacts Panel
Double click a user icon or right click and select “Call extension”.
Drag and Drop
Right click a user icon on the Contacts panel and drag the icon up to the Active Call Window. This will open a call to that user. Calls dragged onto a monitored user will either be blind transferred or present options depending on the user preferences in Settings and whether the monitored user is engaged or not. For engaged contacts, park, camp-on and transfer to voicemail are available. For available contacts transfer to extension, transfer to mobile, transfer to voicemail or present call hold, camp on and transfer are available.
Using Directory Search
Enter the search field in the Contacts panel to dynamically search all internal users and speed dials. Either right click and select “Call extension” or right-click and drag the icon into the Active Call Window to make the call.
Answer a Call
When Unity displays an inbound call, click the Answer icon  or double click the call in the Active
Call Window to answer the call. Your desk telephone will now be on hands-free speakerphone if it
supports this feature with Unity. If there is an active call in progress, you will need to click the new
inbound call in the Active Call Window before clicking Answer, this will automatically place the first
call on Hold. Please note: Answering a call by lifting the handset on the desk phone will have the
same effect as clicking Answer in Unity.
End a Call
Click the Release button  to end the currently selected call. If there are multiple calls in the Active
Call Window, make sure you select the right call before clicking Release.
Note: Replacing the telephone handset will also end the call, which will then be removed from the Active Call Window.
Redial
You can also right-click the Dial button to see a list of the last 10 dialled numbers. Simply click on an entry to dial the party, as shown below.
Send Call to Voicemail
To send an inbound caller directly to your voicemail click the Voicemail button  .
.
Note: that if voicemail is not assigned or is disabled, the button will still be visible, but inactive.
Retrieving Voicemail Messages via Voicemail Button
When no calls are currently selected, clicking the Voicemail button will dial the user into their voicemail. The phone will default to hands-free speaker phone if it has this capability.
Retrieving Voicemail Messages via Voicemail tab
Clicking into the Voicemail tab will display a list of voice messages with the most recent at the top. Double click an entry to play through the PC’s default media player. Right click to save locally or delete. For the Voicemail tab to appear, the user must be configured for “Use unified messaging” and “Show visual voicemail tab” in Voicemail settings as below.
Transferring a Call
There are two ways to transfer a call; Announced Transfer, where you introduce the call to the receiving party before putting the call through, and Blind Transfer, where you transfer the caller directly to a recipient without introducing the call. Please note that calls can be transferred both to internal users and external contacts.
Announced Transfer
Receive and answer an inbound call. Make a new call to the desired destination extension or number as described Make a Call above. This will automatically place the first caller on Hold and will open a new call in the Active Call Window. Once the called party answers, click Transfer  and select the context menu option to transfer both calling parties together. Both calls will now disappear from the Active Call Window.
Note: The user is not limiting to transferring received calls. They can make two outbound calls and then use transfer to “bridge” them together.
Calls can also be transferred together by dragging one call on top of another within the Active Call List.
Example 1 – Transfer with two live calls
Example 2 – Transfer with four live calls
Warm Transfer
Unity Desktop Web allows you to warm transfer a call by right clicking the user you want to transfer the call to and selecting “warm transfer” from the context menu. This will then put the original caller on hold and dial the selected number. When ready, click the transfer button in the call control options panel and the two calls will be transferred, automatically disappearing from your active call window.
Blind Transfer
Using Contacts Panel Drag and Drop
Unity Desktop can be configured to automatically blind transfer a call by dragging the call from the Active Call Window and dropping it on a user icon or number icon in the Contacts panel.
Note: Unity can be configured to display a menu when dropping a call onto a user icon. If no menu options are selected the blind transfer is performed. If menu options are selected, click “Transfer call to extension” to also perform blind transfer. For more information on Drag & drop refer to section 7.
Using Transfer Button
Once on a call click the Transfer call control button  . In the Transfer window enter the destination and click OK.
Using Right Click
While on an active call right click the recipient icon or number in the Contacts panel or Search. Select “Transfer call to extension” to blind transfer the call.
Transfer to Voicemail
The option to Transfer to voicemail is valid only for internal company users that have Voicemail assigned and activated.
Using Contacts Panel Right Click - Voicemail
While on an active call, right click a user in the User Status list and select “Transfer to voicemail”. This will send the selected call directly to the destination extension voicemail without introducing ringing.
Using Drag and Drop
If configured, Unity will display “Transfer to voicemail” in the list when an active call is dragged onto the destination user icon in the Contacts panel. For more information, refer to section 7.
Transfer to Mobile
If the destination user has a mobile number entered as part of their profile, you have the option to right click and select either Dial Mobile [to perform an announced transfer] or Transfer Call to Mobile [to perform blind transfer].
Using Contacts Panel Right Click - Mobile
Right click the desired user in the Contacts panel. To announce the call, click Dial Mobile. Once the recipient answers click Transfer  and select the context menu option to transfer the calls together.
To blind transfer the call without introduction click Transfer call to mobile.
Using Drag and Drop
If configured, Unity will display “Transfer to mobile” in the list when an active call is dragged onto the destination user icon in the Contacts panel. For more information, refer to section 7.
Call Hold/Retrieve
The Hold/Retrieve 
 function toggles depending on the status of the currently selected call. Hold is only available for an active call while Retrieve is only a valid option for a call currently on Hold. When a call is on Hold, the blue Hold icon is shown in miniature to the left of the call in the Active Call Window and the status is On Hold, as shown below.
Placing a Call on Hold
To place a current active call on Hold, press the red Hold button  . The call status will now show as on hold in the Active Call Window and there will be an On Hold icon alongside the call.
Retrieving a Held Call
Click the held call in the Active Call Window to select it. Click the Retrieve button  to take the call
off hold, you can also double click the call to retrieve it. Please note that any other active calls will be
placed on hold before the selected call is retrieved, meaning you can toggle between call by double-
clicking them in the Active Call Window.
Conference Calling
A conference call can be established with any combination of internal and external numbers. The total number of parties that can be supported is determined by service assignment. The Three-Way Calling user service supports conference calls with two other parties only while the N-Way Calling user service supports conference calls with more participants.
Starting a Conference Call
Once an active call is established [that you have either made or received] call a second person. You can do this by clicking the Dial button  or double clicking a user in the Contacts panel or Search, or Call Log lists. Making this call will automatically place the first caller on Hold.
Once the second party has answered the call, click the Conference button  and a new conference will be created between you and the other two parties. This is represented in the Active Call Window as shown below:
Selecting either call or clicking Hold will place the conference call on hold, during which time the other callers can still talk to each other.
Adding Multiple Parties
Once you have a conference established you can add additional parties by calling them. This will place the existing conference on hold. Now click the Conference button  . You will be prompted to add the new party to the existing conference as below.
Please note that conference calls can be started with any two remote calls, regardless of the direction of either call or if the number is internal or external [for example between two mobile calls].
Adding Multiple Parties
Once you have a conference established you can add additional parties by calling them. This will
place the existing conference on hold. Now click the Conference button  . You will be prompted to add the new party to the existing conference as below.
To end a conference call but leave the two remote parties in conversation with each other, click the Transfer button and select the “Transfer call together” menu option, as shown below.
Conference Bridge Integration
Unity allows the user to right click the Conference button to view or copy details of their “reservation less” conference bridge(s), or to call a bridge as a moderator. If this has been configured in BroadWorks.
Call Recording
If the Call Recording User service is assigned then the user may be able to manage call recording, although this depends on the functionality offered by the BroadSoft and service configuration parameters. If this service isn’t assigned, then the Call Recording button is not displayed in the main window.
Changing the Call Recording Option
Right-click the Recording button to select the call recording option, as below. Please note that depending on permissions this may not be available.
Call Recording options are:
Option |
Description |
Always |
Calls are automatically recorded from the beginning of the call. There is no option to pause or stop recording. |
On Demand |
Calls are not automatically recorded from the start, but recording can be started at any time during the call in which case the entire call will be recorded. |
Never |
Calls are never recorded, and recording cannot be started while a call is in progress. |
Always with Pause/Resume |
All calls are automatically recorded from the beginning of the call, but recording can be paused and resumed, which is especially important when taking credit card details over the phone [that need to be omitted]. This will still result in a single recording for the call, regardless of how many times it was paused and resumed. |
On Demand with User Initiated Start |
Calls are not automatically recorded from the start, but recording can be started at any time. However, any conversation before the recording was started will not be included in the recording. Recording can be paused and resumed, which will result in different recordings being created for a single call. |
Controlling Call Recording
You can start, stop, pause, and resume call recording depending on the Call Recording Option currently selected. Left-click the Recording button to manage recording for the selected call in the Active Call Window will toggle the option depending on the current recording state. The call recording button will change 
 to indicate this. When set as Always with Pause/Resume, the user can left click to Pause/Resume and the button will toggle as Resume [recording]
  or Pause
  .
.
When set as “On Demand With User initiated Start” left clicking the call recording button presents the following menu to allow the user to control the call recording behaviour.
Click the Recording button again to continue/restart recording the call.
The Active Call List will also indicate the recording state of all calls, as shown below.
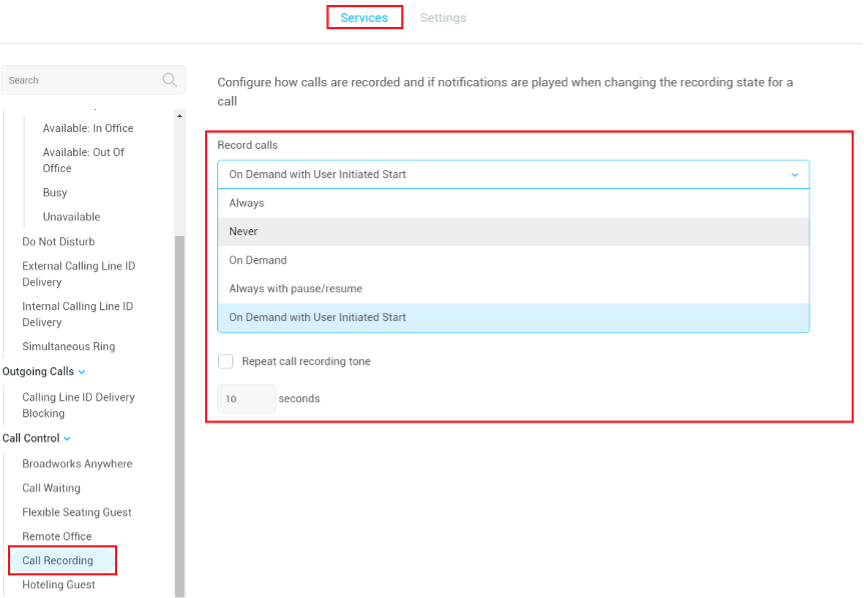
To configure the call recording settings, go to Settings>Services>Call Recording. When configured as “Always with Pause/Resume” or “On Demand with user-initiated start”, an announcement can be set to inform both parties that recording has either started or stopped. When the recording is paused or resumed, a beep notification can be played, as shown below.
“Record voice messaging” will dictate whether calls are recorded when a caller leave a voicemail message.
“Repeat call recording tone” will repeat the tone throughout the call, you can configure how often the tone is played from 10 seconds to 30 minutes.
Active Call Window
The Active Call Window gives visual representation of the status of all calls for the logged in user. This includes the caller [From], number called [To], Duration and hold/active/ringing Status. Where the calling number [From] is matched to a contact within a directory [Group/Enterprise, Personal Directory, Outlook etc], the caller’s name rather than number will be displayed.
From – This field will display the incoming CallerID or the name if it is matched in the Group/Enterprise directory, Personal Contacts or Outlook Contacts.
To – This field displays the name of the user or hunt group that has been called ensuring the call can be answered appropriately.
Duration – This displays the total time elapsed since the call was first answered. The timer does not restart when the call is placed on hold.
Status – This shows the Ringing/Active on On Hold status of each call.
Managing Multiple Calls
To manage a particular call, first select it by clicking it in the Active Call Window. If there is only one call in the list it will be selected automatically. You can then use the call control buttons to perform different actions on the call. There is no limit to the number of calls that can be displayed in the Active Call Window, this is limited by the number of simultaneous calls allowed and if the Call Waiting user service is assigned and active.
You can also double-click an incoming [unanswered] call to answer it, or to retrieve it if currently on hold.
Resizing the Active Call Window
The bottom border of the Active Call Window can be dragged down to display as many or as few calls as necessary. Unity will save these dimensions when closed.
Drag and Drop
Many common call handling actions can be performed with drag and drop, as well as right click and call control buttons.
Make a Call to a User or Number
Drag a user’s name or number from the Contacts panel up into the Active Call Window to make a new call to the selected user or number.
Transferring a Call to a User
Drag a live call onto a user to either perform blind transfer, or to populate a drop list with call handling options.
Send to Voicemail
Dragging an unanswered call from the Active Call Window onto the Voicemail button  will blind transfer the incoming call to your voicemail.
Call Control
Dragging a call over the Hold/Retrieve, Answer/Release, Transfer, or park buttons will perform that action on the selected call.
Send New Instant Message
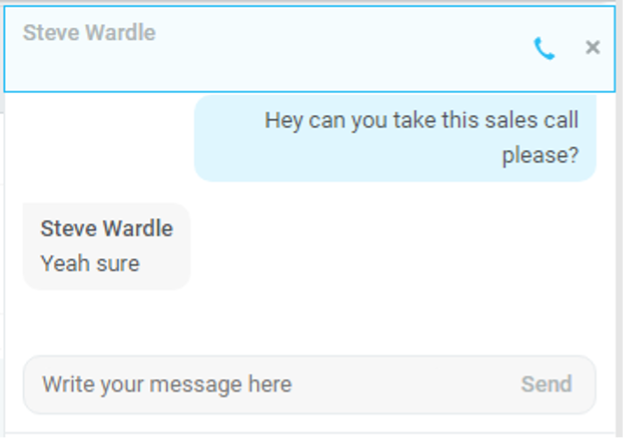
Drag a user to the IM window to the right of the Contacts panel to send an IM to that user. Open and close the IM window by clicking the IM window icon  next to the call control buttons.
See also section 9 on Instant Messaging.
Add Participant to Existing IM Session
Drag a user icon onto an existing IM and choose “Add to the conversation”.
Transfer Call to IM Participant
Drag a call from the Active Call Window onto an IM session in the Docked IM Window and you will see a prompt to transfer the call. This is particularly useful if you want to check the recipient’s availability before you transfer.
When dropping a call onto a multi-party IM session you will be prompted where to transfer the call.
Contacts Panel [Busy Lamp Field]
The Contacts tab gives a visual indication of the status of users [within the group/enterprise] that are currently being monitoring. A maximum of 30 users can be displayed. Double clicking a monitored user will call them and right clicking will bring up a dynamic options menu.
Contact Panel Display Options
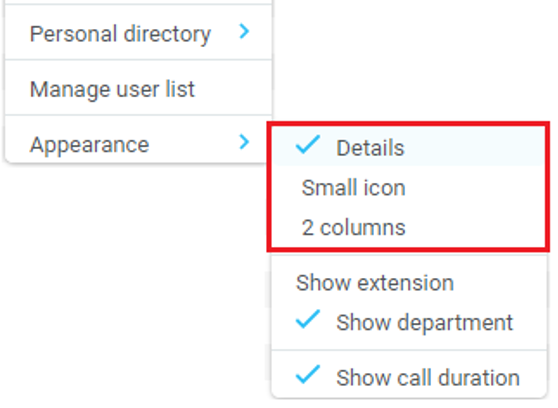
There are three different views available, as outlined below. Right-click anywhere in the Contacts panel and select Appearance list to change the view.
Details View
This view is the most detailed but requires more space [although the list can be shortened in which case scrollbars will automatically appear].
With this view the sort order for each column can be set, which is saved when Unity is closed. You can also configure Unity to display or hide the extension, department, and call duration columns.
Column View
This option will display all users in two columns.
Small Icon View
This view combines a simplified look and space reduction.
User Icons
There are four main user icons states shown in the Contacts panel, regardless of the view chosen
|
|
Available |
The monitored user extension is on hook |
|
Ringing |
The monitored user extension is ringing |
|
Engaged |
The user is on the phone |
|
|
Do Not Disturb |
The user has selected DND or Unavailable profile |
Instant Messaging Availability
Regardless of a user’s Available/Ringing/Engaged/DND state, if they currently have any version of Unity open, they will be available for instant messaging. This is shown by the envelope at bottom right of the user icon, as per the following examples.
|
|
Ringing. Unity open and available for IM |
|
DND/Unavailable profile. Unity open and available for IM |
|
Engaged. Unity open and available for IM |
|
|
Available/on-hook. Unity open and available for IM |
Managing Monitored Users in the Contacts Panel
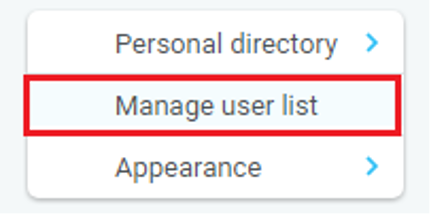
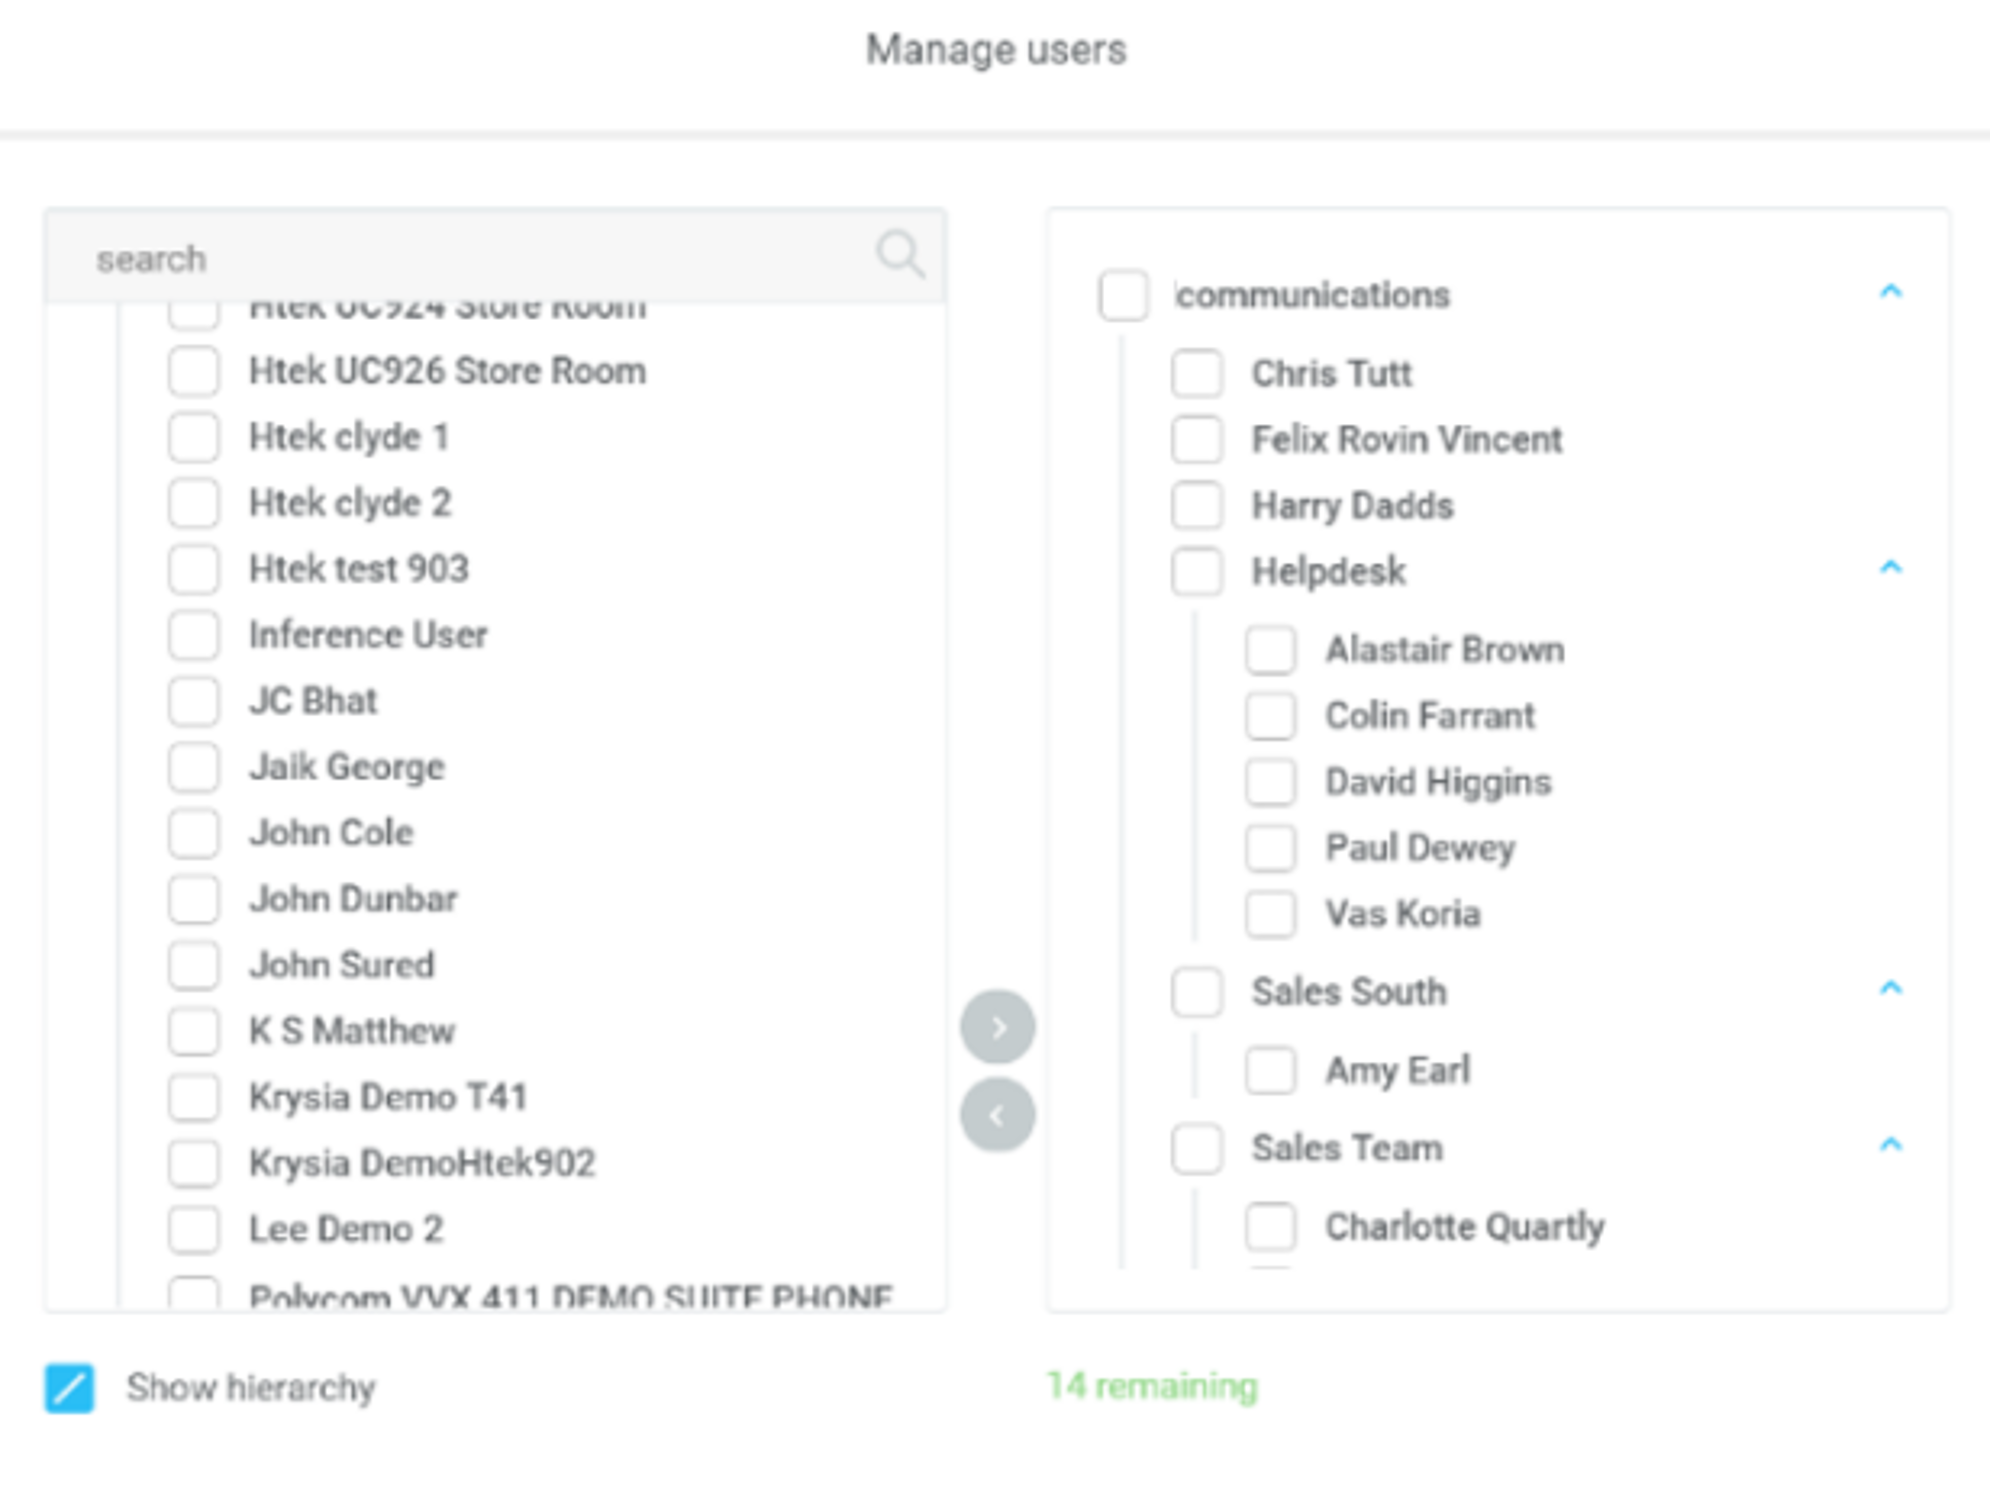
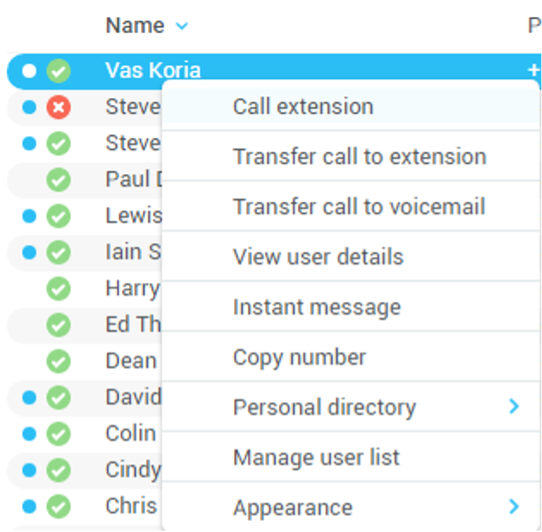
The Contacts panel will display 30 users. In the Contacts panel, right click anywhere and click “Manage user list”. This will allow you to choose which users to display.
You will then be able to move users or departments between the lists either by double-clicking them or using the arrow button. All users in the right-side list will be monitored in the Contacts panel. This list is saved when Unity is closed.
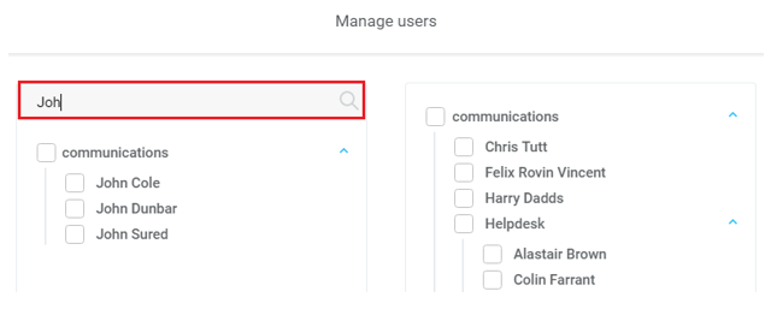
The box at top left will dynamically search the group directory.
Performing Call Control Actions in the Contacts Panel
There are many call control functions that can be performed by right-clicking a monitored user in the main Contacts panel or Search. The menu options displayed will dynamically change to only show those available depending on the state of the monitored user and/or the state of the selected call in the Active Call Window [if there is one]. For example, “Transfer to voicemail” will not be available if the user does not have the voicemail service assigned.
Call Extension
Selecting “Call extension” will open a new call to that user in the same way that double clicking the user icon would. Any current call will automatically be placed on hold. This can be used to make an announced transfer as opposed to a blind transfer using the “Transfer call” commands further down the menu.
Park Call on Extension
Parks the call on the monitored user’s extension park slot.
Feature Dependency
- Must have a live call.
Retrieving Parked Calls
Once a call has been parked onto a user’s extension, their Unity will display a parked icon and a toast pop up window will appear. In order for the user to retrieve the parked call they simply need to click either the parked icon or the toast pop up. If the call is not retrieved it will be redirected back to the original user who parked the call.
Camp Call on Extension
Will camp the call onto the engaged monitored user. When the user goes back on-hook the camped call will be delivered and their phone will start ringing. If the user does not go back on-hook before the camp timer expires the call will return to the Desktop Web user.
Feature Dependency
- Must have a live call in the Active Call Window
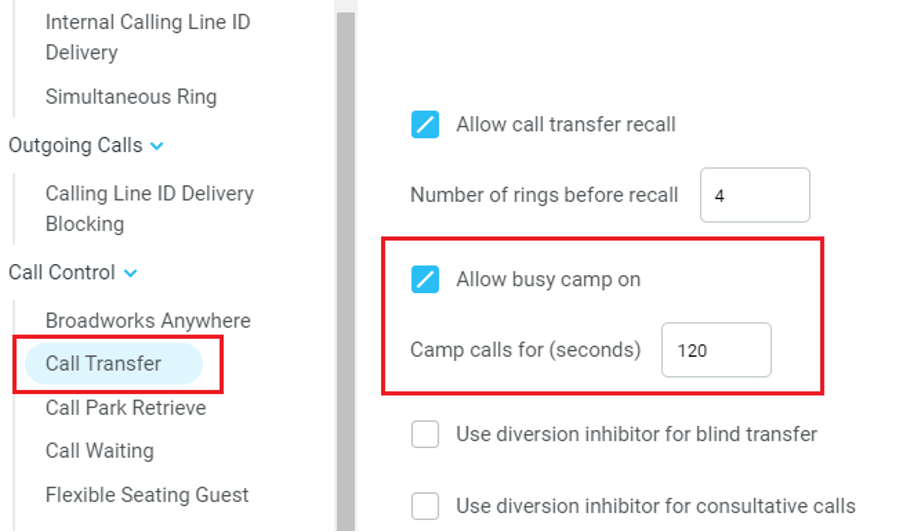
- Must be enabled in Settings > Call Transfer as below:
The Camp Call option will only be available if activated in Settings > Call Control > Call Transfer as below.
Call Mobile
Places call to mobile. Any live call placed on hold.
Feature Dependency:
The monitored user must have their mobile number entered in their profile.
Transfer Call to Mobile
Performs blind transfer call to monitored users mobile.
Feature Dependency:
- The destination user must have their mobile number entered in their profile.
- Must have a live call.
Transfer Call to Voicemail
Performs blind transfer to the destination user’s voicemail.
Feature Dependency:
- The destination user must have voicemail service assigned.
- Must have a live call.
Barge into This Call
Makes an immediate three-way conference call with the Desktop Web user, the monitored user and the third party the monitored user is talking to. All parties will be able to talk and hear each other. When attempting to barge into a call, if the phone plays a “number doesn’t exist” tone then this means the monitored user cannot be barged into, because they have the Barge-In Exempt service assigned and activated. Only users without this service active can be barged into.
The Active Call Window will display like a normal conference call, as below, and the Desktop user can Hold/Retrieve the same as for a conference call.
Please note that when leaving a call that you barged into, you must transfer the call parties together to leave the conference without ending the original call. To do this either drag one call on top of the other in the Active Call List or press Transfer  then select the option to leave the conference, as shown below.
Feature Dependency:
- The Desktop user must have directed call pick-up with barge-in service assigned.
- Monitored user must be engaged on a call.
- The monitored user must not have the barge in Exempt service active.
View User Details
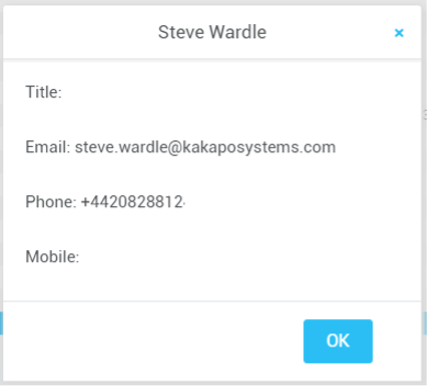
Performs a lookup on the user’s details as entered in the system. This includes their phone number, mobile and email address.
Adding Audio Alerts to Monitored Users
The “View user details” box also allows a wav file to be specified that will be played when the monitored user receives a call. Click the ![]() icon to select the wav file then click OK. This feature is useful in Manager/Secretary scenarios where the Desktop user is screening calls. When the audio alert plays that is the reminder for the user to perform call pick-up.
icon to select the wav file then click OK. This feature is useful in Manager/Secretary scenarios where the Desktop user is screening calls. When the audio alert plays that is the reminder for the user to perform call pick-up.
Send Email
This will open a new email window in the default Email application. The user must have the email field populated against their name in the system.
Feature Dependency:
- The recipient user must have their email address entered in the system.
Answer This Call [Call Pick-Up]
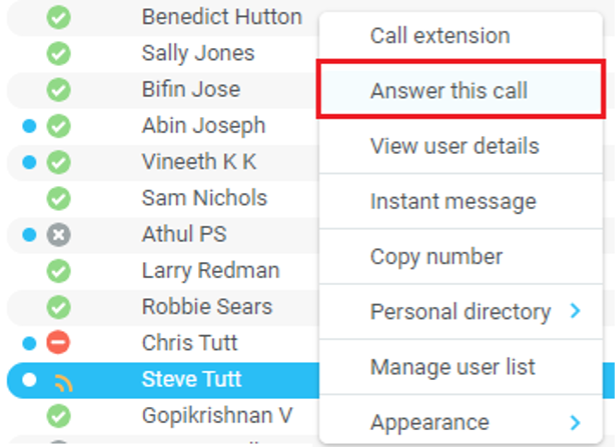
When monitored users are ringing their icon in Contacts becomes orange  . To perform pick-up and answer the call, right click the icon and select “Answer this call”. This option is only displayed when you right click a ringing user.
Feature Dependency:
- The Desktop user and the monitored user must be the same pickup group, or the Desktop user must have the “Directed Call Pick-Up” service assigned.
Instant Messaging
Instant messages can be sent and received between any Unity app [Reception, Desktop, Agent, or Supervisor]. Messages sent to offline user [those that do not have an instance of Unity open] can be stored and delivered when the recipient next opens Unity.
The maximum character limit for each instant message is 700.
Online/Offline Indicator
A person that is running an instance of Unity, and therefore available to send an online IM to is indicated with a small envelope on their user icon. This applies across all the available, engaged, ringing and DND states as shown below.
State |
Online [Unity Open] |
Online [Unity Open] Offline [Unity Closed] |
Available |
|
|
Ringing |
|
|
Engaged |
|
|
DND/unavailable profile |
|
|
Docking the IM Window
Instant Messages can be displayed in the Docked IM Window or as separate dialogue boxes for each individual IM thread. If the docked window is used, IMs can be initiated via drag and drop and new IM windows will not pop over other applications.
Easily toggle the IM window by clicking the IM icon next to the call control buttons:
Sending an Instant Message
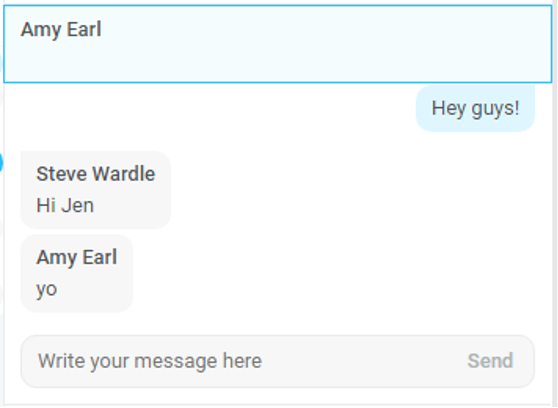
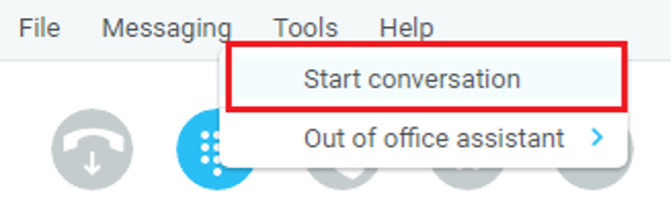
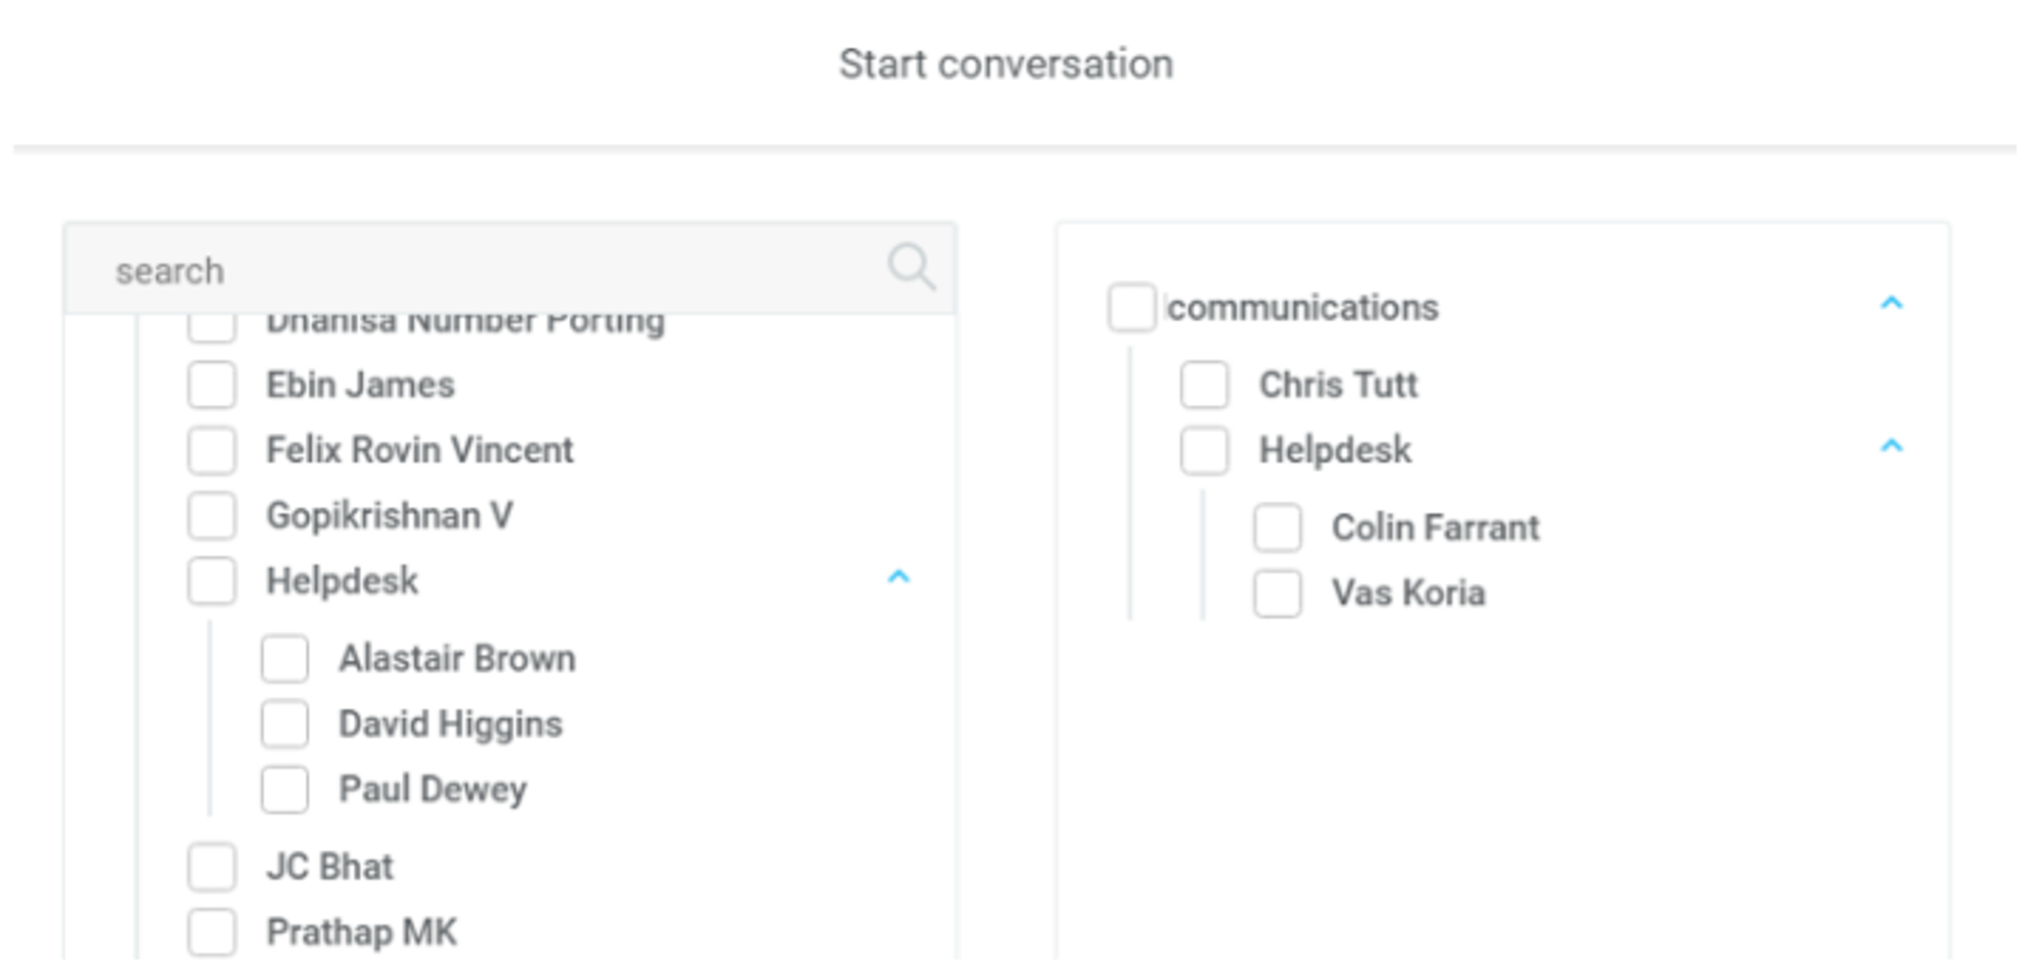
Send an instant message either by right clicking a user icon in Contacts panel, Search and selecting “Instant Message” from the drop list, or by dragging a user icon into the docked IM panel. Alternatively, you can select Messaging > Start Conversation from the top menu bar.
You can then select the users to include in the IM conversation. Please note that only online users will be displayed in the lists. The left list contains all online users, to include them in the IM conversation move them into the right list either by double-clicking the entry or using the arrow button.
Adding Participants to an Existing IM Session
When an IM conversation is in the Docked IM panel you can drag a user icon from the Contacts Panel to add them to the conversation.
Personal Directory
The Personal Directory is a repository on the system for each user to store personal speed dials. Using this feature in Unity will populate the directory on the system. Once numbers have been entered, they are available in the Search panel or can be pinned to the main Contacts Panel. A Personal Directory entry is shown by a ![]() icon. Double clicking the icon will make a call to the Directory number. The Personal Directory menu is available when right clicking a monitored user or in the Contacts panel.
icon. Double clicking the icon will make a call to the Directory number. The Personal Directory menu is available when right clicking a monitored user or in the Contacts panel.
Add New Entry
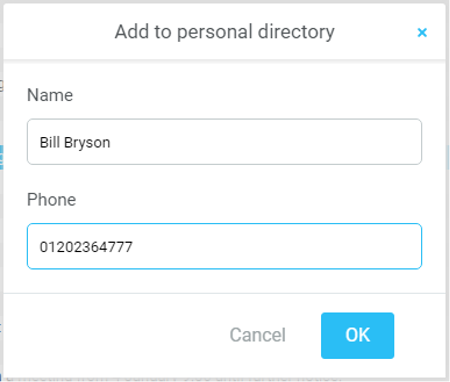
Enter the Name and Number and click Ok.
If the number specified is already in the Directory, the user will be alerted as below.
Edit Entry
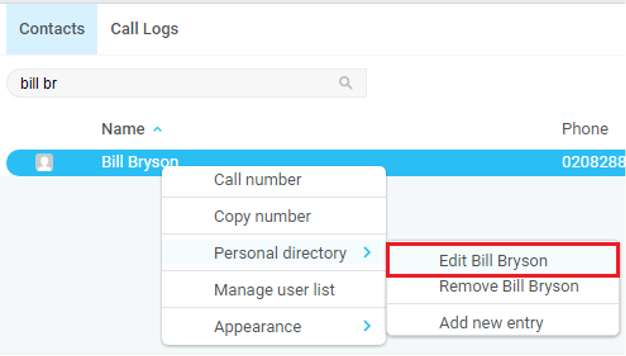
Use the Search field in Contacts to locate the entry. You can search by either Name or Number. Right click the Entry and select “Edit”.
Remove Entry
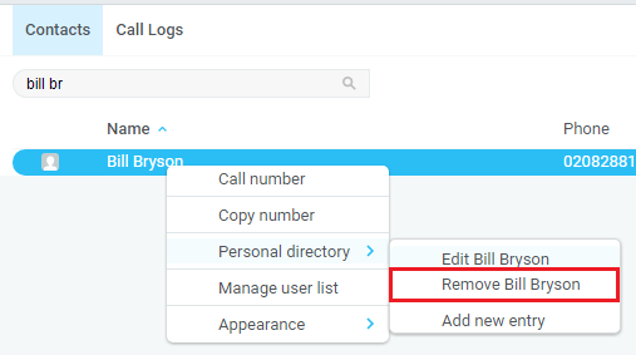
Use the Search field in Contacts to locate the entry by name or number. Right click the Entry and select “Remove”.
Dialing Directory Entry
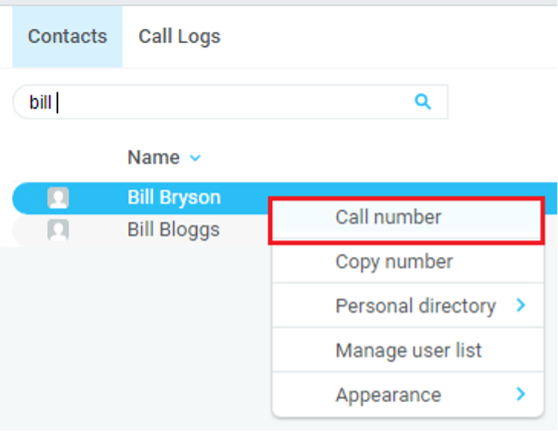
Locate the entry either on the Contacts panel or Search. Drag the entry into the Active Call Window, double click to make a call, or right click the entry and click “Call number”.
Contact Search Directories
The Contact Search field combines all system and Outlook Contacts directories to create a central search repository. The system directories include the Common Phone List [system speed dials], the receptions user’s own Personal Directory entries, and the Group Directory which includes all the other users in the group as well as hunt groups and auto attendants. Unity can also integrate with third party LDAP [including Microsoft Active Directory] and SQL directories as well as integrating with CRM systems.
Please see your Administrator for a separate guide on using CRM integration.
Directory Owner |
Directory Type |
All other users for BLF presence as well as hunt groups and auto attendants |
System |
Group Directory |
All other users for BLF presence as well as hunt groups and auto attendants |
System |
Common Phone List |
Speed dials entries at the Group level |
System |
Personal Directory |
The user’s own personal speed dial entries |
Outlook |
Personal Contacts [private folder] |
The user’s own Outlook Contacts |
Outlook |
Group Contacts [public folder] |
The shared Outlook Contacts at the Outlook group level |
Third Party |
SQL |
External SQL Directory |
Third Party |
LDAP |
External LDAP Directory |
Loading Directories
Unity will load all directory entries into Contact Search on start. If users are added to the BroadSoft Group Directory while Unity is running, they will not be visible until Unity has restarted. Personal directory entries the user adds will be available to use immediately without restarting.
Contact Search Results Layout
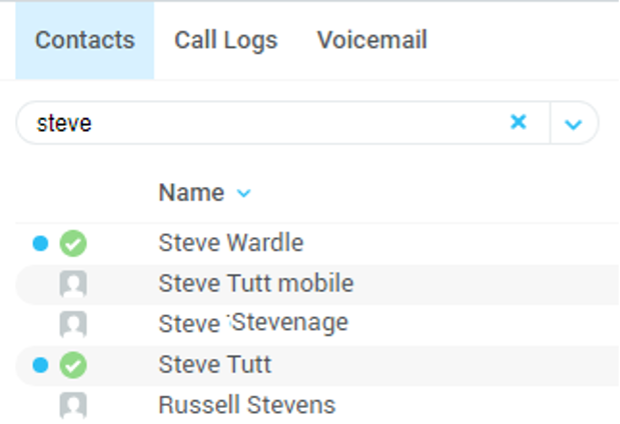
To perform a search type characters or numbers in the Search field and Desktop will start dynamically populating a list of matching entries across all directories. The list will narrow as more characters or numbers are entered. Clearing the Search box and returning to the main Contacts panel can be achieved by clicking again in the Search filed [provided “Clear the search box when activated” is enabled in Settings as outlined in the section below.
Search results will display each number for a contact as a separate line. Drag or double click the entry to make a call or right click to select a call action from the context menu.
 icons represent external numbers or system resources such as hunt groups for which presence information cannot be displayed.
 icons represent other users in the group with their presence status. Red is engaged, green is available, orange is ringing, and grey is on do not disturb.
It is also possible to search on department name to list all users of matching departments.
Call Logs
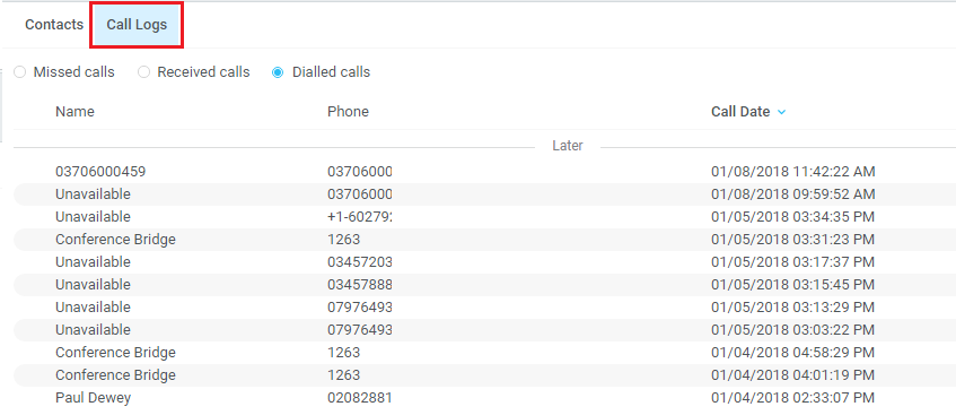
The Call Logs tab displays Missed, Received and Dialled Calls in chronological order [although the sort order can be changed by clicking on the column header]. The Call logs tab will show the number of missed calls since Unity was last used, as well as any missed calls received while Unity is running, as shown below.
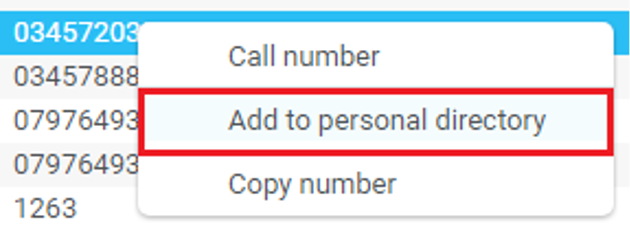
Drag or double click an entry to make a call to that number or right click to add the number to your personal directory.
Call logs can be exported as a csv file, either individually or together, by clicking the  Export button.
My Status
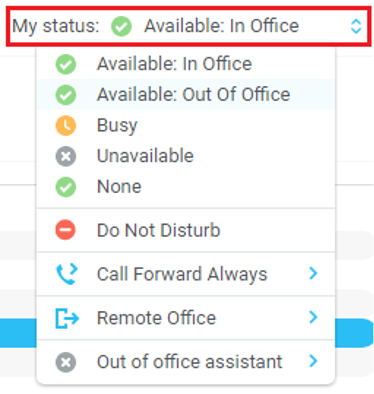
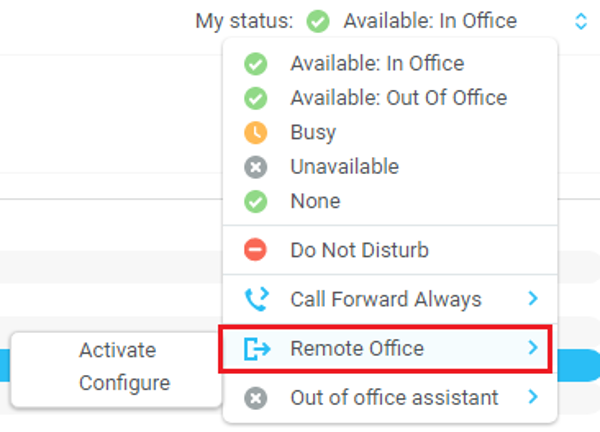
The “My Status” link provides an indication of the current user’s status and provide quick access to key services that are regularly modified. Unity will only display the options for the services that have been assigned to the user, available services are CommPilot Express (CPE), Do Not Disturb (DND), Call Forward Always (CFA), Remote Office and Hoteling Guest (for hot-desk environments).
CommPilot Express Profiles
CommPilot Express profiles are used to apply a pre-configured call routing policy based on your current state. CommPilot profiles are also used to convey presence information to other users within the group or enterprise. As users change their CommPilot Express state, any Unity client that is monitoring that user [through the User Status list] will see their image change, as outlined below.
User State |
Description |
User Status Image |
Available: In Office |
I am in the office and available to receive calls. |
|
Available: Out Of Office |
I am not in the office but am available to take calls |
|
Busy |
I am currently busy (short term) |
|
Unavailable |
I am currently unavailable (longer term) |
|
None |
No call routing plan is in use |
|
The My Status link will show the current CommPilot Express state, unless overridden by another service activation such as Do Not Disturb or Call Forward Always. To change the current status, click on the My Status link and select the state from the context menu, as shown below.
Do Not Disturb
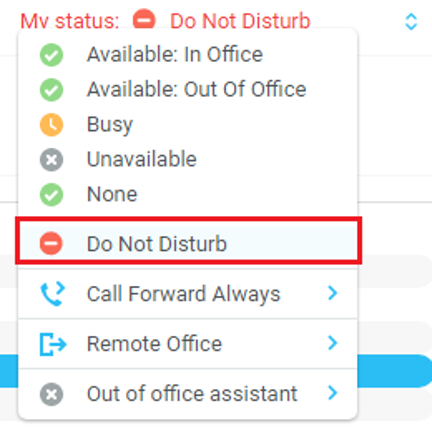
To activate Do Not Disturb, click on the My Status link, and click the menu option as shown below.
Unity will show that the user currently has DND activated through the My Status link and the Unity title bar.
Anyone monitoring the user [in the User Status list] will also see that they currently have Do Not Disturb activated.
Click on the same menu option or a CommPilot Express status to deactivate Do Not Disturb.
Call Forward Always
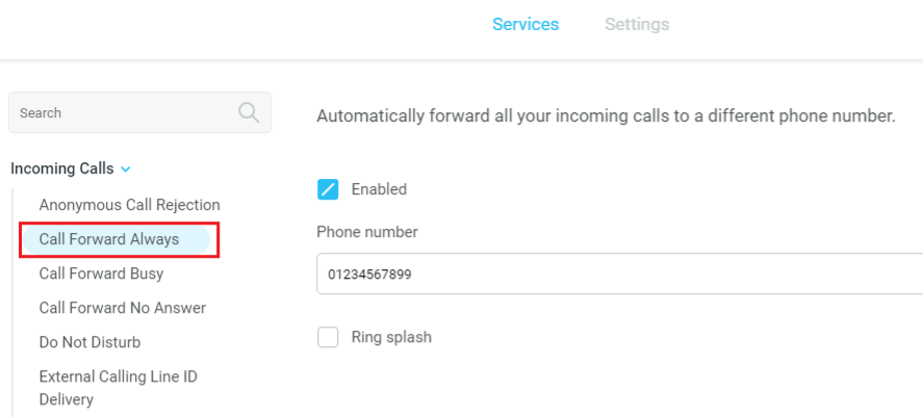
Call Forward Always will automatically route all incoming calls to the pre-defined phone number, meaning the user’s phone will not ring.
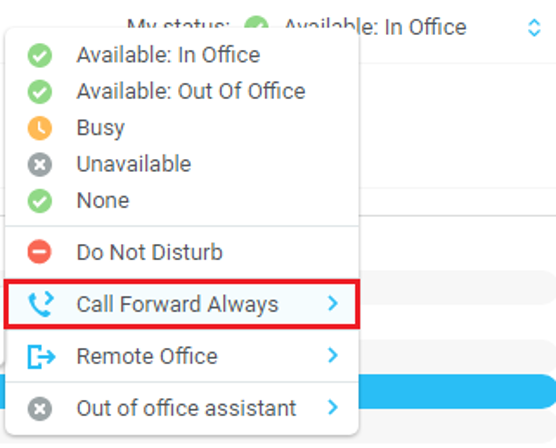
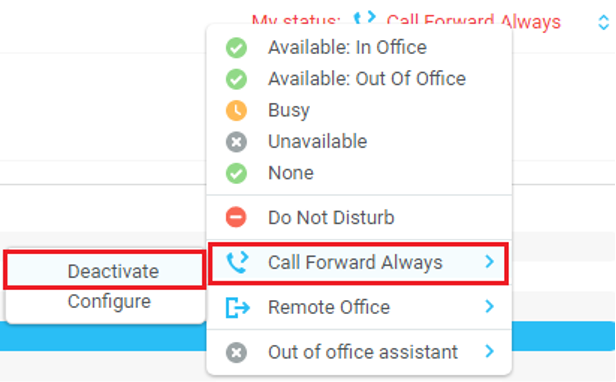
To activate this service, click on the My Status link and activate the service as shown below.
Unity will show that the user currently has Call Forward Always activated through the My Status link.
The Call Forward Always service can be deactivated through the My Status link.
Hot-Desk and Flexible seating
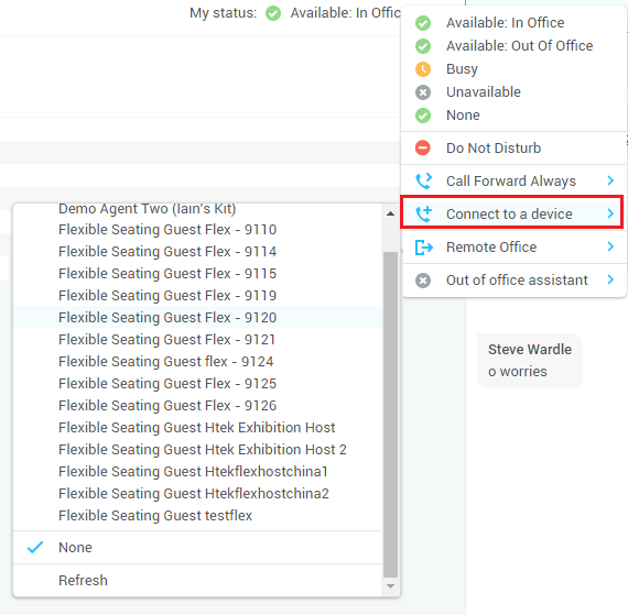
Hoteling Guest allows the user to connect to a device, typically in a hot-desk and flexible seating environment. To attach the user account to a device, select the device from the menu option below. Please note that only available devices [that aren’t already in use] will be displayed.
There is no visual notification that the user account is attached to a device, other than if the user clicks in the My Status link, in which case they will see the device is ticked.
When Unity is closing, it will prompt the user to remove the device attachment.
If the user clicks no they will continue to be attached to the device until the association is automatically ceased by the system.
Out of office assistant
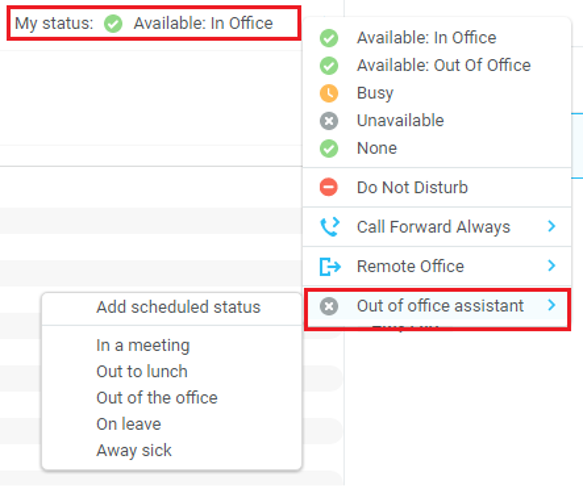
The Out of office assistant is only available on Unity Desktop Enterprise. To configure the Out of office status, click on My Status and select from the options, as shown below.
Users can also schedule their Out of office assistant by clicking “Add scheduled status” and scheduling the time and reason.


 Print and share


