


 Print and share
Poly Edge E550 - Phone Guide
Table of contents
Your Desktop Device
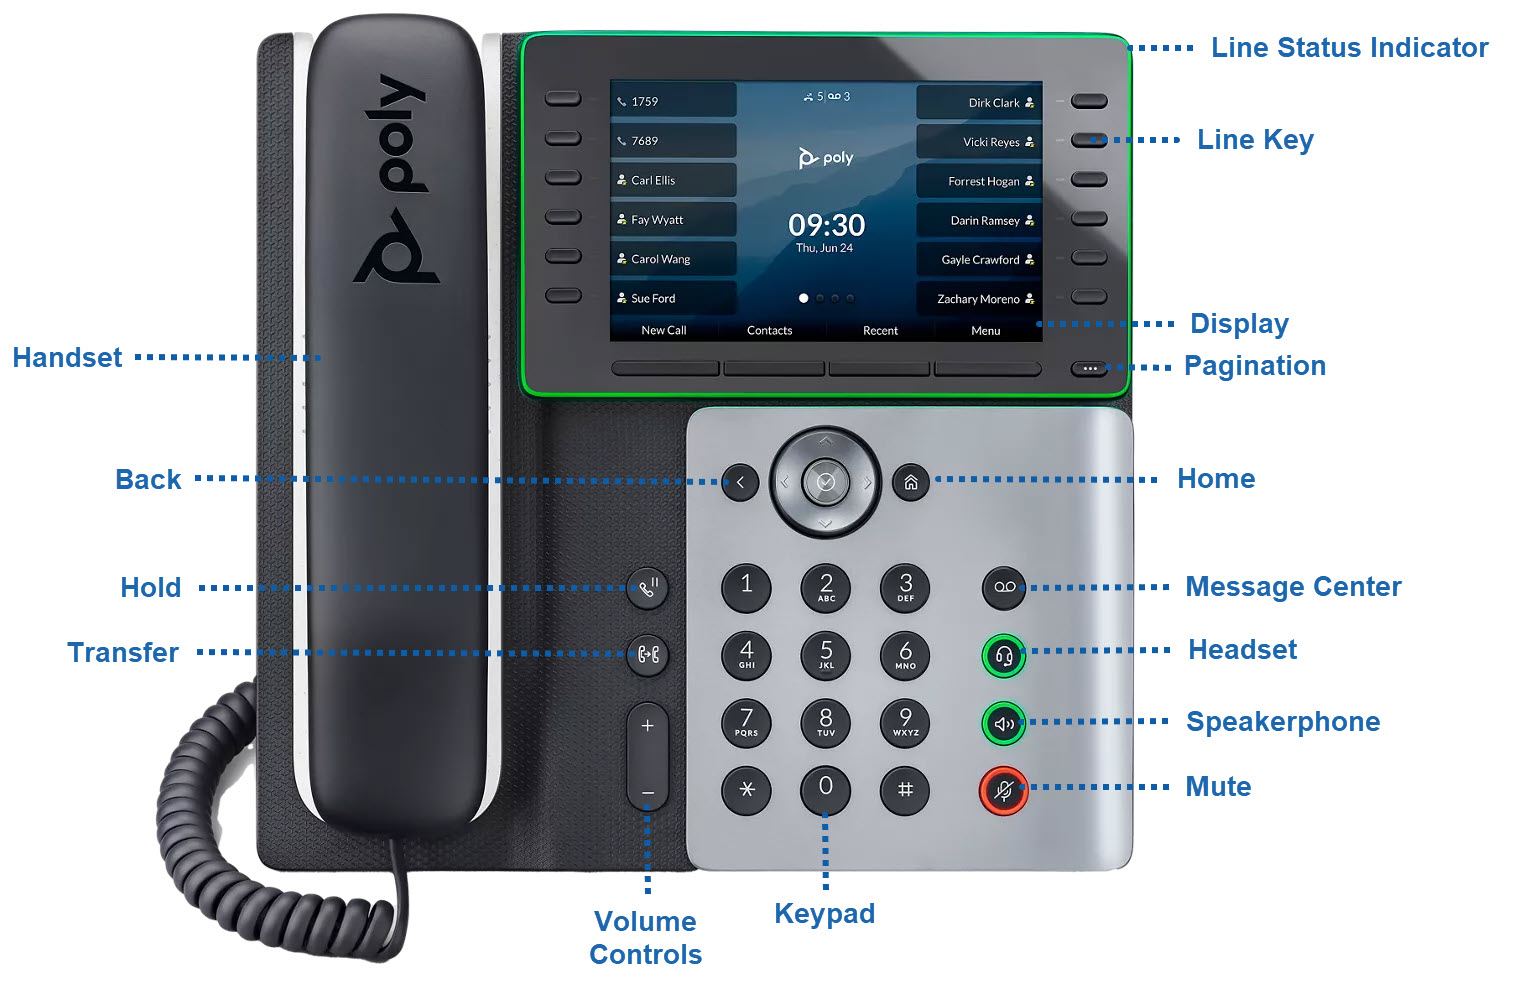
Display
The lines screen is the first screen that appears once the phone is powered on. This shows your phone lines and provides access to your directory.
The second display is located to the lower right of the dialpad and acts as an expansion module to the first screen. This display has six line keys and pagination arrows to sort through programmed line keys.
Voicemail Indicator
The indicator is on the upper right corner of the phone. The light flashes red to indicate new messages.
Softkeys
The functions for the soft-key buttons appear directly above them on display. Their functions are context-sensitive, which means the function of the soft-keys changes depending on your current activity. For example, if you are conferencing, the soft-keys display functions related to the conference feature.
Home Button
The Home button is located to the right of the navigational keys. Press this button from any screen to return to the Home screen.
Navigation Button
By pressing left or right, you can scroll through the options and lists on the display up or down. To select an item, press the OK button in the center of the four-way navigation arrows.
Headset, Speaker, and Mute Keys
These keys are located along the right edge of the phone and used as they are stated.
Volume Key
The volume key is located at the bottom of the phone below the dial pad. This key adjusts the volume of the handset, headset, speaker, and phone's ringer.
Transfer Button
This button will transfer active calls to another number.
Message Button
This button gives you access to your voicemail messages.
Hold Button
This button will place a call on hold.
Back Button
This button cancels actions or returns to the previous screen when pressed.
Line Keys
These buttons indicate the status of your lines and associated activity. The backlighting informs you when a line is idle, ringing, in use, on hold, or disconnected.
Use Your Desktop Device
Place a Call
First, dial the number. Then, pick up the handset. For hands-free speakerphone – dial number, then press the Speaker button or press Dial softkey.
Answer a Call
Pick up the handset. For a hands-free speakerphone, press the Answer soft key or press the Speaker button.
Dial a Number From Your Directories
Press the Home button, and then select Directories. Proceed to Contact Directory. Select the contact, then the number from the Contact Information Screen, and then press Ok.
Dial a Number From Your Recent Calls
Press the Home button, then select Directories. Proceed to Recent Calls. Press the Sort softkey to sort and order calls; Press Type to display only specific calls. Select a call record to call the person.
Hold and Resume
From Lines, Calls, or Active Call view, press the Hold softkey or function button. To retrieve the call, press the More softkey and press the Resume softkey or Hold function button again.
Call Park / Call Retrieve
Call Park places a call on hold so that other users assigned to Call Park service can retrieve that call from any phone in the office.
To Park: Press the Park softkey (the Park softkey does the same thing as Hold and *68). Enter the extension where the call will be parked, and then press #.
To Retrieve: Press the Retrieve softkey. Enter the extension where the call was parked then #.
Transfer a Call
Announced Transfer: Press the Transfer button to place an active call on hold. Dial the number where you want to transfer the call. Once the third-party answers, announce the call and press the Transfer button.
Blind Transfer: Press the Transfer button to place an active call on hold. Press the Blind softkey (If you don’t see Blind, press the More softkey,) Dial the number where you want to transfer the call.
Transfer to Voicemail: Press the Transfer button to place an active call on hold. Next, enter *55 and dial the party’s extension, then #.
Mute
Press the Mute function button to silence your phone’s mouthpiece and speaker. To turn mute off, press Mute again.
Voicemail
Press Messages from home view or press the Messages function button. Then press the Connect softkey. Your phone will ring your voice portal. Enter your passcode, then #. Follow the voice prompts to listen to delete/save messages.
Call Forward
Press the Forward softkey from the home or lines view. Select the forwarding type and enter the number to forward your calls to. Then press Enable softkey. Calls Forwarded will be displayed on the LCD screen. To turn off Call Forwarding, press the More softkey and then press the Forward softkey. Select the forwarding type and press Disable softkey.
Visual Call Park
Visual Call Park is an optional Unified Communications functionality. Once requested, the appearance of the available Visual Call Parks is represented in the line keys / Busy Lamp Field (BLFs) on every phone that’s in the customer’s location. It is either vacant or occupied (with a parked call).
Everyone on the site sees the same parking spots and their status (whether a call is parked or not), and can either park a call in a vacant spot, or retrieve a call from an occupied spot.
For consistency, all phones in the location must be provisioned precisely the same way, in this case being the Poly Edge 550. The client must also select between 4 parking spots (up to 12 phones per site), or three parking spots (up to 16 phones per location).
Bluetooth
You can pair your Poly Edge phone with a mobile device or headset and use it to place, answer, and manage calls.
To pair your headset to your Poly Edge E550 phone:
- On the phone, press the Home button.
- Select Bluetooth.
- Select Manage Devices.
- Select Scan.
The phone will search for available BlueTooth devices within range to pair with them. Locate and select the name of the headset to pair with it.
To reconnect a headset that was already paired:
- Go to Menu and select Bluetooth.
- Select Manage Devices.
- Choose your device name from the list of paired devices and press Connect.
WiFi
To connect to the Wifi:
- Press the Menu softkey.
- Navigate to Basic Settings.
- Click the Wifi option or simply press the number 8.
- When the WiFi menu appears, use the right navigation arrow to enable wifi.
- Choose Available Networks and press OK.
- Locate your network and press the Connect softkey.
- When and if prompted, enter the WiFi network password and press the Ok button. If successful, a connection success message will appear. If the connection has failed, please make sure you have selected the correct network and supplied the correct password.
Visual Park
To use Visual Call Park, while on an active call:
- Press the Home button, so the Line Key view is displayed. Here you will see your available Visual Call Park spots.
- Proceed to park the call at any vacant call park spot by tapping the VISUAL CALL PARK (VCP 1) spot.
- Once this is complete, the call will be parked and indicated by a white phone icon.
- Once the call is parked, everyone in the location can see the parked call occupying the parking spot.
- Any user can then retrieve the call to his / her line freeing up that spot.
- To retrieve the Parked Call, press the corresponding line key.
Pagination
To access Pagination options, press and hold the Ellipses button. Options include: Add New Page, Remove Empty Lines, and Make Page 1 as Default.
Select the pagination option you’d like to use. By default, with no pages added, an instructional page appears describing how pagination works when you press it or press and hold.
Once you add enough line key items on one page, a new page is automatically created where you can choose to delete to add a page later or continue adding contacts. If you have a full page and are ready to add a new one, press and hold the pagination button to add a page.
WiFi
To configure a voice VLAN, you must provision the following items on your DHCP server:
You must enable Wi-Fi before connecting to a Wi-Fi network.
Do one of the following:
- Go to Menu > Wi-Fi.
- Go to Menu > Settings > Basic > Wi-Fi Menu.
Note: Your system administrator determines the availability of these options.
- Press the Select key to enable Wi-Fi, and then press Save.
- Press Reboot.
After the phone reboots, it can connect to a wireless network.
Connect to a Wireless Network
After you enable Wi-Fi on your phone, connect to a wireless network.
Do one of the following:
- Press the Scan softkey to scan for available networks and select one to enter information as required by the network's security settings.
Note: For a WPA2-Enterprise network, select the correct authentication mode.
- Press the Other softkey to manually enter network settings, including SSID, security type, and password.
- Select Connect.
Update Wireless Network Settings
You can update settings for a saved wireless network.
Do one of the following:
- To change settings related to the current network, to re-attempt connection, or to forget/disconnect the network, select Saved Network.
- To edit advanced network settings including IP settings, SSID, security options, and radio regulatory country domain, select Advanced.
Disconnect from a Wireless Network
To change wireless connections or switch to an Ethernet connection, disconnect from the current wireless network:
- Select Wi-Fi Menu.
- Select the connected wireless network SSID from the list.
- Select Disconnect.
Remove a Saved Wireless Network
To remove any saved wireless network that is no longer necessary:
- Select the connected wireless network SSID from the list.
- Select Forget.
Key Expansion Module
With the key expansion module, users can:
- Expand phone functions.
- Easily track call activity on the 5” color LCD screen.
- Quickly access more contacts.
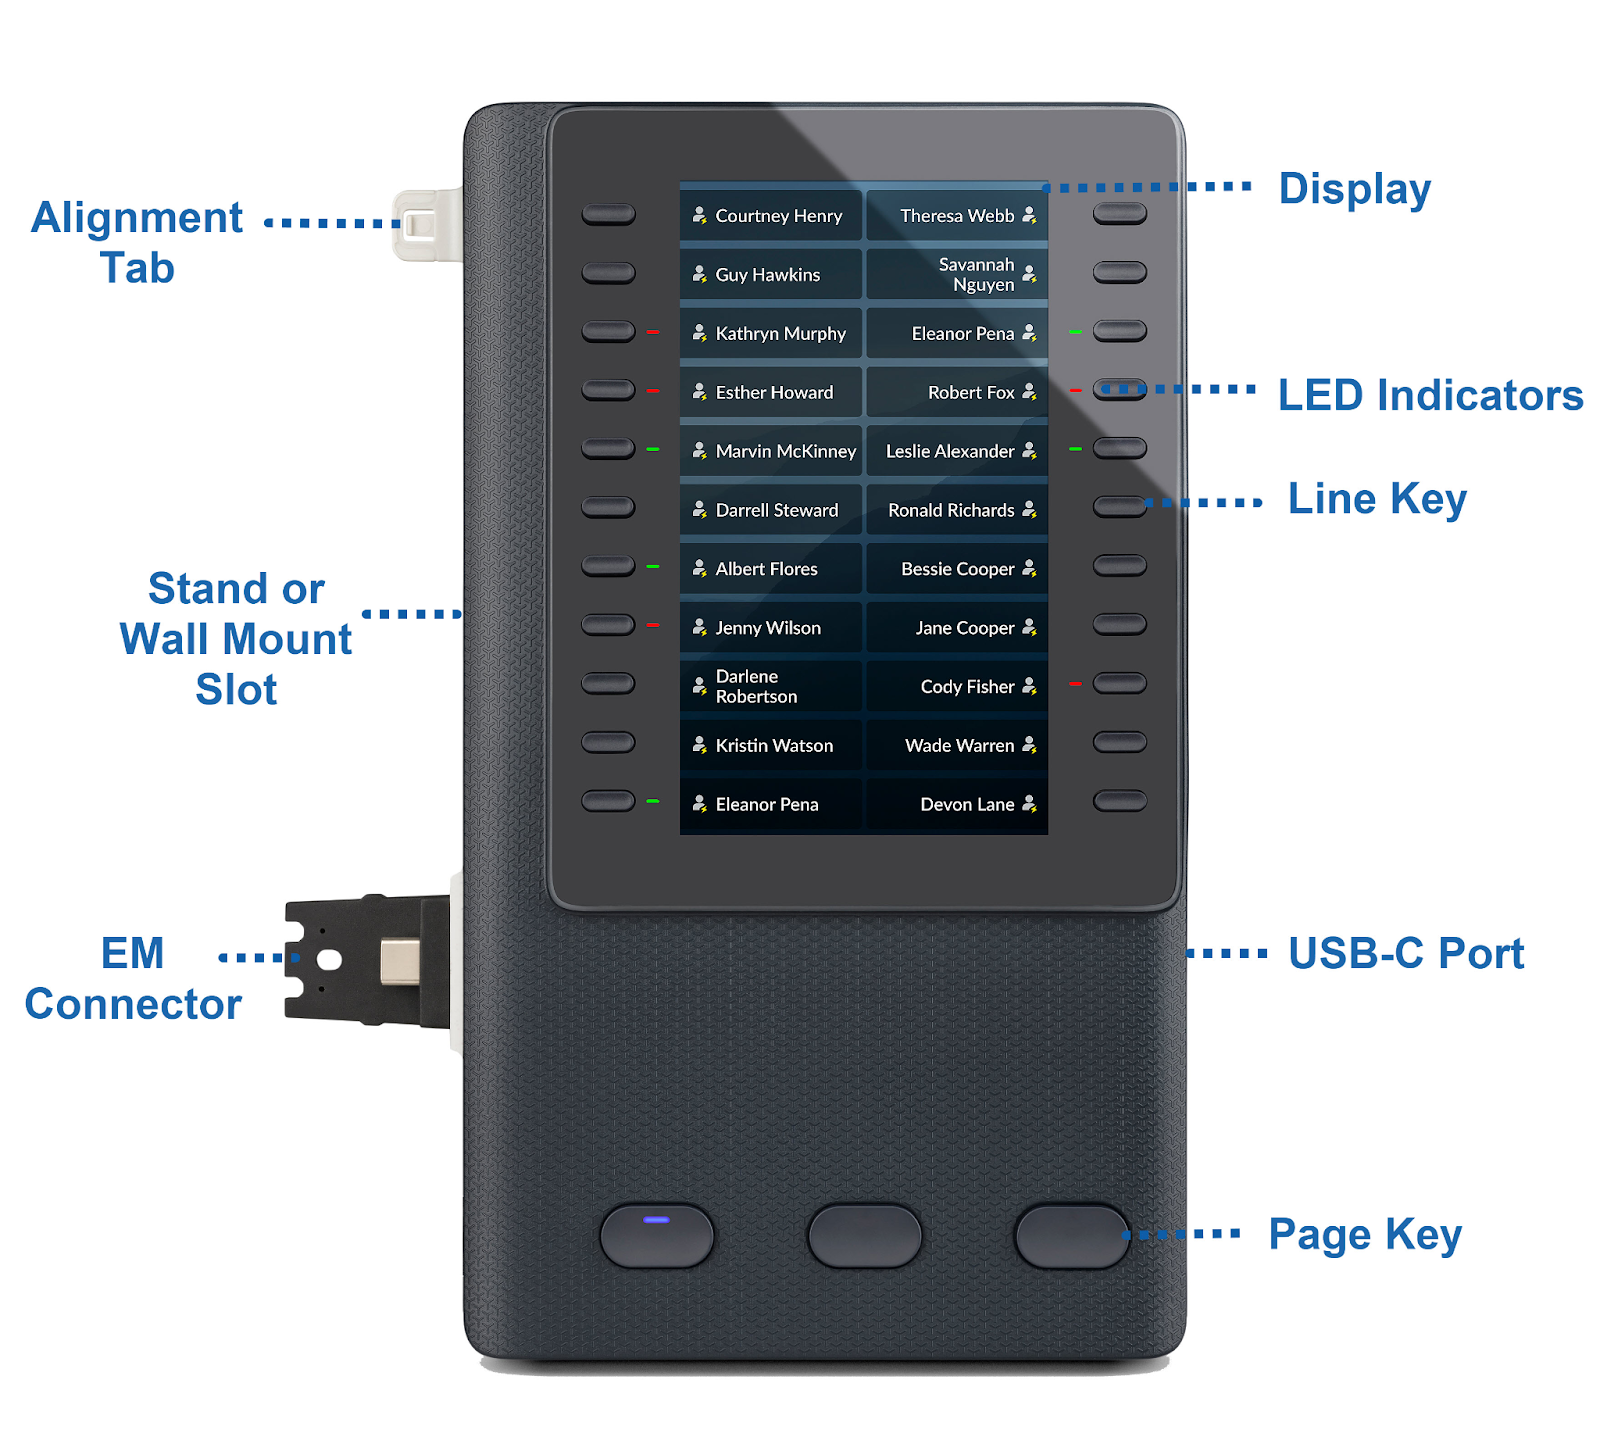
The following features are available:
- Color LCD 480 × 854-pixel display
- Up to 66 programmable keys with 22 line keys on 3 display pages
- LED indicators for line keys and page keys
- Side USB port for connecting and charging low-powered devices, such as a USB headset.
The Poly Edge E550 has the capabilities to support 1 or 2 expansion modules. To power a second expansion module on Edge E550 Series phones, the phone must be powered using PoE+ (802.3at) or an AC adapter.
Line Keys
Line keys are located on the sides of the display. These keys are used to view calls on a line or access speed dials or show call appearances. The line keys on the Poly Edge E550 and expansion module are numbered sequentially.
To assign a line key:
- Press and hold a line key
- Enter the contact’s information
- Press Save.
Note: You must assign every available line key on your Poly Edge E450 before using the expansion module. You can still use the expansion module to assign a line key; however, the contact appears on the phone if there is an available line key. Once all available line keys on the phone have been assigned to a contact, you can begin to assign line keys on the expansion module.
Page Keys
The Page keys are used to switch pages of line key options.