


 Print and share
Poly CCX 500 Quick Start - Quick Start Guide
Table of contents
Your Desktop Device
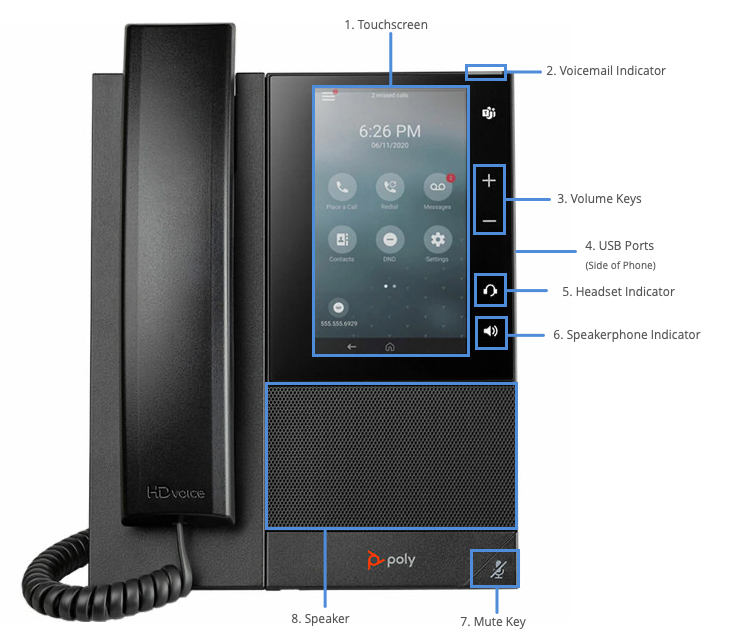
- Touchscreen
- Enables you to select items and navigate menus on the touch-sensitive screen.
- Voicemail Indicator
- Flashes red to indicate when you have new messages.
- Volume Keys
- Adjusts the volume of the handset, headset, speaker, and ringer.
- USB Ports
- Enables you to attach a USB flash drive or USB headset. This phone includes one USB-A port and one USB-C port.
- Headset Indicator
- Displays when the phone is powered on. The icon glows green or blue when a headset is connected and activated.
- Speakerphone Indicator
- Provides ringer and speakerphone audio output.
- Mute Key
- Mutes local audio during calls and conferences.
- Speaker
- The dial pad is located on the bottom half of the phone.

Using Your Desktop Device
- Placing a call
- First, dial the number. Then, pick up the handset, press the headset icon or speakerphone key. Enter your contact’s number. When complete select Dial.
- Answer a call
- Pick up the handset. For hands-free speakerphone, select Answer.
- Dial a number from your directories
- First, select Directories, then select Contacts. Choose the directory you wish to use. In the search field, enter your contacts name. Select the Contact. The call will be placed automatically.
- Dial a number from your recent calls
- From the home screen, select Recent calls, proceed to search and select the contact you wish to call. The call will begin automatically.
- From the place a call screen, select Recent calls, proceed to search and select the contact you wish to call. The call will begin automatically.
- Placing a call on hold
- To place a call on hold while on an active call, Select Hold. To resume a call that has been placed on hold, from the calls screen, select the call and select Resume.
- Call park / Call retrieve
- To park a call during an active call. press Hold. Then proceed to dial *68. Next, enter the contact’s line extension (example, dial *684144). The call will now be parked.
- To retrieve a parked call, press and hold the line key with the parked call. The Park Info soft key is displayed. Then, press the Park Info softkey. The parked call screen is displayed. Lastly, press Retrieve.
- Transferring a call
- Announced Transfer: While on an active call, select Consult. The phone will place the caller on hold. Proceed to dial the recipient's number or extension. You can also select a contact from the Recent Calls or Contacts list. When the recipient answers, speak with them and then select Complete Transfer to transfer the call.
- Blind Transfer: While on an active call, select Transfer. Proceed to dial the recipient's number or extension. You can also select a contact from the Recent Calls or Contacts list. The call transfers as soon as the recipient's line connects.
- Mute a call
- To mute an active call, press the Mute key.
- Listening to voicemail
- Your phone indicates when you have new voicemail in the following ways:
- The message icon displays with the number of new messages:
- On the Home screen in the status bar.
- Next to the phone line on the Lines screen.
- The message waiting indicator LED flashes.
- The phone plays an audible alert.
- The message icon displays with the number of new messages:
- To listen to your voicemail messages, go to Messages. Select your Message Center. If you have multiple lines on your phone, select the line that has the new message. From the messages screen, select Connect and follow the prompts to access your new voicemail messages.
- Your phone indicates when you have new voicemail in the following ways:
- 3-way conferencing
- While on an active call, select Add. The phone places the first call on hold and opens the dialpad. Proceed to call the second recipient or choose a contact from the Recent Calls or Contact list. When the recipient’s line rings, select Merge Calls.
- You can merge an active call and a held call to initiate a conference call. Within the calls screen, select the held call. Then select Merge. The held call merges with the active call to initiate a conference call.
- Forwarding calls
- To enable Call Forwarding, select Forward from the setting menu. If you have more than one line, select the line you wish to use. Proceed to choose one of the following: Always, No Answer, or Busy. Next, Enter a contact’s number then select Enable.
- To forward an incoming call,select Forward. Proceed to enter your contact’s number, then select Forward.
Note: If you select No Answer, enter the number of rings before the phone forwards the call.
Visual Call Park
Visual Call Park is an optional Unified Communications functionality. Once requested, the appearance of the available Visual Call Parks are represented in the line keys / Busy Lamp Field (BLFs) on every phone that’s in the customer’s location. It is either vacant or occupied (with a parked call).
Everyone on the site sees the same parking spots and their status (whether a call is parked or not), and can either park a call in a vacant spot, or retrieve a call from an occupied slot.
For consistency, all phones in the location must be provisioned precisely the same way, in this case being the Poly CCX 500. The client must also select between 4 parking spots (up to 12 phones per site), or three parking spots (up to 16 phones per location).
To use Visual Call Park, while on an active call:
- Tap the Home icon, so the Line Key view is displayed. Here you will see your available Visual Call Park spots.
- Proceed to park the call at any vacant call park spot by tapping the Visual Call Park spot.
- Once this is complete, the call will be parked and indicated by a “P” encased in a red circle next to the visual call park link key.
- Once the call is parked, everyone in the location can see the parked call occupying the parking spot.
- Any user can then retrieve the call to his / her line freeing up that spot.
- To retrieve the Parked Call, press the corresponding line key.

