


 Print and share
Auto Attendants
Table of contents
The Auto attendant feature is used to route calls to various destinations, employees, groups of employees, voicemail, or other outside numbers –without the assistance of an operator or receptionist. They also provide callers with your company greeting, announcements and dialing menu options.
An auto attendant has two modes - business hours and after hours. Each mode allows you to set up options for keys 1 through 9, pound (#) and star (*) to present callers with different choices.
Modifying an Auto Attendant
Administrators can set up and modify auto attendants within the admin portal. To view and modify an auto attendant, follow these steps:
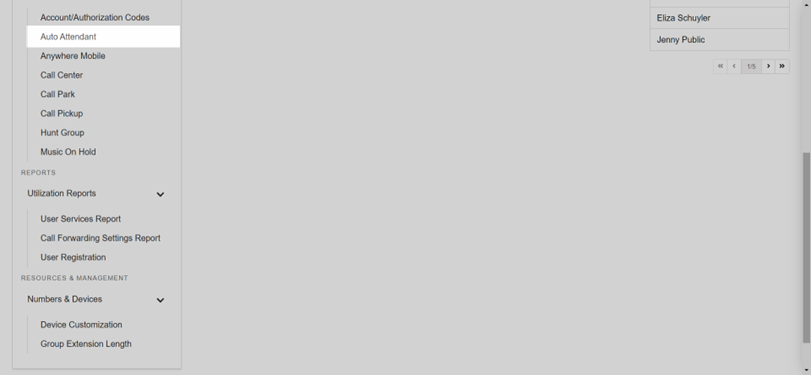
- From the group dashboard, select Auto Attendant under Group Services.
- A list of the auto attendants assigned to this group/location are displayed. Select the one you would like to modify.
- This brings you to the auto attendant menu where the left-hand navigation refers to the settings available to modify for this auto attendant.
- Modify announcements and dialing menu options in the After Hours Menu and Business Hours Menu.
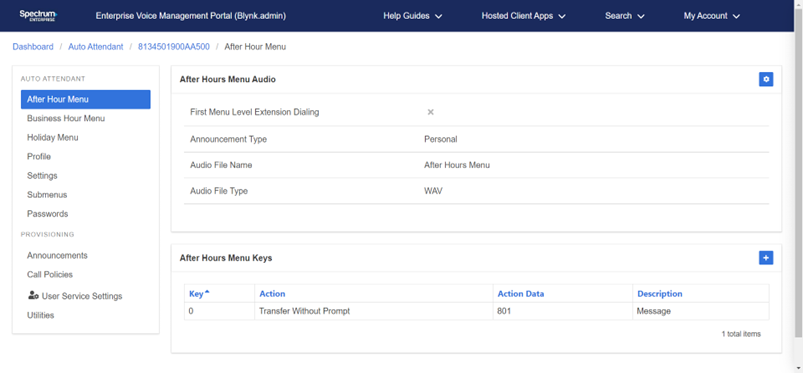
After Hours Menu
After Hours/Business Hours Audio
- Select the Settings icon to modify the announcement type.
- Select either Default or Personal. If you select Personal, upload your custom audio.
- Select Save to save your changes.
After Hours Menu Keys
You can modify existing menu key options or create a new menu key option. To edit an existing menu key, click to open the edit window. To create a new menu key, select the Plus icon.
- Select the Key to assign and the Action from the drop-down menu. Options include:
- Transfer With Prompt - Callers are sent to a pre-configured user extension or outside number. As soon as the caller chooses this option, a prompt will play a message before the transfer is placed. If transferring to an extension, it will include the user’s name as recorded in the voicemail box.
- Transfer Without Prompt - Callers are sent to a pre-configured user extension or outside number. This option will route the caller as soon as it is selected.
- Transfer To Operator - This will redirect callers to a configured operator, who will either receive calls when that option is selected or receive all calls that “time out” when a caller does not choose an option from the Auto Attendant.
- Name Dialing - This action permits callers to dial by recipient name, using the letters on the Keypad.
- Extension Dialing - Callers dial by recipient extension, using the numbers on the Keypad.
- Transfer To Mailbox - This action will transfer the caller to the mailbox.
- Play Announcement - If selected, this action will play the announcement file chosen.
- Repeat Menu - This action will repeat the announcement and menu options.
- Exit - Allows callers to exit the menu system, terminating the call.
- Enter an appropriate description and select Save to save your changes.
Profile
The Profile in the left-hand menu is where you can view the auto attendant profile details. Select the Settings icon to modify.
Settings
The Settings tab in the left-hand menu is where you can view the auto attendant settings details, including the schedule assignments. Select the Settings icon to modify.
You can modify the following settings:
- Transfer to Operator Timeout Seconds - Set the number of seconds before the call is transferred to the operator. Default is 10 seconds.
- Extension Dialing - Choose where the extensions are pulled from for the extension dialing menu (Group, Department or Enterprise).
- Name Dialing - Choose where the names are pulled from for the dial-by-name dialing menu (Group, Department or Enterprise).
- Dialing Entries - Choose how the name dialing entries are received.
- Business Schedule - Choose the auto attendant schedule for business hours.
- Holiday Schedule - Choose the auto attendant schedule for Holidays, if applicable.