Print and share
Unity CRM Integrations – Zendesk
Table of contents
Unity integrates with Zendesk to enable contact lookup and “popping” for inbound and outbound calls, searching for CRM contacts in Unity, and click-to-dial from both Unity and Zendesk.
Note: The CRM integration requires a license to be assigned to the user. This license is required in addition to the base license for Unity Desktop, Agent, or Supervisor.
Once the CRM Integration license is assigned. Restart Unity. The CRM panel will become available in the Settings tab, as shown below.

Configuring Zendesk Integration
To integrate your Zendesk into Unity, open Unity and go to the Settings tab. Then select CRM in the left-hand navigation. From the drop-down menu, select Zendesk. Enter the domain, login ID (which is typically the email used to log in) and the API key.
Note: You do not need to enter a password. The API Key is all you need to authenticate. Each user can have a separate API Key, or all users in a business can use the same one.

Select the Test button to save and test the login details. Once the CRM connection test has been successful, you will receive a pop-up notification. Select OK to continue.

Contact Pop
Unity will use Zendesk to identify inbound and outbound calls, including queued call center calls. “Popping” a contact means that at any time you can search for CRM contacts from Unity and perform click-to-dial to make an outbound call to the contact or display the contact in the CRM platform.
Note: If a number is attached to a contact in the directory and in the CRM platform, Unity will use the directory contact in the Active Call Window.
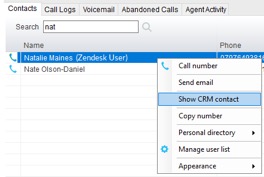
You can also right-click a call to pop the record in Zendesk using the default browser. This assumes the contact was found in the CRM platform rather than another directory (e.g. an Outlook contacts folder).
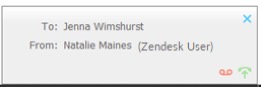
You can also click on the call details “toast” notification popup to pop the contact. This assumes the contact was found in the CRM platform.
- To enable this feature, follow these steps:
- Go to the Settings tab.
- Select Call Notification in the left-hand navigation.
- Then check the box next to Pop CRM (if applicable).
- Unity can also be configured to automatically pop the CRM contact when the call is answered. Enable this setting on the Automatic Contact Pop tab within the CRM settings window.


Contact Search
When you perform a contact search, Unity will check all directories (e.g. group and enterprise phone lists, personal directories, Outlook, etc.). It will also search Zendesk. You can search by contact name or company name. Double click on the search result to call the number.
Note: Enter a minimum of three letters to search for a CRM contact.

To quickly send an email to a CRM contact, you can right click an entry and select Send email. This will open your default mail program.

Call Log Entry
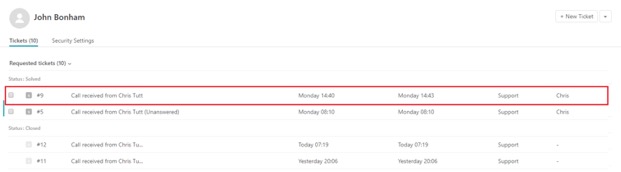
When integrated with Zendesk, Unity can add call log entries. Unity will create tickets for call logs and contact center conversations, and the ticket type will be set as a “Task.”
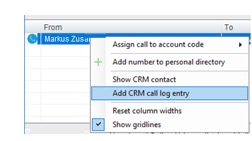
- Manual Call Log Entry
- Right click on a call and select Add CRM call log entry.
- Automatic Call Log Entry
- Go to the Settings tab.
- Select CRM in the left-hand navigation.
- Then check the box next to Automatically add call log entry.
- Unity will automatically add call log entries when the call is released (the same time it is removed from the Active Call List in Unity). Only basic information on the call is presented, based on the direction of the call and the Unity user that made or received the call. Zendesk will timestamp the call internally.

Unity will enter basic details of the call depending on if the call is inbound or outbound.
Note: This call log will be stored in Zendesk, so an outbound call in Unity is an inbound call in Zendesk, because we have called the contact.
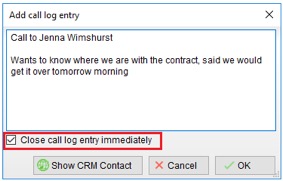
Once the call log is created, you can manually enter notes. The call note will be saved against the contact in the CRM platform.
You can specify whether to close the status of the call log entry in the CRM platform or keep it open by selecting the checkbox next to Close call log entry immediately. If you select Show CRM Contact or Cancel, the call log entry will not be saved.
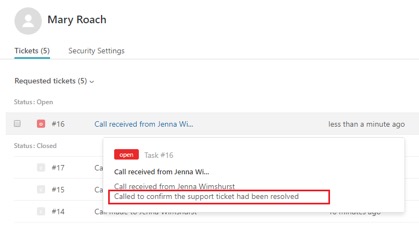
The call log entry will now appear in Zendesk.
Unity can be configured to automatically add a call log entry for any calls where a call log hasn’t been manually created using the steps above.
To enable this feature, follow these steps: