
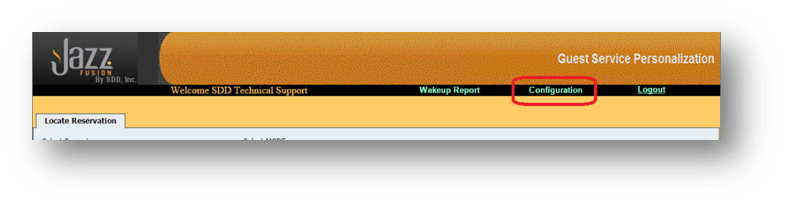
 Print and share
Hospitality Portal
Table of contents
- Hospitality Portal Main Screen
- Property Selection
- Search Criteria
- Hospitality Portal Search
- Check in Functionality
- Check Out Functionality
- Room Move Functionality
- Room Status Functionality
- Guest Detail Page Overview
- Estimate Call Charge
- Change Phone Restriction (class of service)
- Do Not Disturb
- Text Message Waiting Light
- Create Text Message
- View Text Message
- Manage Wakeups
- View Charge Report
- Wakeup Call Report
- Wakeup Report Definitions/fields
- Wakeup Call Engine Configuration
- Interactive Voice Recording System
- Hospitality Portal Room Status
- Hospitality Portal Mini Bar
- Hospitality Portal Wakeup Calls
Hospitality Portal Main Screen
Once logged into the hospitality portal you will see the main screen which is where you will find guest information for all guests:
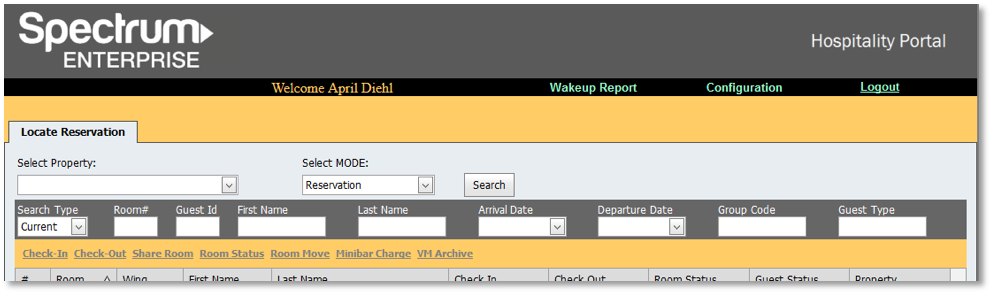
Property Selection:
Option where you select your property or properties you want to view.
- To view data for one or more properties you must first access the drop down menu beneath Select Property label.
- Click on the check boxes next to the property name or properties you want to pull up data on.
- Click Close.
- You can click on the Search button to display the information for that property:
- To deselect a property, access the property drop down.
- Uncheck the box next to the property and then click on Search again.
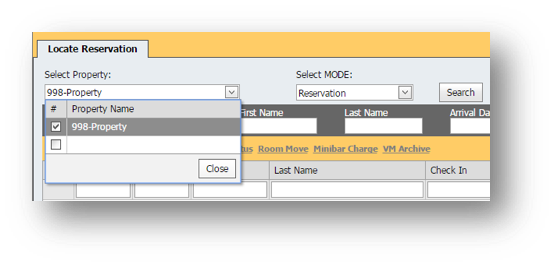

Note: You must select at least one property before you click on the Search Button.
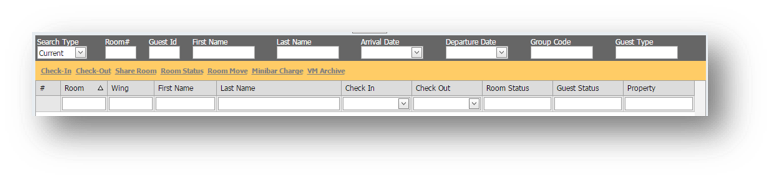
Search Criteria:
- Option where you can search for specific criteria relating to guests
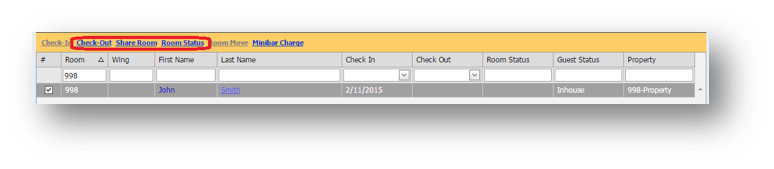
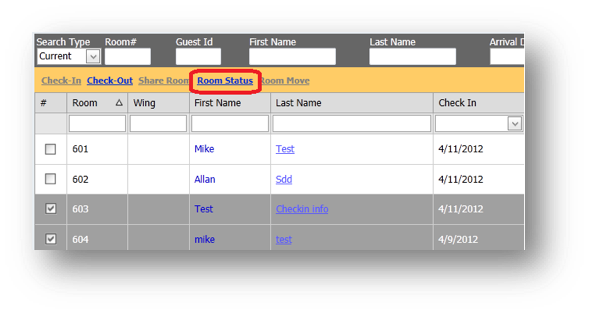
- Function Bar: Where you can Check-In, Check-Out, Share Room, change Room Status, Room Move, view Minibar Charges (if supported) and Archive Voicemail for guests
- Filter By Criteria


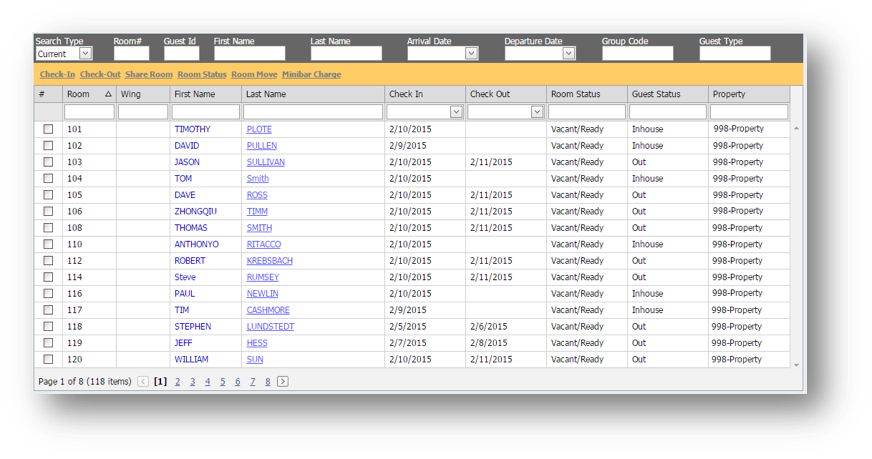
Hospitality Portal Search
By default, the Hospitality portal will display all the guest records for the all selected properties. The selection can then be narrowed down by using the available search parameters. The results can be filtered by:
- Current or historical data
- Room number
- Guest ID
- Guest first name
- Guest last name
- Arrival date
- Departure date
- Group code
- Guest type
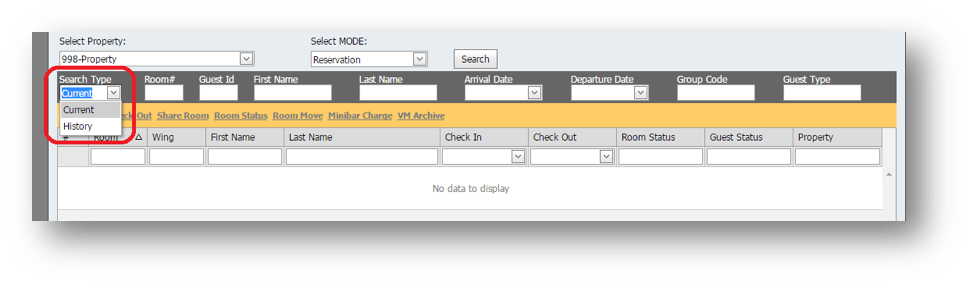
Note: If Current data search type is selected, the search results will only show In House guests. If History data search type is selected, the filtered results will show both guests who are In House and guests who have Checked Out. The search type menu can be found right below the property selection dropdown:
Search vs. filterOn the menu you will notice there are options for both a search and a filter:
The Search Function retrieves all the records that match the Search criteria after clicking on the Search button. Once the search has returned the results you can use the Filter Function to filter the records that were returned as part of the Search.
Pattern searchFor flexibility, the search function is designed to match the pattern entered in the criteria. For example:
- If the Guest’s last name is “Markes” but a misspelling may have occurred, enter “Mar” into the Last Name field, the Hospitality portal will return all guests whose last name starts with “Mar”.
Any combination of criteria fields can be used to narrow down the search. For example:
- If First Name = Phil is entered, all guests whose first name starts with “Phil” will be displayed.
- If First Name = Phil and Arrival Date = 01/04/11 is entered, only guests whose first name begins with Phil and who arrived on 01/04/11 will be displayed.
Note: The Arrival Date field and the Departure Date field do not function as ranges. If an Arrival Date of 01/01/11 and a Departure Date of 01/15/11 is entered, only those guests who arrived on January 1st and who departed on January 15th will be displayed.
Check In Functionality
In the event that the PMS is down, the hospitality portal can be used to:
- Check a guest into one room
- Check multiple guests into one room (Share Room)
- Check a guest with one guest reservation id into multiple rooms
Note: The hospitality portal should only be used to check guests in and out in the event that the PMS is unable to perform this function.
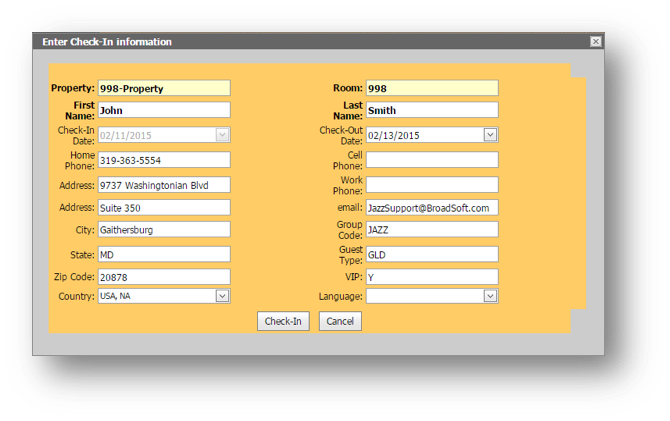
To check a guest into a room using the Hospitality portal follow the below steps:
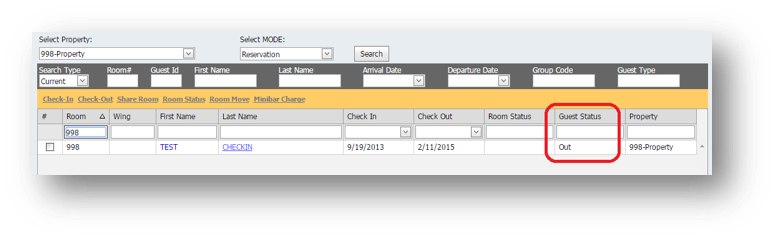
- Using the Portal, locate a vacant room which will be identified with the Guest Status of Out (as the room must be vacant in order to create a new check-in):
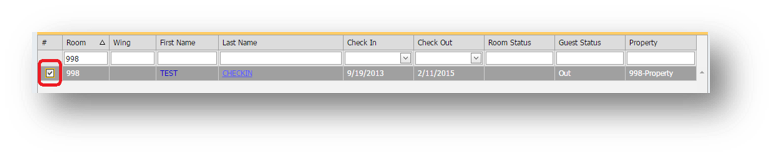
- Click the check box to the left of the vacant room:
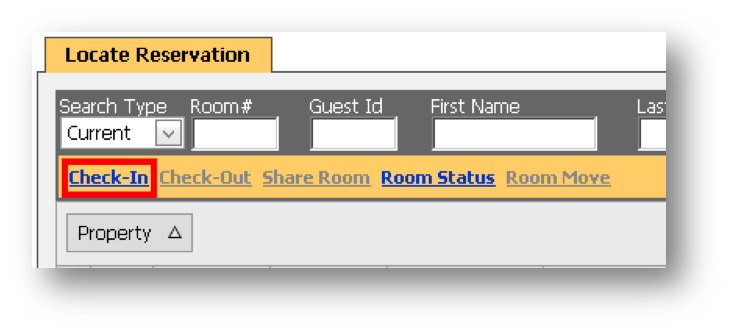
- Click the Check-In link on the Function Bar. Function is “grayed out” (not available) until a room that is vacant is selected.
- The Check-In pop-up box will appear. The Property Name, Room # and Check-In Date will be automatically populated by the system. Enter in the appropriate Guest Information, this information will not be sent to the PMS only to the PBX and Voicemail.
- Click the Check-In Button to save the guest information. The new guest is now assigned to that room.

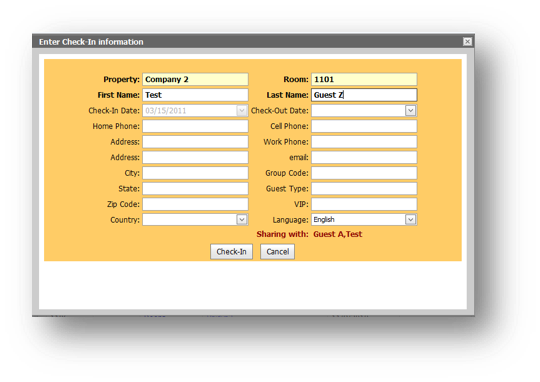
To check multiple guests into a single room follow the below procedures:
- Check in the first guest following the above procedures.
- Click the check box to the left of the room again, notice the ‘Share Room’ is available:
- Click the Share Room Link (instead of the Check-In Link) on the Function Bar and the Check-In pop-up box will appear. The verbiage “Sharing with: [first checked-in guest’s name]” will appear at the bottom of the window and the Property Name, Room # and Check-In Date will be automatically populated by the system. Enter the information for the Second Guest into the Check In pop-up box.
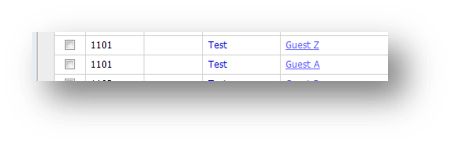
- Click the Check-In Button to save the guest information. The second guest is now assigned to that room as well. Each guest will have their own record.
- Repeat Steps 2 - 5, if there are additional guests sharing the same room.
Multiple rooms can be checked-in at the same time under one reservation using the Hospitality portal. For example: A family reserves 2 rooms; one for the parents and one for the children.
- To check in multiple rooms at one time under the same reservation using the Hospitality portal click the check box to the left of all the rooms for the reservation.
- Next click the Check-In Link on the Function Bar (the check-in function is grayed out/not available until a vacant room is chosen. The Check-In pop-up box will appears and notice multiple room numbers are now entered in the room number field:
- Enter in the appropriate guest information and click the Check-In Button to save the guest information. The new guest is now assigned to multiple rooms:


Check Out Functionality
The hospitality portal also allows for a single room or multiple rooms to be checked out at one time. When checking out multiple rooms the rooms do not have to be under the same reservation.
Note: Check Ins and Check Outs made through the hospitality portal are not sent to the PMS. The Hospitality portal should only be used to check guests in and out when the PMS is down.
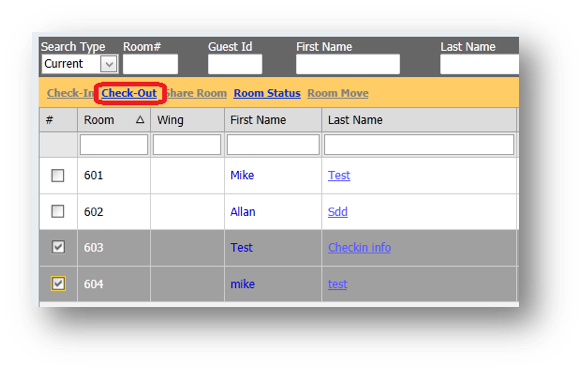
To check one or more rooms out of the hospitality portal:
- Click the check box(es) to the left of the room(s) to be checked-out:
- Click the Check-out link on the function bar. Function is “grayed out” (not available) until a room is chosen:
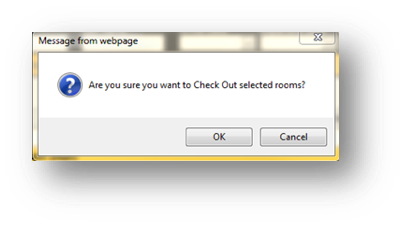
- The check-out confirmation message will appear, click the OK button to confirm check-out:
- The guest status for all the selected rooms will change to out.


Room Move Functionality
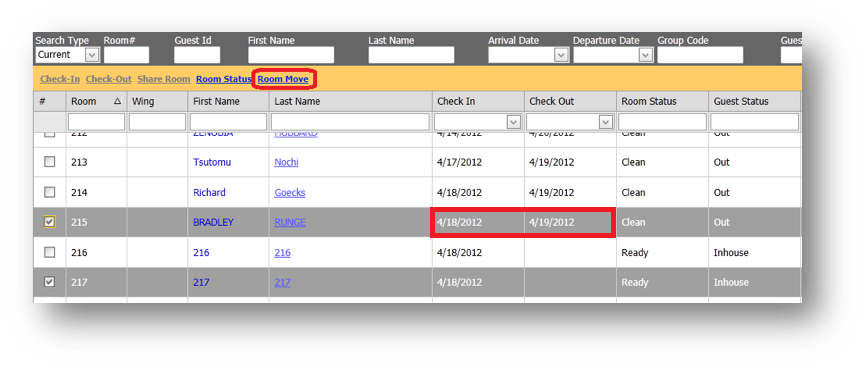
To move a guest from one room to another in the Hospitality portal in the event the PMS is down you can click the check box to the left of the guest’s current room, then click the check box to the left of the vacant room where the guest will be moved:
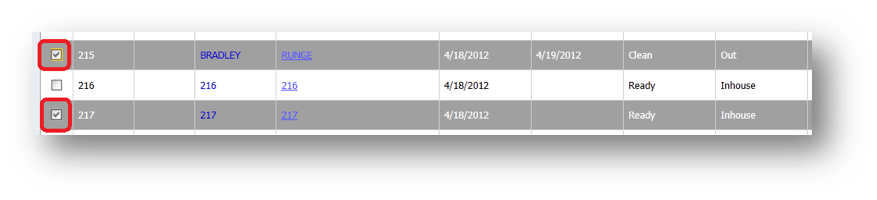
- Click the Room Move link on the function bar on main menu. The room move function will be “grayed out” (not available) if:
- Both rooms are not selected
- More than 2 rooms are selected
- The room where the guest will be moved is already occupied
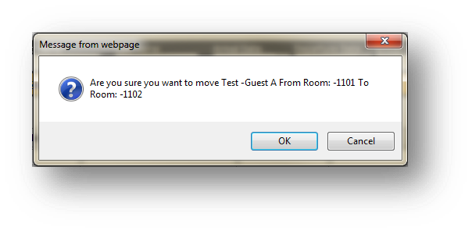
- The following message will appear asking for confirmation that the guest should be moved from Room “X” to Room “Y”. Click OK button to initiate the Room Move. (Click Cancel Button to cancel change):
- After clicking OK the Room Move occurs. The guest will be checked out of the original room and checked-in to the new room. The Check-In, Check-Out and Guest Status fields will been changed to reflect the move.
Room Status Functionality
The purpose of room status is to update the PMS with the current status of a room, for example Dirty, Clean or Ready. Typically the housekeeper uses the guest room phone to update the status of the room by entering codes that correspond with the condition or status of the room. However, the room status can also be updating using the Portal. When room status is updated using the phone, the updates will be sent to the Portal as well as the PMS. If the status is updated using the Portal, then the Portal will update the PMS.
The room status can be updated for one or more rooms at once using the main portal screen. Alternatively, the room status can be updated for a particular guest room by selecting that room and making the change from the guest details page.
To update the room status from the portal main screen follow the below steps:
- Click the check box to the left of the room(s) to update the room status record
- Click the Room Status link on the function bar. The function is “grayed out” (not available) until a room is selected:
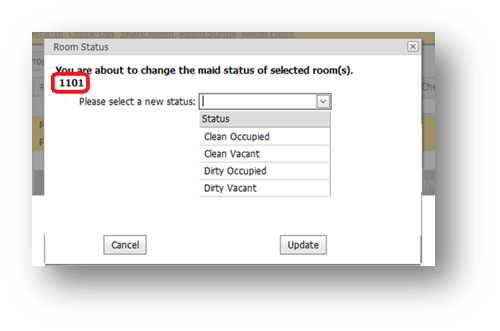
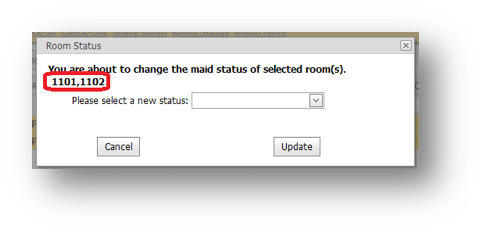
- Open the drop down box and select a new status. The room number(s) that will receive the change are displayed on the screen.
- Click the Update button to save Room Status change or click Cancel button to cancel change. After clicking update the room status will be updated.

Note: The room status selections available in the drop down vary depending on the property’s PMS and PBX configurations. BroadSoft can configure Hospitality to suit the needs of the property as long as they are supported by the PMS:
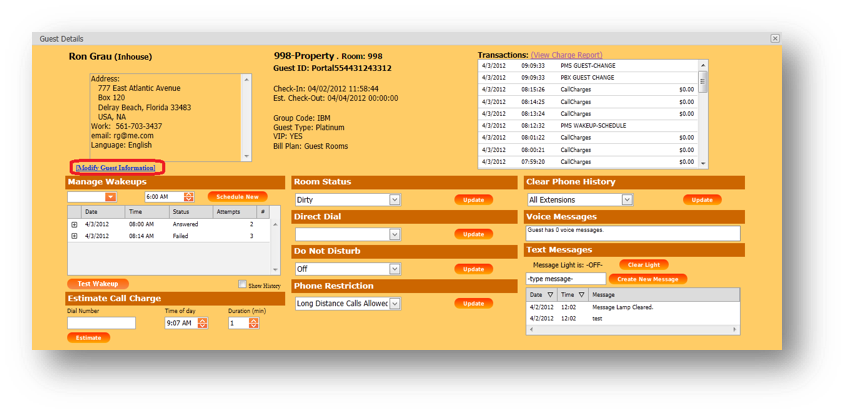
Guest Detail Page Overview
The guest detail page contains information pertaining to the guest that was entered either in the PMS or manually in the Hospitality portal. This page contains the following information:
- Guest information
- Modify guest information link
- Manage wakeup calls
- Call charge estimate
- Class of service Phone Restriction
- Do not disturb
- Direct dial number assignment (if supported)
- Room status
- Transaction history
- Clear phone history (Supported PBX’s only)
- Voice messages
- Text messages
- Modify guest information
- Estimate call charges
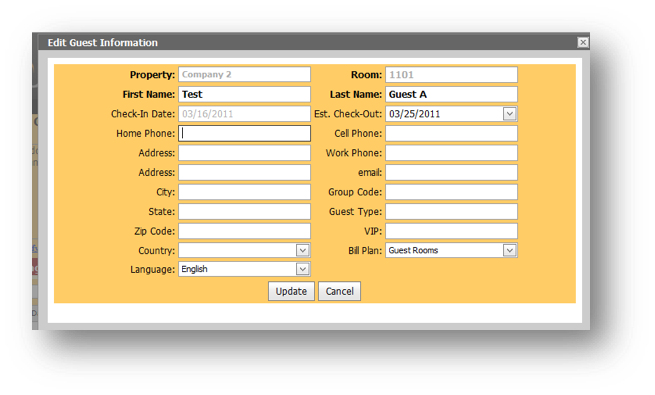
After a check-in has been created, the name, address, phone(s), e-mail, estimated check-out, guest type, VIP status, or Bill plan, can be modified using the link modify guest information.
Note: Information entered here does not get sent to the PMS. The property, room number and Check-in date cannot be modified using this link. To modify the room number, return to the main reservation screen.
- To modify the Guest information in the hospitality portal in the event the PMS is down go to the main reservations screen, click on the guest’s last name to open the guest detail record:
- Click the Modify Guest Information hyperlink located in the guest information section on the guest detail page.
- Once the edit guest information pop-up window appears enter the changes and click the Update button to save the guest information changes.

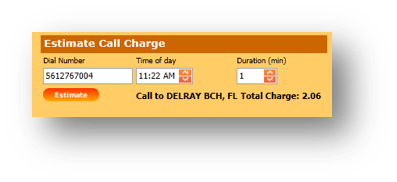
Estimate Call Charge
The Estimate Call Charge feature in the portal allows hotel staff to provide a guest with the estimated charge for making a call from their hotel room to a particular phone number. This feature is specific to the guest, although frequently all guests have the same phone rates in certain circumstances VIP or Resort Fee guests may have different billing options for phone calls. Therefore, the estimate will be based on whatever bill plan has been assigned to this particular guest.
To provide a guest with an estimate for a call charge open up the guest detail screen for the guest in question:
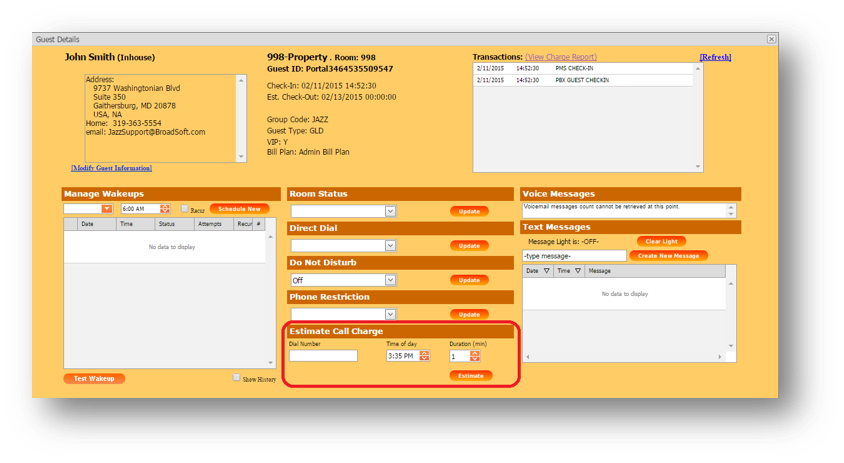
- In the estimate call charge section, enter the telephone number that will be dialed (without dashes or spaces), the duration in minutes, and the time of day the call will be made.
- For international calls, enter the international dialing prefix (such as “00” or “011”), the country calling code then the telephone number. For example: A call from the USA to London, England would be entered as: 011447801111111.
- Click the Estimate. The call location and total charge will appear to the right of the estimate button:
Change Phone Restriction (class of service)
Phone restriction is most often used when a guest is paying cash and the hotel prefers to block long distance or outgoing calls. If the PMS is down, a guest’s phone can be restricted using the hospitality portal.
To change the phone restriction status of the guest room using the hospitality portal open the guest detail page for the guest in question.
- On the guest details page, access the drop down under the heading Phone restriction and all the class of service options configured for the property will appear:
- Use the drop down to select the correct class of service and click Update. A record will be sent to the PBX and the new Class of Service setting will be applied.
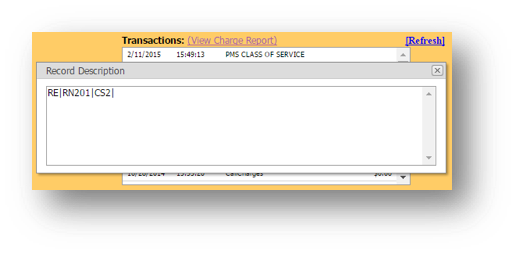
- Service record under transactions in the upper right portion of the guest details screen:

Note: The class of service categories available in the drop down vary depending on the property’s setup.
Do Not Disturb
When a guest is checked in through either the PMS or the hospitality portal, the do not disturb status is automatically set to “Off” by default.
- If the guest requests not to be disturbed and Do Not Disturb is turned on in the PMS, hospitality portal will receive this information and set the PBX accordingly.
- When do not disturb is on, all future calls go directly to the voice mail system.
- If the PMS is unable to send hospitality portal a notification to turn the Do Not Disturb either on or off, the Do Not disturb status can be changed using the hospitality portal
To change the do not disturb status of the guest room using the hospitality portal open the guest detail page for the guest in question.
- On the guest details page, access the drop down under the heading Do Not Disturb:
- Select the correct status and click Update. A record will be sent to the PBX and the new do not disturb setting will be applied.

Text Message Waiting Light
The front desk can create a text message using the portal for the guest. The information is sent to the Voice mail or PBX and the message light is turned on. The guest in the room will see the phone light on and will call the front desk to retrieve the message. Once the text message has been provided to the guest, the front desk staff should clear the light using the clear light button on the portal which will send the message to the voice mail or PBX to clear the light on the phone.
Create Text Message
To create a text message in the hospitality portal and turn on the message waiting light open the guest detail page. On the guest details page, type a message into the message box under the heading Text Messages and click Create New Message. The message light indicator on the portal will change from “-OFF-” to “-ON-”:
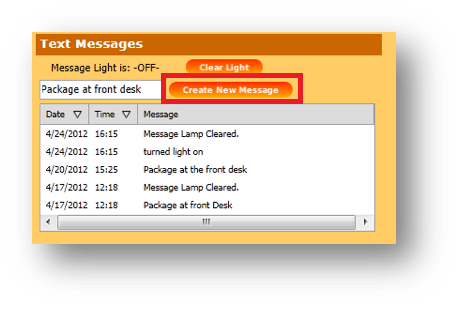
A record will be sent to the PBX and the message waiting light will be turned on.
View Text Message
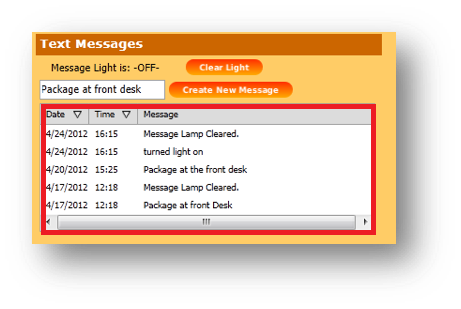
To view a message and turn the message waiting light off on the guest room phone open the Guest Detail page and view the messages listed under the heading text Messages.
Click on clear light to turn off the message waiting light once the guest has been informed off the messages. A message will be sent to the PBX to turn off the light and the Message Light indicator in the portal will change from “-ON-” to “-OFF-”.
Manage Wakeups
The hospitality portal provides the ability to view and manage wakeup requests for the guest room.
Scheduling wakeups
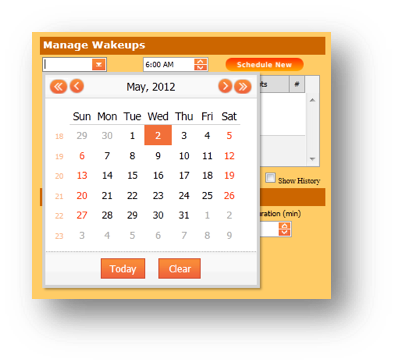
To set a wakeup call for a guest room using the Hospitality portal open the guest details page.
- Under the heading manage wakeups, click on the empty drop down box. A pop-up calendar will appear:
- Select the date for the wakeup call from the pop up calendar.
- Next, move to the time selection box. Select the time of the wakeup call using the up and down arrows or type in the time using the keyboard. If using the arrow keys, use the mouse to move the cursor from the hours to the minutes to the AM/PM fields in the time box before clicking on the arrows:
- After scheduling a wakeup call, a record will be sent to the PBX when it is time for the wakeup call to notify the guest.

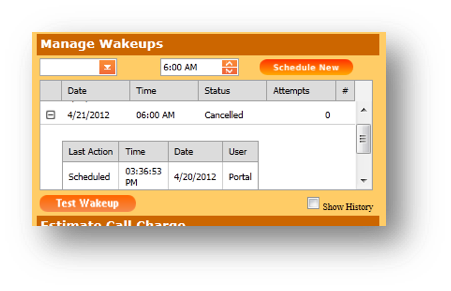
Canceling wakeups
To cancel a wakeup call for a guest room using the hospitality portal open the guest detail page for the guest in question. On the guest details page under the heading Manage wakeups find the wakeup call that should be canceled.
Click on the red X and the wakeup that was scheduled will be cancelled.
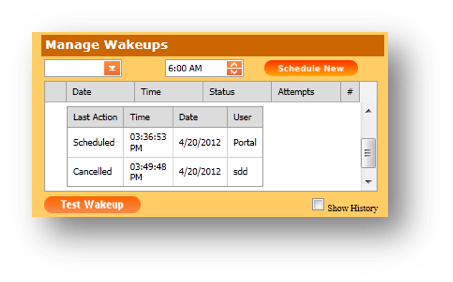
Wakeup details
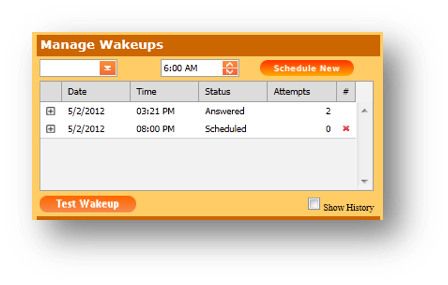
To view the details related to any wakeup call for a guest room using the hospitality portal go to the guest detail page for the guest in question. On the guest details page, under the heading manage wakeups, click the + sign next to the wakeup call to be investigate.
All the records and activity related to the wakeup calls will appear including:
- When the call was scheduled
- What time the call was scheduled for
- Who scheduled the call
- When the call took place
- The number of times the system has attempted to call the guest if the guest did not answer
The status of the wakeup call attempt include:
- Answered > If the guest answered the call
- Snoozed > If the guest answered the call and chose to snooze
- Failed > If the guest did not answer after all retry attempts have been made
- Cancelled > If the call was cancelled before it took place
- Auto Cancelled > If there was a problem with the system and the call could not be placed
Wakeup call history
To view the history of wakeup calls for a guest room using the hospitality portal go to the guest detail page. On the guest Details page, under the heading manage wakeups, check the box entitled Show history.
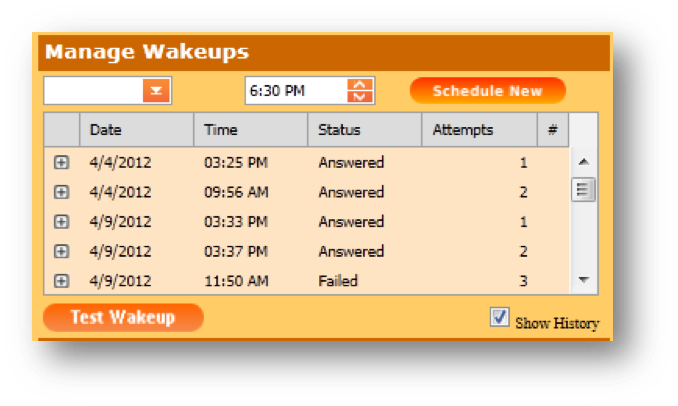
A list of all wakeup calls for this guest will appear in the grid.
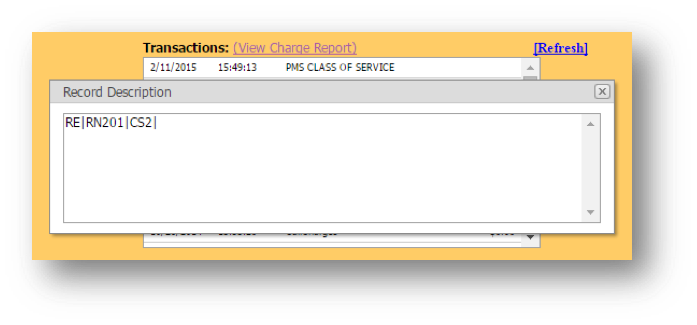
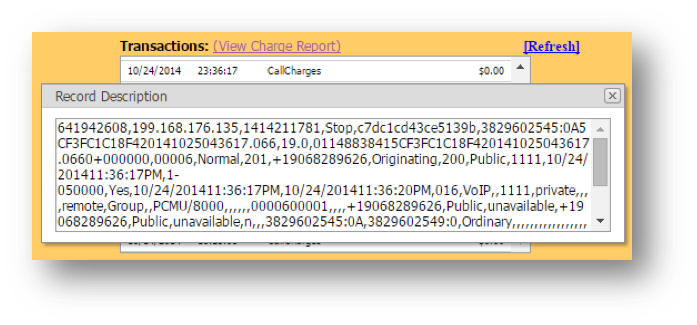
Transactions history
The transaction box displays descriptions of all the transactions that have occurred. Transactions include any updates such as room status, call charges, phone restriction, do not disturb, mini bar charges etc.

To view detailed records of any transaction, right click on the record and a detail record will appear in a new pop up window:
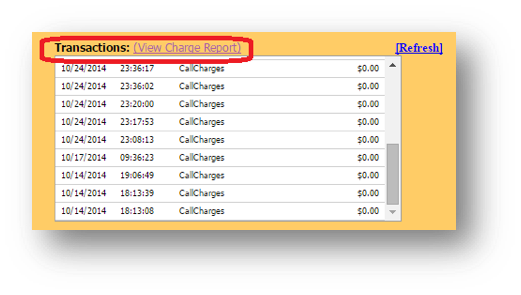
View Charge Report
The portal provides a detailed list of all the call charges and mini bar charges made to the room.
- To view the charge report open the guest detail page for the guest in question.
- On the guest details page, click on View Charge Report in the upper right hand corner next to transactions:
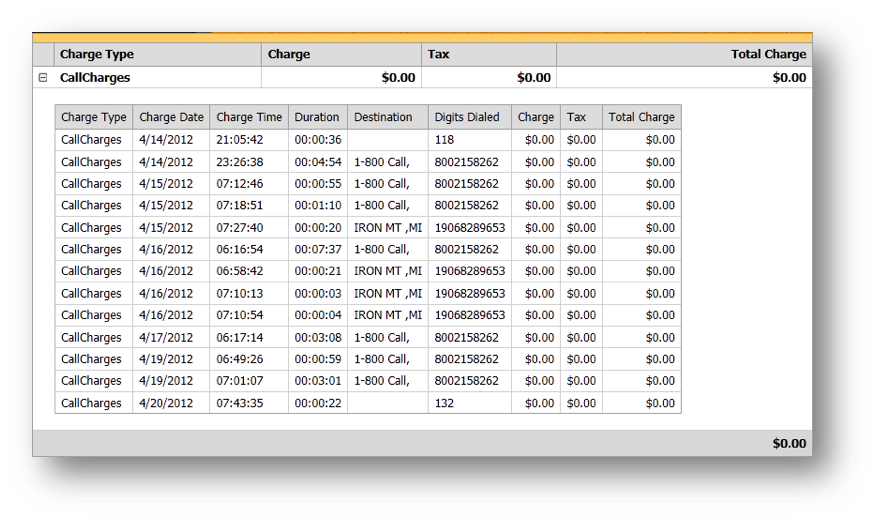
- To see the detail of the charges, click on the + sign next to the charge type. The detail of the charges will be displayed:
- To exit the charge report, click on the X in the upper right corner.
The report will open with the charge summary. The charges will be rolled up by charge type.
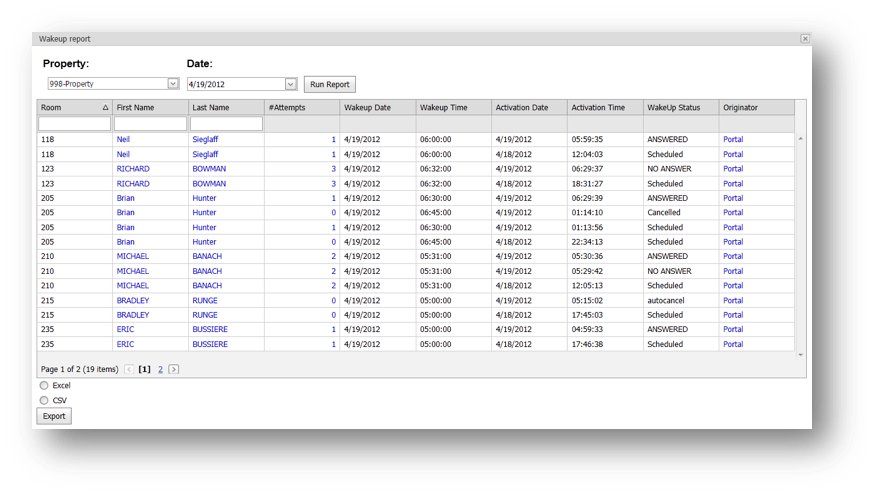
Wakeup Call Report
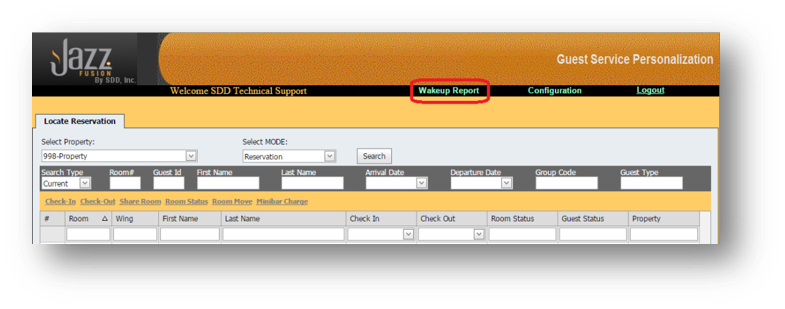
The Portal provides a detailed report of all the wakeup call activity for a selected property by day. To view and/or export a report of all the wakeup activity that has taken place at a property for a given day from the Main Reservations screen:
- Click on the Wakeup Report link:
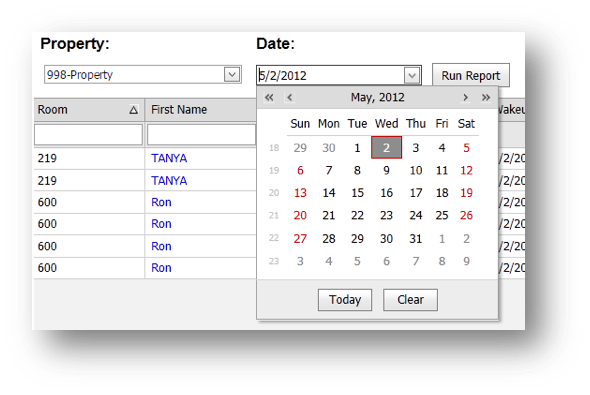
- Select the name of the property from the dropdown menu similarly to how you would when selecting your property at the main reservations screen.
- Then click on the dropdown menu next to the date to get a calendar pop-up screen and select a date:
- Then click on Run Report and a report will be generated showing all of the wakeup call details for the property:
- To sort the report on any heading, simply click on the heading.
- To filter the report find a particular record(s) in the report, enter the room number, first name, or last name into the filter boxes just below the column headers and hit Enter or the Tab key. To remove the filter, clear the filter box and hit Enter or the Tab key.
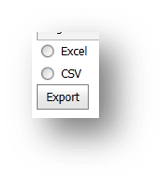
- To export the report to CSV or Excel, select the appropriate radio button on the lower left hand corner of the report and click Export.
Wakeup Report Definitions/fields
The report contains the following fields and definitions:
Fields |
Meaning |
Wakeup date & wakeup time |
The date and time when the wakeup call is scheduled to occur. |
Activation date & activation time |
The date and time that some activity took place related to the scheduled wakeup call. The status field indicates what activity took place. |
# of Attempts |
The number of wakeup calls that were placed in an effort to reach the guest. If a wakeup call is not answered, the PBX will try again after a specified amount of minutes. The number of minutes in between tries is configurable. The system will continue to retry up to the number of retries that have been configured. |
Wakeup status |
The wakeup related activity that generated the record. |
Operator |
The source that originated the activity. The originator may be a person or a system. |
Wakeup Call Engine Configuration
The Wake Call Engine has several settings that can be adjusted in order to suit the needs of the property. Please contact BroadSoft to have the wakeup call engine settings changed.
Setting |
Purpose |
Default value |
Property identifier |
Indicate which property is being configured. |
|
Hospitality wakeup |
Enable the hospitality wakeup call system |
Yes |
Time format |
Setup the time format for the wakeup call engine |
HHMMSS |
Date format |
Setup the date format for the wakeup call engine |
MMDDYYYY |
Auto cancellation On/Off |
Turn the auto cancellation feature described below On/Off |
Yes (On) |
Auto cancellation time limit |
Setup the number of minutes to allow before automatically cancelling a wakeup call that could not be placed for any reason (such as a down connection) |
15 Minutes |
Number of retries |
Indicate the number of times the wakeup call engine should attempt to call the guest in the event that the guest does not answer |
3 |
Retry time interval |
Indicate the number of minutes between retry attempts when a guest does not answer a wakeup call |
1 minute |
Email alert |
Enable the email alerts that indicate when a guest failed to answer a wakeup call or when a wakeup call could not be placed |
Yes |
Email addresses for alerts |
Indicate the email(s) address(es) to receive email alerts for failed wakeup calls |
No email addresses |
Extensions to receive phone alerts |
Indicate the hotel phone extensions to receive automated alerts when a wakeup call was unanswered or could not be placed |
No phone extensions |
Snooze time |
Indicate the number of minutes to wait before ringing the phone again after the guest has hit a key to snooze |
10 minutes |
Audio file location |
Specify the location of the wakeup call wav files. |
|
Interactive Voice Recording System
Hospitality portal has interactive voice records (IVR’s) that are used for the room status updates and automated wakeup calls, and mini-bar; see below for further details of each IVR.
Hospitality Portal Room Status
The hospitality portal room status functionality allows the housekeeping staff to use the phone system within the guest room to report the physical condition of the room back to the PMS and to the hospitality portal.
To access the hospitality portal room status functionality from the guest room:
- Dial the room status access code Ext 8003 from the guest room phone.
- An IVR will request the status of the room followed by #:
- Enter room status (Example values below - can vary by PMS/Property)
- 1 = Vacant ready
- 2 = Vacant clean
- 3 = Vacant dirty
- 4 = Occupied clean
- 5 = Occupied dirty
- 6 = Maid in room
The room status IVR also has the ability to require each housekeeping staff to log in prior to changing the status of a room. This will be done as follows:
- Dial the room status access code (for example, *01) from the guest room phone.
- A series of Interactive Voice Recordings (IVR’s) will request information
- Language preference: (example)
- 1 = English
- 2 = Spanish
- Employee ID and #
- PIN number and #
- Room status (example values below) followed by the # (see further details*)
- 1 = Vacant ready
- 2 = Vacant clean
- 3 = Vacant dirty
- 4 = Occupied clean
- 5 = Occupied dirty
- 6 = Maid in room
- Confirm selection
- 1 = Correct
- 2 = Incorrect
Use the keypad on the phone to reply with the following:
In the event that an invalid response is entered, the IVR will request another response. The IVR will read back the description matching the code that has been entered and request verification of the status before disconnecting.
Note: Upon installation, BroadSoft will setup the room status values to match the values recognized by the PMS and PBX. To have the values changed, please contact Support.
Hospitality Portal Mini Bar
The hospitality portal Room Status functionality allows the housekeeping staff to use the phone system within the guest room to record the mini bar items that have been consumed by the guest. The information is processed by hospitality portal according to the pricing already setup in hospitality portal and the quantities entered by the housekeeping staff. Hospitality portal then sends a posting record to the PMS and records the transaction in the hospitality portal.
To access the hospitality portal mini bar functionality from the guest room:
- Dial Ext 8001 from the guest room phone. See note below.* A series of interactive voice recordings (IVR’s) will request information Use the keypad on the phone to reply with the following prompts:
- Language preference:
- 1 = English
- 2 = Spanish
- Employee ID and #
- PIN number and #
- Mini bar item code and # (see below*)
- Confirm selection:
- 1 = Correct
- 2 = Incorrect
- Mini bar item quantity consumed and #
- Confirm selection:
- 1 = Correct
- 2 = Incorrect
- Continue with another Iitem:
- 1 = Enter another mini bar item
- 2 = End of mini bar items
In the event that an invalid response is entered, the IVR will request another response. The IVR will read back the description matching the code that has been entered and request verification of the status before disconnecting.
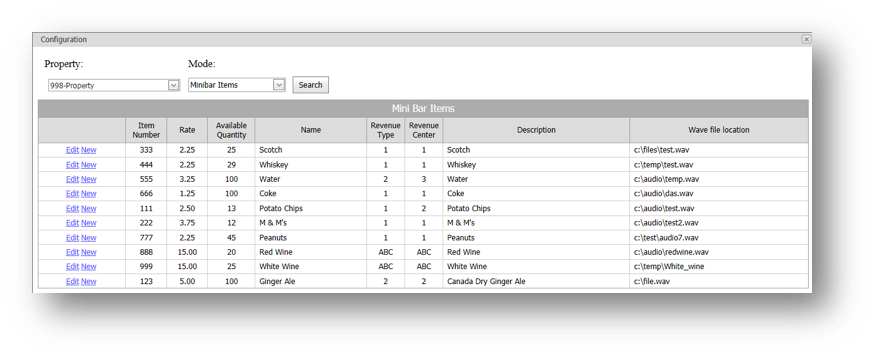
To see what mini bar items are currently configured, go to the hospitality portal and click on Configuration. In the configuration screen, select the property and click Search. If configuration is not an option on the reservation screen, check to see if the user id accessing the screen has permission to view and modify the configuration.
Under configuration select your property and click Search, the mini-bar items will display:
Hospitality Portal Wakeup Calls
The guest has the ability to schedule or cancel his/her own wakeup call using the guest room phone. Typically, most hotels will configure a speed dial button on the guest phone that accesses the wakeup call system. BroadSoft can work with the PBX vendor to configure the wakeup call functionality to point to any extension.
To access the hospitality portal wakeup call functionality from Phone:- Dial Ext 8002 from the guest room phone. (Generally this is a preprogramed button on the phone)
A series of interactive voice recordings (IVR’s) will request information from the guest. The guest should use the keypad on the phone to reply with the following:
Wakeup IVR prompts for wakeup scheduling- Schedule for wakeup
- 1 = Schedule for today
- 2 = Schedule for tomorrow
- 3 = Schedule for remainder of stay
- 4 = Cancel all wakeups
- Time for wakeup in four digit format
- e.g. 2:00 o’clock = 0200 #
- 3) AM/PM Selection
- 1 = AM
- 2 = PM
- Confirm Selection
- 1 = Correct
- 2 = Incorrect