
 Print and share
Poly VVX Quick Start Guide
Your Desktop Device

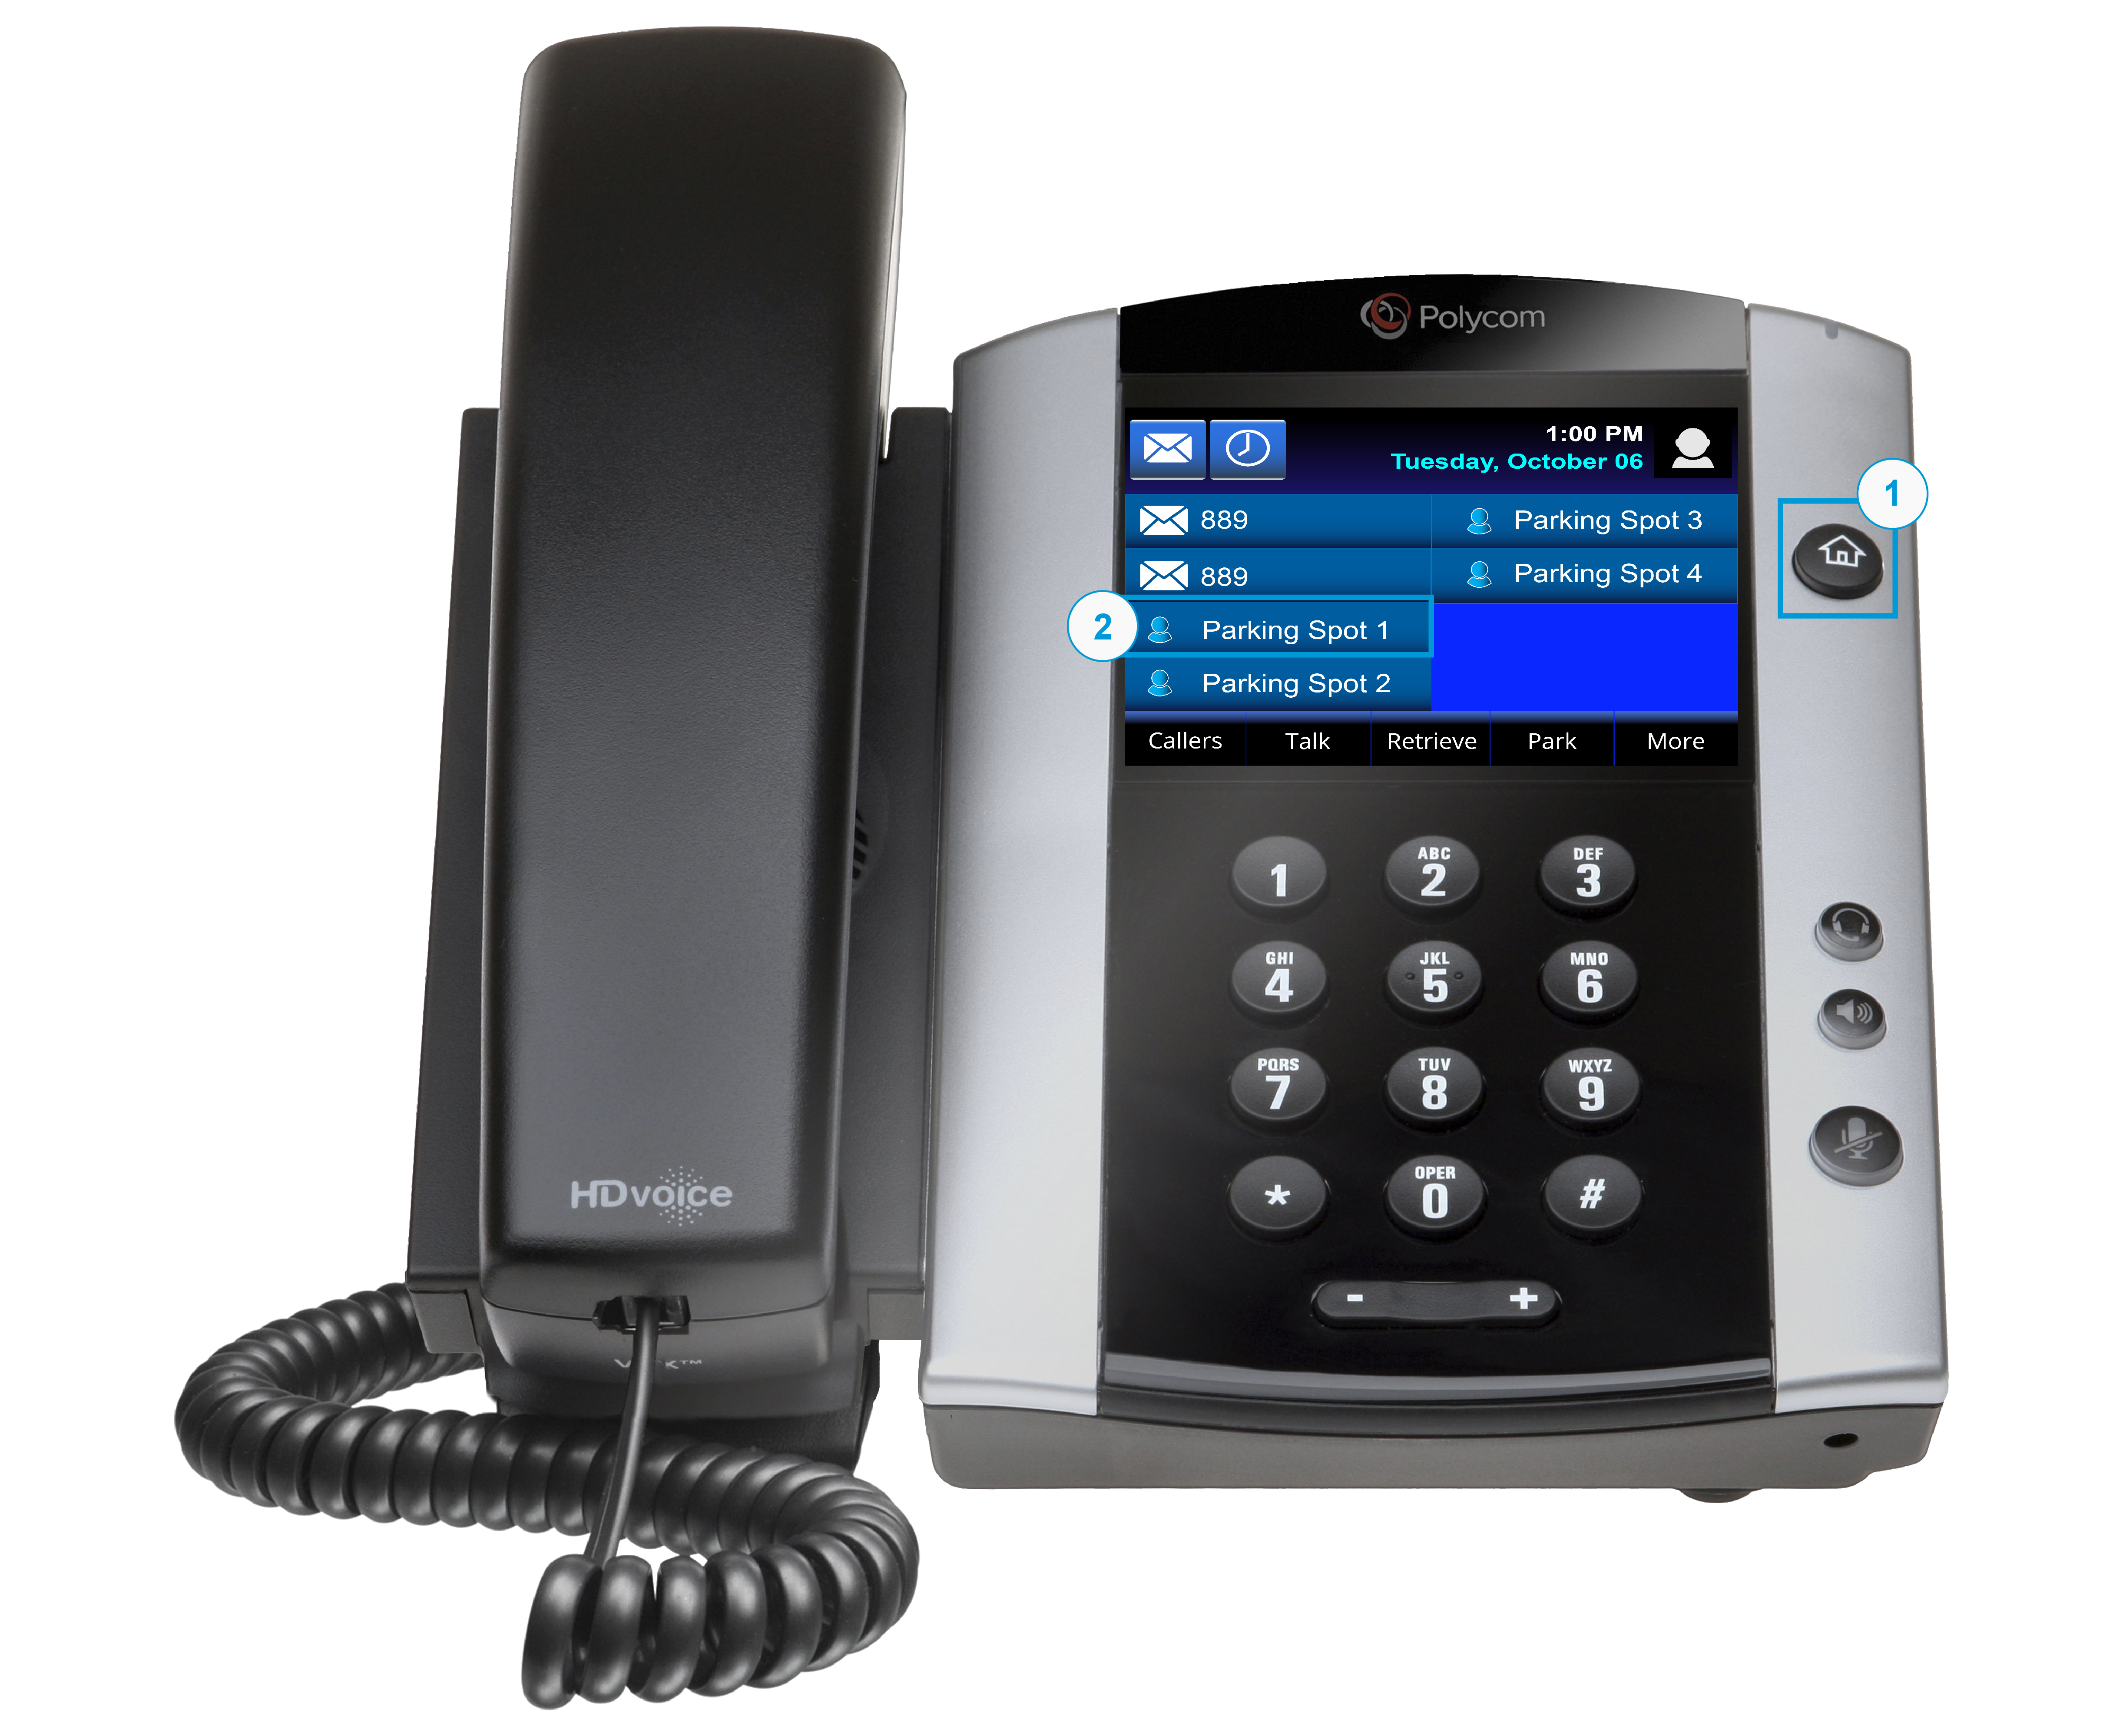
- Voicemail Indicator
- The indicator is on the upper right corner of the phone. The light flashes red to indicate new messages.
- Home
- Home is the closest button to the top edge of the phone along the right edge. Press from any screen to return to home screen.
- LCD Touchscreen
- The LCD touchscreen is a smooth rectangular area in the top half of the center of the phone. The touchscreen provides useful information and access to advanced features.
Note: VVX301/311 does not have a touchscreen. Note: The LCD touchscreen is not accessible to visually impaired users.
- The LCD touchscreen is a smooth rectangular area in the top half of the center of the phone. The touchscreen provides useful information and access to advanced features.
- Softkeys
- These are displayed at the bottom of the LCD touchscreen, which is the smooth rectangular area in the top half of the center of the phone. These keys perform the labeled function. They are context-sensitive and may change depending on the state of the phone.
- Function Buttons
- Headset, Speaker and Mute keys. These keys are located along the right edge of the phone.
- Volume Control
- The volume key is located at the bottom of the phone below the dial pad. This key adjusts the volume of the handset, headset, speaker and phone's ringer.
- Microphone
- The microphone port is on the bottom, right-hand side of the phone.
- Key Pad / Dial Pad
- The dial pad is located on the bottom half of the phone.
- Speaker
- The speaker is the handset on the left-hand side of the phone. The speaker provides ringer and hands-free (speakerphone) audio output.
- Headset
- Your phone supports wired and wireless headsets, including electronic hookswitch (EHS) headsets. VVX 600/601 also support Bluetooth headsets. For connection directions, refer to your headset documentation. Standard headsets typically use the RJ-9 and Serial port. These ports are located at the bottom on the back of the phone (shown on the image below).
Note: VVX301/311 softkeys are displayed below the screen.
Note: VVX301 also includes Transfer, Messages and Hold keys to the left of the keypad.

Using Your Desktop Device
- Placing a Call
- First, dial number. Then, pick up handset. For hands-free speakerphone – dial number, then press the Speaker button or press Dial softkey.
- Answer a Call
- Pick up handset. For hands-free speakerphone, press the Answer softkey or press the Speaker button.
- Dial a Number From Your Directories
- From the Home View, select Directories, then select Contact Director. Select contact, then the number from the Contact Information Screen.
- Dial a Number From Your Recent Calls
- From Home View, select Directories, then select Recent Calls. Press Sort or
 to sort and order calls; Press Type or
  to display only certain calls. Select a call record to call the person.
Note: The Sort and Type are examples of icons visible on the LCD touchscreen. The touchscreen is not accessible to visually impaired users.
- From Home View, select Directories, then select Recent Calls. Press Sort or
- Placing a Call on Hold
- From Lines, Calls or Active Call view, press the Hold softkey or function button. To retrieve the call, press Resume softkey or Hold function button again.
- Call Park/Call Retrieve
- Call Park places a call on hold so that other users assigned to Call Park service can retrieve that call from any phone in office.
- To Park: Press Hold and then *68, or just press Park softkey (the Park softkey does the same thing as HOLD and *68). Enter the extension where the call will be parked, and then press #.
- To Retrieve: Pick up Handset, press *88 or the Retrieve softkey. Enter the extension where the call was parked then #.
- Transferring a Call
- Announced Transfer: Press the Transfer softkey or function button to place active call on hold. Dial the number where you want to transfer the call. Once the third-party answers, announce the call and press Transfer softkey or function button.
- Blind Transfer: Press the Transfer softkey or function button to place active call on hold. Press Blind softkey (If you don’t see Blind, press More softkey,) Dial the number where you want to transfer the call.
- Transfer to Voicemail: Press the Transfer softkey or function button to place active call on hold. Next, enter *55 and dial the party’s extension, then #.
- Mute a Call
- Press Mute function button to silence your phone’s mouth piece and speaker. To turn mute off, press Mute again.
- Listening to Voicemail
- Press Messages from Home View or press Messages function button. Press Message Center, then Connect. Your phone will ring your Voice Portal. Enter your passcode, then #. Follow voice prompts to listen to delete/save messages.
- 3-Way Conferencing
- Place the first call. Then, press the Confrnc softkey to place the next call and dial the number. The active call will be on hold. (If you don’t see Confrnc softkey, press More softkey.) After the second call answers, press the Confrnc softkey again to join all parties in the conference. All parties will be disconnected when you exit the call.
- Press End Call to remove you from the call, but keep the other participants connected.
- Press Manage to manage each participant.
- Tap Split to end the conference and hold all participants.
- Forwarding Calls
- Press the Forward softkey from Home or Lines view. Select forwarding type and enter the number where you want your calls forwarded and press Enable softkey. Calls Forwarded will be displayed on LCD screen. To turn off Call Forwarding, press Forward from Home or Lines view. Select Forwarding type, and press Disable softkey.
Visual Call Park
Visual Call Park is an optional Unified Communications functionality. Once requested, the appearance of the available Visual Call Parks are represented in the line keys / Busy Lamp Field (BLFs) on every phone that’s in the customer’s location. It is either vacant or occupied (with a parked call).
Everyone on the site sees the same parking spots and their status (whether a call is parked or not), and can either park a call in a vacant spot, or retrieve a call from an occupied spot.
For consistency, all phones in the location must be provisioned precisely the same way, in this case being the Poly VVX 501. The client must also select between 4 parking spots (up to 12 phones per site), or three parking spots (up to 16 phones per location).
Note: Visual Call Park is only available for the Poly VVX 501 & 450 desktop phones.
To use Visual Call Park, while on an active call:
- Press the Home Button, so the Line Key view is displayed. Here you will see your available Visual Call Park spots.
- Proceed to park the call at any vacant call park spot by tapping the Visual Call Park spot.
- Once this is complete, the call will be parked and indicated by the letter “P” enclosed in a yellow circle.
- Once the call is parked, everyone in the location can see the parked call occupying the parking spot.
- Any user can then retrieve the call to his / her line freeing up that spot.
- To retrieve the Parked Call, press the corresponding line key.

Key Expansion Module
The Poly VVX Expansion Module broadens the usefulness of Poly VVX Desktop phones with additional multifunctional line keys.
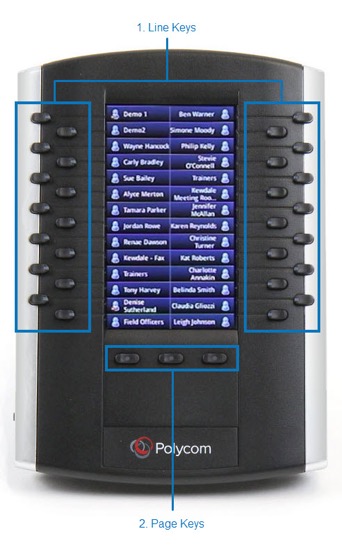
- Line Keys
- Line buttons are located on the sides of the display. These buttons are used to view calls on a line or access speed dials or show call appearances.
- Page Keys
- The Page keys are used to switch pages of line key options.
Your Add-On Cordless Device


- LED Indicator
- The LED Indicator flashes to indicate an incoming call, missed call, or new voicemail.
- Soft Keys
- The Soft Keys allows you to select a menu item displayed above the key.
- Navigation / OK Button
- Use the navigation arrow to Increase or decrease the ringer volume, scroll through menus, or move the cursor within fields. Press OK to enter the main menu, select a highlighted item, or save an entry or setting while in a menu.
- Talk Button
- The Talk Button allows you to place or answer a call or view recent calls.
- End Button
- The End Button allows you to hang up during a call or cancel the handset software update. The End Button also allows you to power of the unit by long-pressing the button.
- Speakerphone Button
- The Speakerphone Button allows the user to place or answer a call using the wireless handset speakerphone. The user can also switch between the wireless handset speakerphone and the wireless handset earpiece during a call.
- Mute Button
- The Mute Button allows you to mute or unmute the microphone during an active call.
- Redial Button
- The Redial Button allows you to access the redial list.
- Charging Cradle
- Place the wireless handset in the cradle to charge.
- Status Indicator
- Indicates whether the handset is charging, or the phone is in use.
- Find Button
- Press to locate the registered wireless handsets. Also, press and hold for a few seconds to register the wireless handset to the base station.
- LAN Port
- Allows a computer to connect to a network using a wired connection. The LAN Port is also used for Power Over Ethernet connectivity allowing the phone to function without the Power Adapter.
- PC Port
- Allows you to pass through Ethernet connection to a nearby PC.
- Reset Button
- Allows you to reset the base device.
- Power Supply
- Connect the power adapter to the base station if Power over Ethernet (PoE) is not available.
Using Your Add-On Cordless Device
- Placing a Call
- First, dial number. Then, press the Talk Button. For handsfree talking, dial number and then press the Speakerphone Button.
- To place a call using an alternative line press Lines and then select the desired number. Dial a number and press either the Talk Button or the Speakerphone Button.
- To place a call during an active call, press the New Call soft key, dial a number and then press the Call softkey.
- Answering a Call
- Press the Talk Button or for handsfree talking, press the Speakerphone Button.
- Directories
- The Poly VVX D60 Wireless Handset can access the phone’s Contact Directory and/or Corporate Directory (if available on the phone). Press the Left Navigational Arrow. Select from the directories available. Locate the contact using the Up and Down Navigational Arrows.
- To view Contact Details, select the contact. Press Options. View Details.
- To add a number to a Directory, Press the Left Navigational Arrow. Select Add New Contact. Enter First/Last Name. Press the Down Arrow. Enter a valid number. Press the Down Arrow. Press Save.
- Placing a Call on Hold
- While on an active call, press Options. Select Hold.
- Resume a Call That Was Placed on Hold
- While a call is on hold, press Options. Select Resume.
- Ending a Call
- Press the End Button.
- Redialing a Call
- Press the Redial button. Then navigate to the button you want to call. Press the Talk Button
- Muting a Call
- During an active call, press Mute. To unmute a call, press the Mute button again.
- Volume Control
- During an active call, press the Up-Navigation Arrow to increase the volume. press the Down-Navigation Arrow to decrease the volume.
- To Set a Speed Dial Contact
- Press the Left Navigation Arrow and then select Speed Dial List. Select an empty speed dial slot and choose a Directory Contact or enter a contact manually.
- Directory Contact: If this option was selected, enter the contact first or last name to search the directory (or navigate using the navigation arrows) and press Save.
- Manual Entry: Enter the contact's number. Press Save.
- Speed Dial Calling
- Press the Left Navigation Arrow and then select Speed Dial List. Select the desired speed dial. Press Options, then Call.
- Transferring Calls
- You can transfer a call to another wireless handset, to a directory contact, or to a designated number.
- Announced Transfer: Press the Transfer Soft Key while on an active call, Dial the number or select a number from your directory. Press Transfer. This connect you to the recipient. After your initial talk, Press Transfer again to complete the act.
- Blind Transfer: From an active call, press Options. Select Blind Transfer. Enter the number of the desired party and press Transfer.
- Intercom Call
- You can create an intercom call with another wireless handset to quickly send an announcement. Press Menu. Select Intercom and choose the wireless handset you wish to connect with. Press the End Button once finished.
- To place an intercom call while on an active call. Press New Call, select Intercom and choose the wireless handset you wish to connect with. Press the End Button once finished.
- Conference Calls
- To initiate a conference call while on an active call, press Options. Select New Call. Either enter a number or chose a number from your directory. Press the Talk Button. After the new call has been answered, press Options. Select Conference. The two lines should not be connected.
- Splitting: To split the conference into two calls on hold, press Split while in the conference. Select the call of the conference you would like to talk to and resume.
- Joining Calls: With one active call and one call that was place on hold, press Options and navigate to Conference and then press Select.
- Call Parking and Retrieving
- You can park the current call and retrieve it on another wireless handset or phone by entering the dedicated retrieval code.
Note: This feature is only available for lines registered with the Spectrum Enterprise Hosted Voice Server.
- Parking Calls: During an active call, press Options. Select Call Park. Enter a valid extension you want to park the call. Press the End Button.
- Retrieving Calls: Dial Star (*) 88. Dial the extension number in which the call was parked. Press the Pound (#) Key.
- You can park the current call and retrieve it on another wireless handset or phone by entering the dedicated retrieval code.
- Call Logs
- You can view the following types of call entries in the Call Logs:
- Missed calls – Record of calls that have been missed by the user.
- Received calls – Record of calls that have been received by the user.
- Dialed calls – Record of calls made or dialed by the user.
- Recent calls – Mixed record of the missed, received, and dialed calls.
- Remotely Answered - Record of calls to a shared line that were answered on another wireless handset.
- To access these call logs, press the Right Navigation Arrow and then select your destination from the list of call logs available. To view details of a select the desire call log from the menu and then navigate to the entry in which you want to know more about. Press Options and then View Details.
- Accessing Voicemail
- Press Menu and then Select Messages. Navigate to the Message Center where you will choose a line and press Select.
- Setting Time & Date
- Press Menu and then Select Settings. Locate preferences and Select Time & Date. Select Clock Date and choose format. Select Clock Time and select format.
- Setting a Language
- Press Menu and then Select Settings. Locate preferences and Select Language. Select your desired language.
- Setting the Handset Name
- Press Menu and then Select Settings. Locate preferences and Select Handset Name. Enter desired name. Press Save.
- Setting Ring Type
- Press Menu and then Select Settings. Locate preferences and Select Ring Type. From here you can either set the External Ring or the Internal Ring Type. As you scroll through the list a sample sound will be played. Choose a Ring Type.
- Enabling & Disabling Keypad Tones
- Press Menu and then Select Settings. Locate preferences and Select Keypad Tones. Choose either Turn On or Turn Off.
- Wireless Pairing
- After the VVX D60 Base Station is paired with the VVX business media phone, you can register up to five wireless handsets to the base station.
Note: Spectrum Enterprise sets the number of registered handsets based on the customer order. It is not possible to registered additional handsets beyond those ordered.
- Press Menu and then Select Settings. Select Features and locate the Registration function. Select Register. Press and Hold the FIND button on the base. Select YES to confirm.
- After the VVX D60 Base Station is paired with the VVX business media phone, you can register up to five wireless handsets to the base station.
Voicemail Setup
- Record Name
- Press Messages from Home View or press Messages function button. Press Message Center, then Connect.
- Enter your PIN provided on your User List and Login Credentials. (Press * if you need to access another voicemail box.)
- Press #. Follow prompts to set a new PIN. Then, press #.
- Follow prompts to verify the new PIN, then press #.
- Follow prompts to record a name announcement, then press #. At the tone, say the name of the group or a brief two or three-word description and press #. (This is a name announcement and not one of the two main voicemail greetings supplied with the service.)
- You will be asked if you are satisfied with your name recording. If yes, press *. If no, follow prompts to re-record.
- Press 1 to access your voicemail box.
- Record Busy Greeting
- A busy greeting plays when your phone is in Do Not Disturb mode or unplugged.
- Press 2. Then, press 1. Wait for the tone, and then record your “busy greeting.”
- Press # immediately after finishing.
- Press 2 to listen to your greeting or press * to get back to the previous menu.
- Record No Answer Greeting
- Press 3. Then, press 1. Wait for the tone, and then record your no-answer greeting.
- Press # immediately after finishing.
- Press 2 to listen to your greeting or press * to get back to the previous menu.