Print and share
Call Center Routing Policies
The call center routing policies allow you to configure the various routing features of call centers. Not all features listed below are available for every call center type (only Premium Call Center has all listed features). There are up to seven call center routing policies, depending on your service, that can be configured for your call center within the Unified Communications Enterprise Portal (UCEP). The following call center routing policies are reviewed in this guide.
Uploading to the Announcement Repository
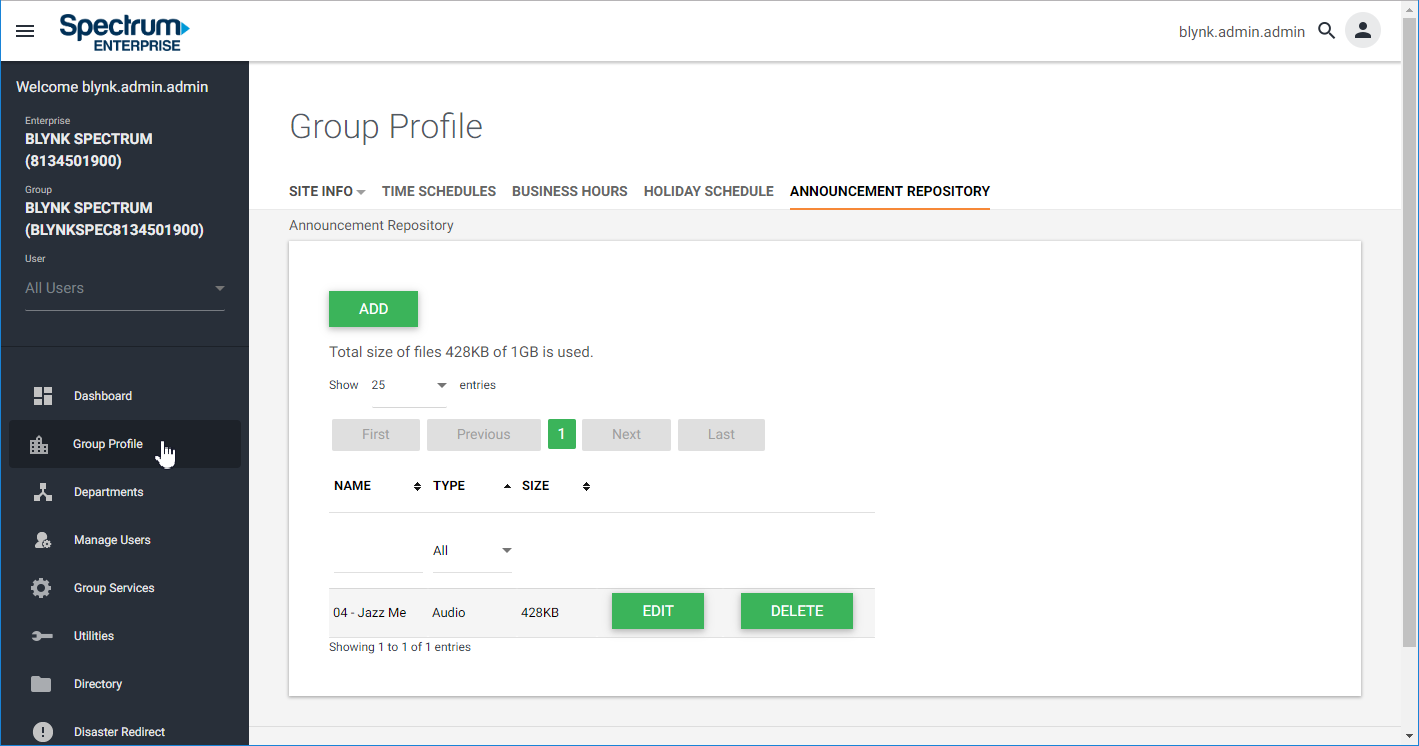
With the announcement repository, you have a common place where all your custom announcements can be viewed and maintained. In the announcement repository, announcements can be shared among multiple services. You can modify an announcement with another file while the announcement is being used by services, and you can keep an announcement on the system without it being used by a service. You can also record from the voice portal to create an announcement that can be used by any service
An announcement must be added to the repository before it can be assigned to a service. To add an entry, follow these steps:
- After logging in to UCEP, select Group Profile from the left-hand navigation. Then select the Announcement Repository tab.
- On the Announcement Repository page, select Add.
- Enter the Name of the announcement. Then select Choose File to find the file saved on your computer. Select Upload to upload to the Announcement Repository. Select Save to save your changes. The announcement will now be available as a choice in the Custom field when modifying your custom announcements and greetings.
NOTE: Custom, pre-recorded greeting files must be saved in C.C.I.T.T u-law settings with 8 kilohertz, 8bit-mono attributes as a .wav file. To save a recording in this format, you may need to use a basic sound recorder.


Accessing Your Call Center Routing Policies
After logging in to UCEP, expand the Call Center drop-down on the Dashboard. Select the Settings icon next to the call center you would like to modify.
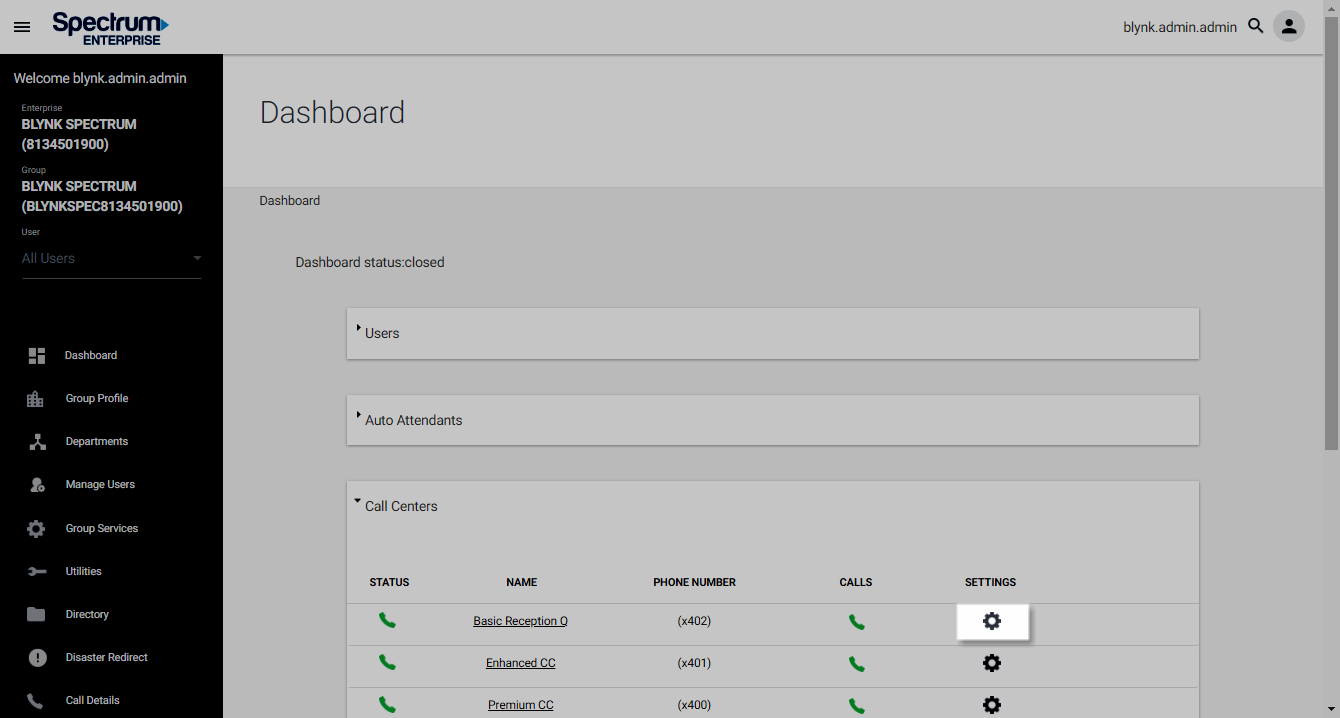
Then, select Detailed Settings.
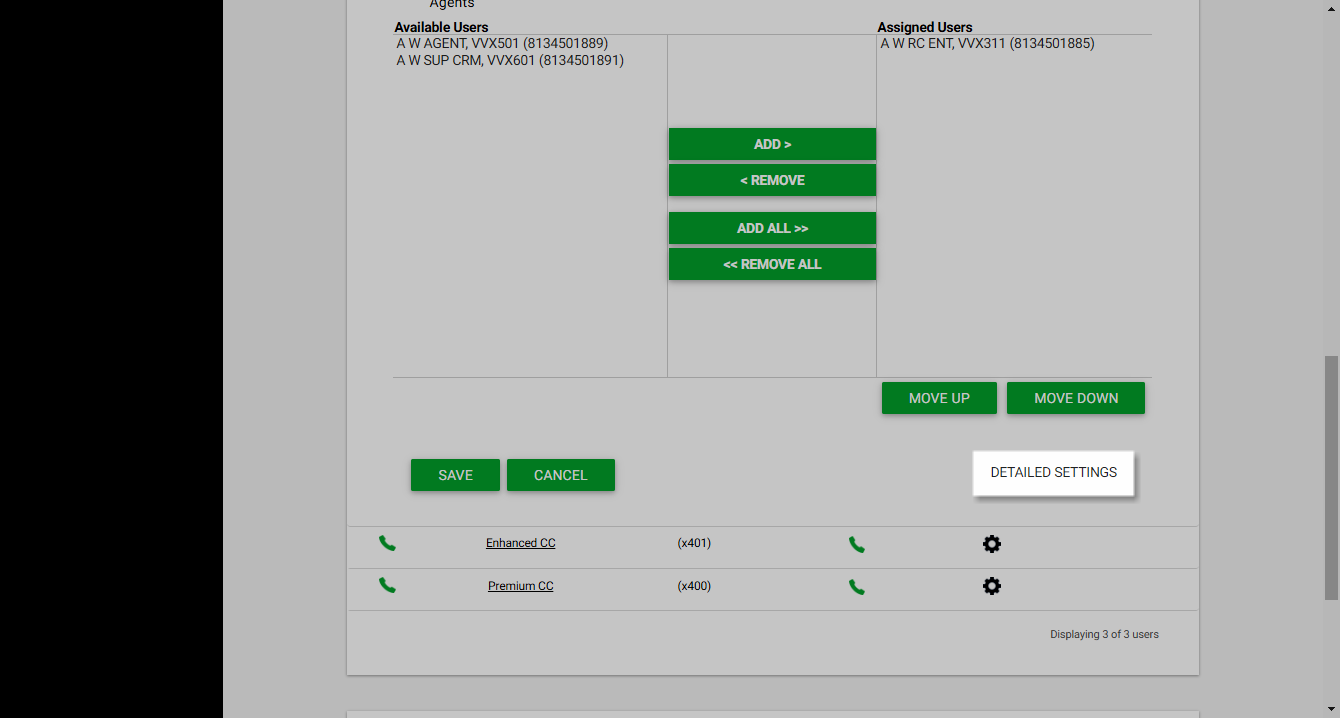
You will be brought to the Call Center Profile. From here, select Call Center Routing Policies in the left-hand navigation.
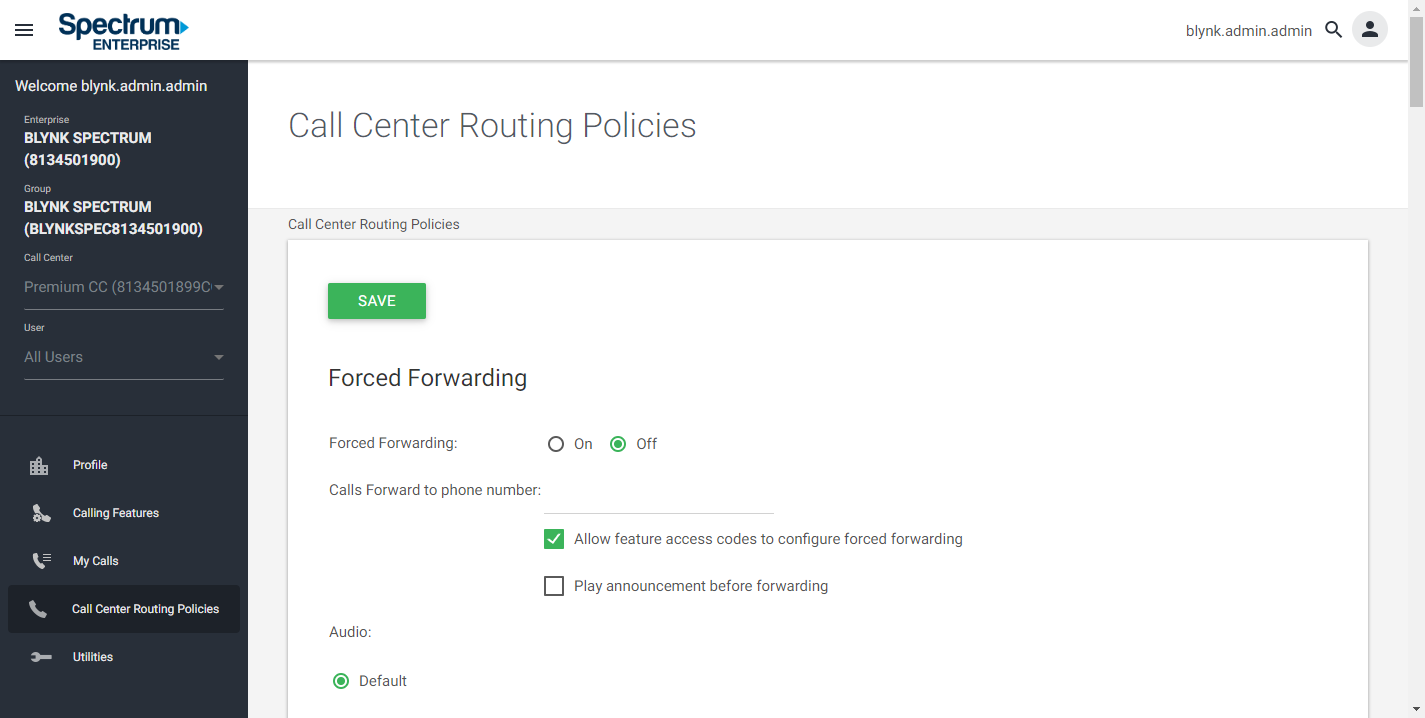
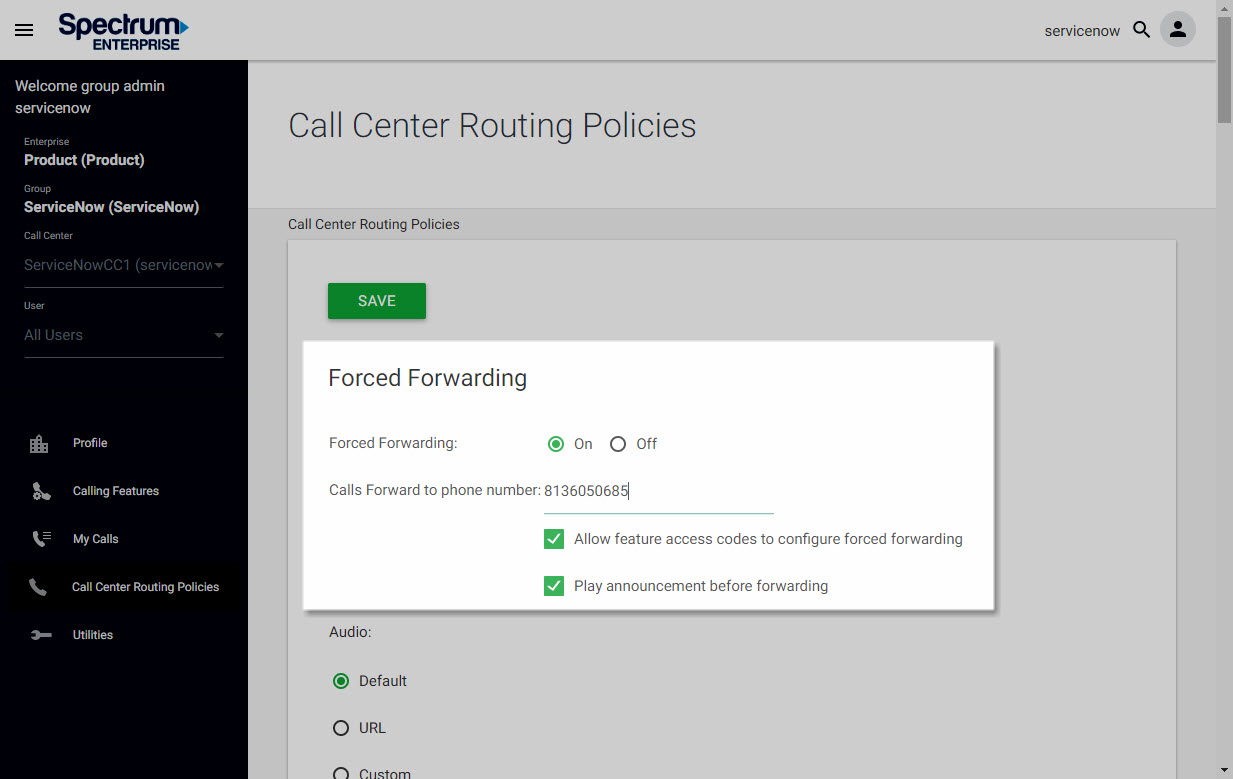
Forced Forward (Premium Call Center Only)
The Forced Forwarding feature can temporarily divert new incoming calls that come into the Call Center to a different route independent of the Night Service route. Forced Forwarding does not affect calls already in the queue. This is only available for Premium Call Centers. The following can be modified within the Call Center Routing Policies tab.
- To enable Forced Forward, select On.
- Define where you would like calls forwarded. In the Calls Forward to phone number text box, enter the number.
- Allow or forbid the use of feature access codes. Check or uncheck Allow feature access codes to configure forced forwarding.
- Check the box next to Play announcement before forwarding to enable an announcement to be played before forwarding.
- Select the audio or video file. For the Audio or Video file. Choose from the following:
- Select Default to play the system default announcement.
- Select URL and then enter the URL addresses.
- To add a custom announcement, select Custom and choose a custom file saved in your Announcement Repository.
Note: You can upload up to four greetings. These will play in sequence.
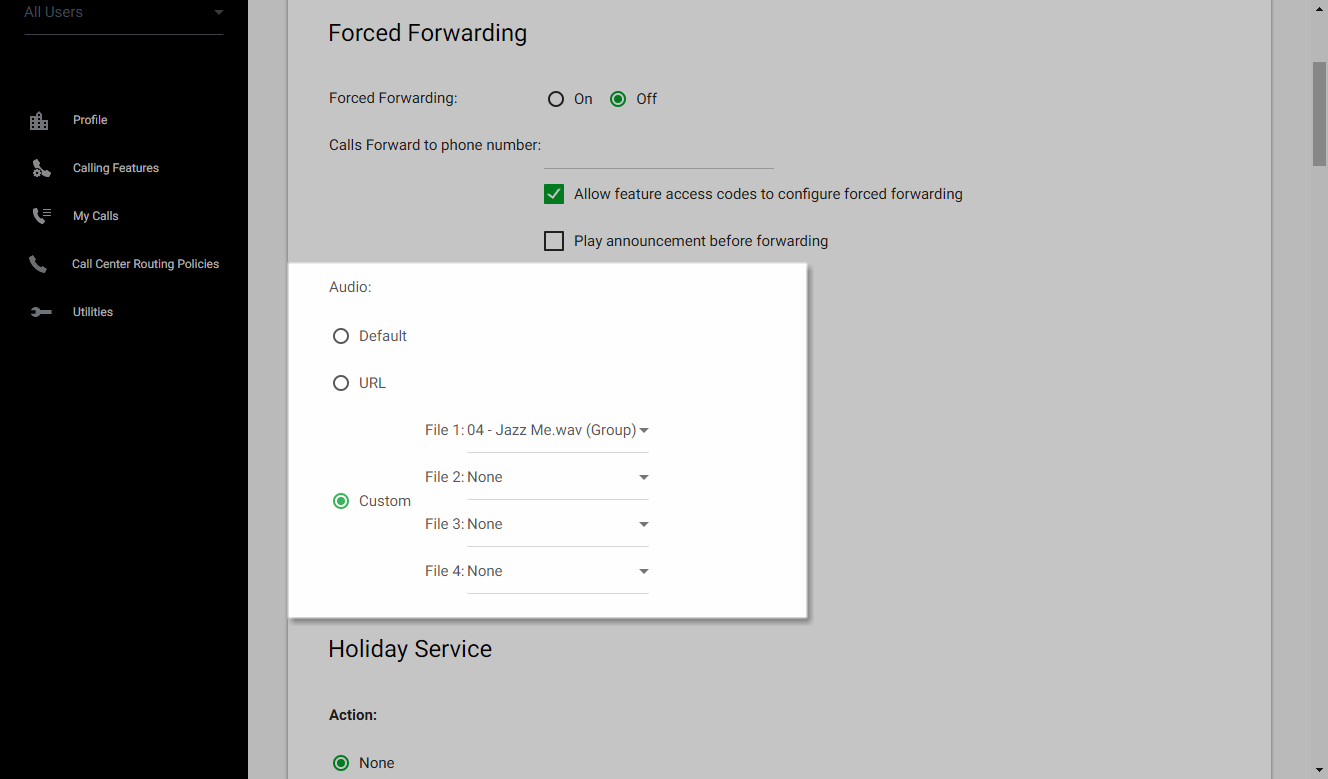
Holiday Service
The Holiday Service feature can be configured for the call center to route calls differently during the holidays.
- Configure the Action settings. Select from the following:
- None
- Perform busy treatment
- Transfer to phone number (then enter phone number)
- Select the Holiday Schedule in the drop-down menu.
- Check the box next to Play announcement before holiday service action to enable an announcement to be played.
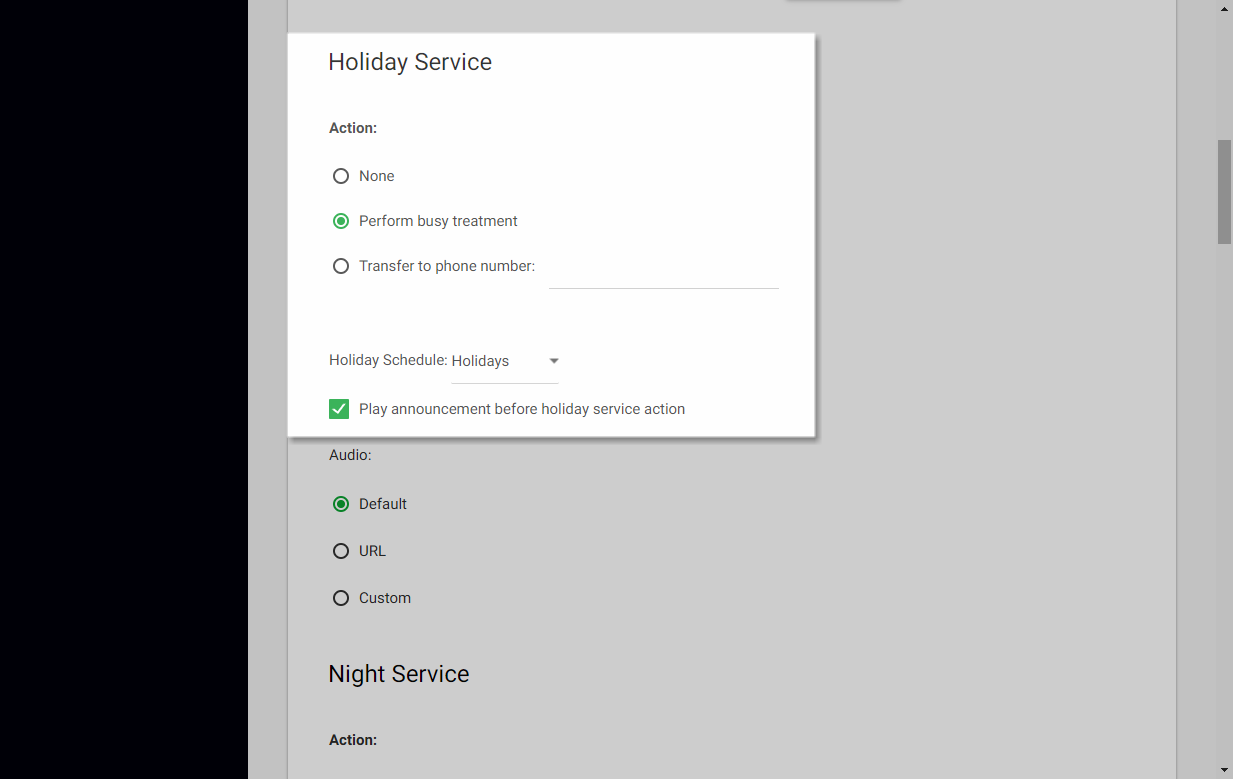
- Select the audio or video file. For the Audio or Video files. Choose from the following:
- Select Default to play the system default announcement.
- Select URL and then enter the URL addresses.
- To add a custom announcement, select Custom and choose a custom file saved in your Announcement Repository.
Note: You can upload up to four greetings. These will play in sequence.

Night Service (Premium Call Center Only)
The Night Service feature can be used to route calls differently during hours when the queue is not in service. This is determined by a schedule that defines the business hours of the queue. Night service cannot be disabled; however, it can have a schedule that defines business hours to be 24x7, which means that no night service is provided.
- Configure the Action settings. Select from the following:
- None
- Perform busy treatment
- Transfer to phone number (then enter phone number)
- Set to force night service. For Force night service now regardless of business hours schedule, select On or Off.
- Select the Business Hours from the drop-down menu.
- Define if feature access codes can override the night service. Check or uncheck Allow feature access codes to manually override night service.
- Check the box next to Play announcement before night service action to enable an announcement to be played.
- Select from the following modes for the announcement:
- Normal announcement
- Manual mode announcement
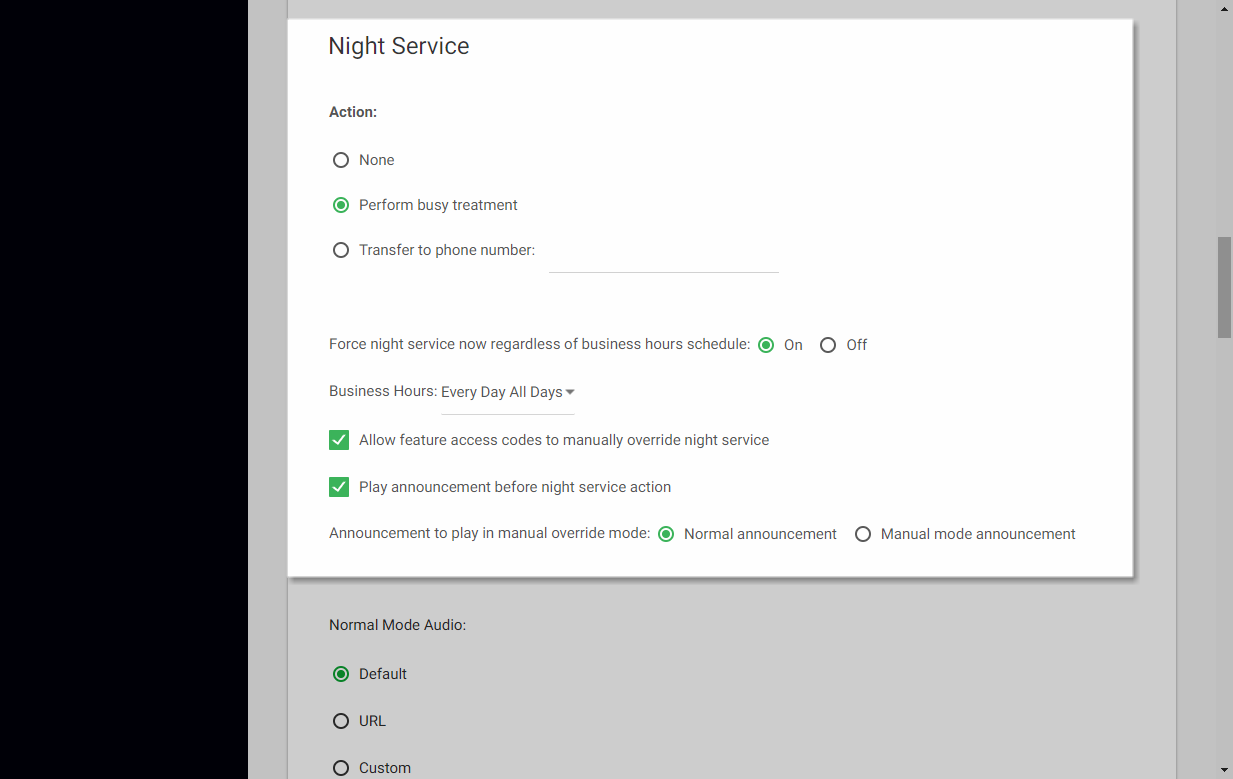
- Select the Normal Mode or Manual Mode Audio or Video file. For the Normal Mode Audio or Video files, select from the following:
- Select Default to play the system default announcement.
- Select URL and then enter the URL addresses.
- To add a custom announcement, select Custom and choose a custom file saved in your Announcement Repository.
Note: You can upload up to four greetings. These will play in sequence. Ccrp12

Bounced Calls
The Bounced Calls feature enables you to configure the call center routing policy for calls unanswered by agents.
- Select whether or not to bounce calls. Check or uncheck Bounce calls after ___ rings and then enter the number of rings in the text box.
- Select whether or not to transfer the call. Check or uncheck Transfer to phone number and then enter the number in the text box.
- Select whether or not to Bounce calls when agent is unavailable while routing the call.
- Select whether or not to Alert agent if call is on hold for longer than ___ seconds and enter the number of seconds in the text box.
- Select whether or not to Bounce calls after being on hold by agent for longer than ___ seconds and enter the number of seconds in the text box.
To keep your changes, click Save.

Comfort Message Bypass
The Comfort Message Bypass feature can configure the call center to play ringing and/or a different message instead of music and comfort messages whenever the call is expected to be answered quickly.
- Enable or disable comfort message bypass by selecting On or Off.
- Define the wait time. For the Bypass comfort message when estimated wait time is less than ___ seconds, enter the time in seconds in the text box.
- Check or uncheck Play announcement after ringing for ___ seconds and then enter the time in the text box to enable or disable if an announcement is played after ringing and then define the time.

- Select the audio or video file. For the Audio or Video file, select from the following:
- Select Default to play the system default announcement.
- Select URL and then enter the URL addresses.
- To add a custom announcement, select Custom and choose a custom file saved in your Announcement Repository.
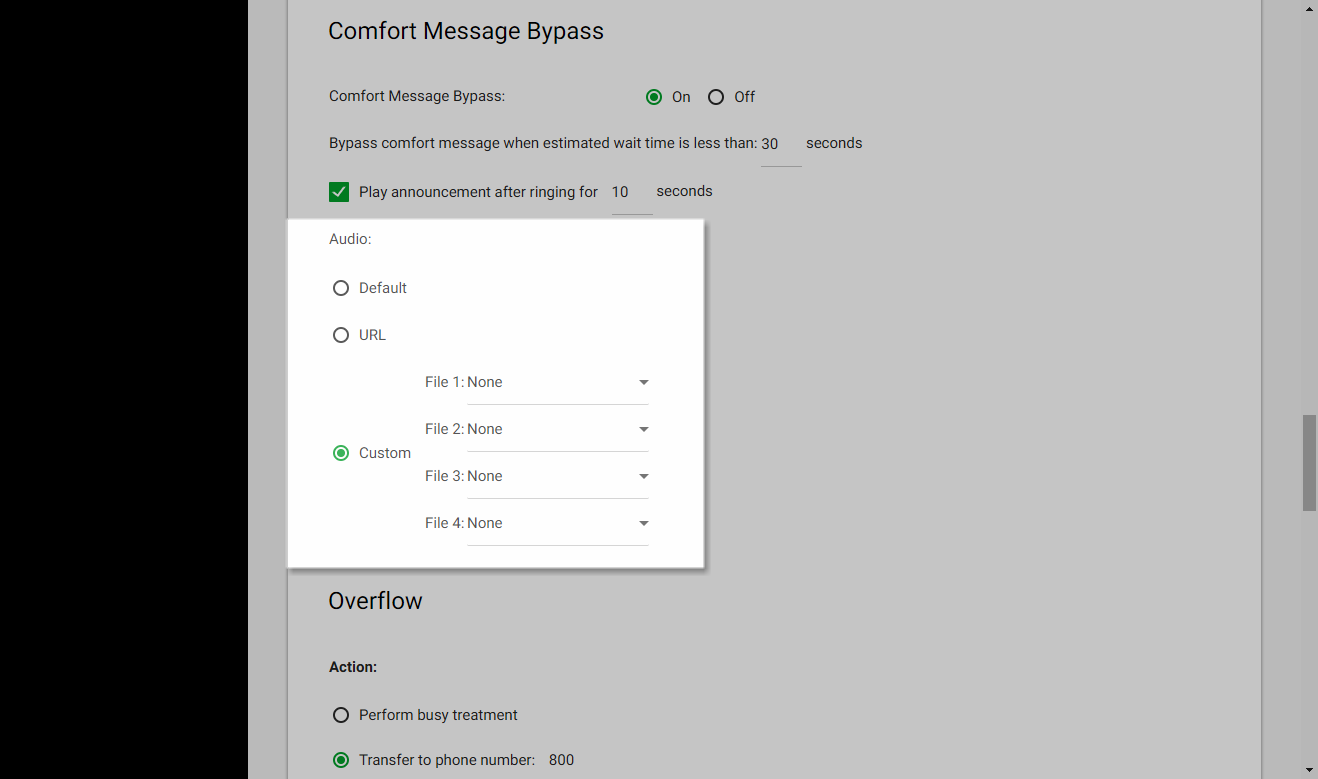
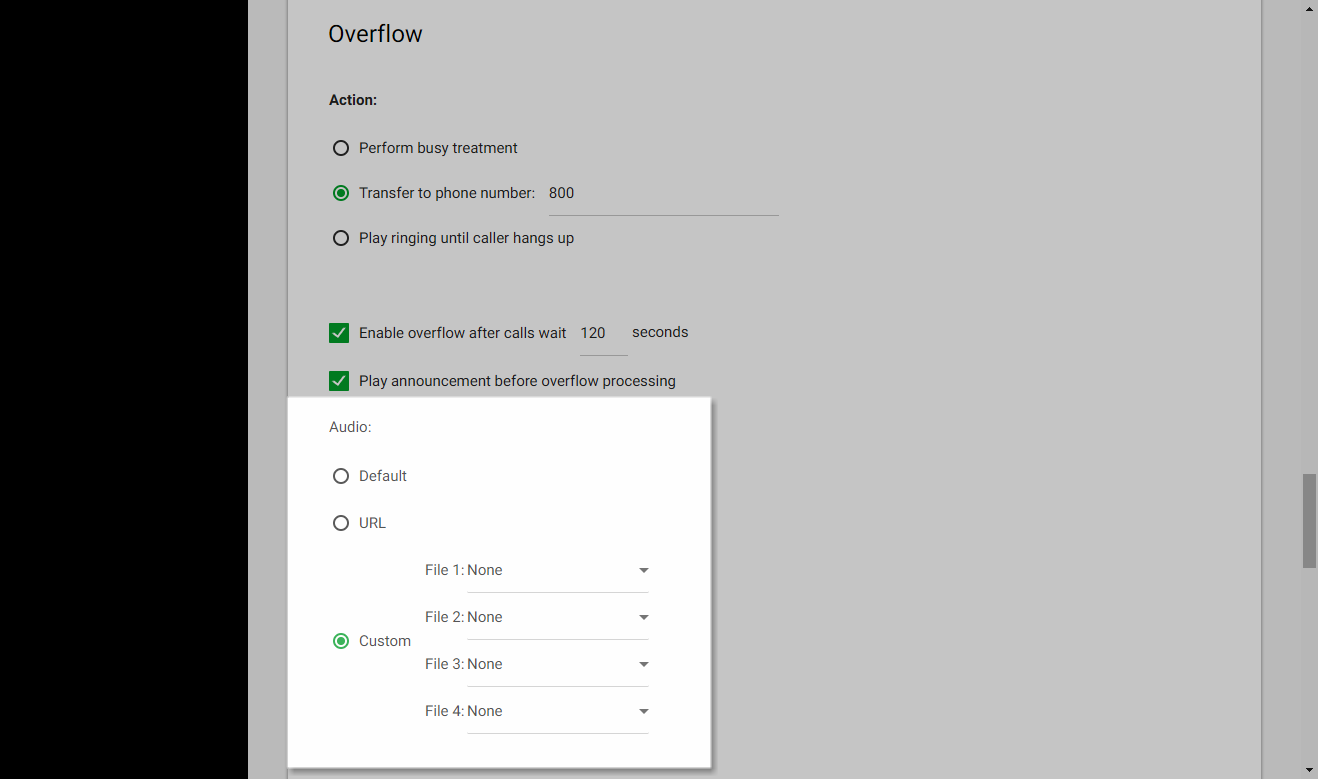
Overflow
In the Overflow feature section, you can configure the call center routing policy when a large number of calls have been received or calls have been waiting longer than the configured threshold.
- Configure the Action settings. Select from the following:
- Perform busy treatment
- Transfer to phone number (then enter phone number)
- Play ringing until caller hangs up
- Select the overflow time. Check or uncheck Enable overflow after calls, wait ___ seconds and enter the number of seconds in the text box.
- Select to Play an announcement before overflow processing.
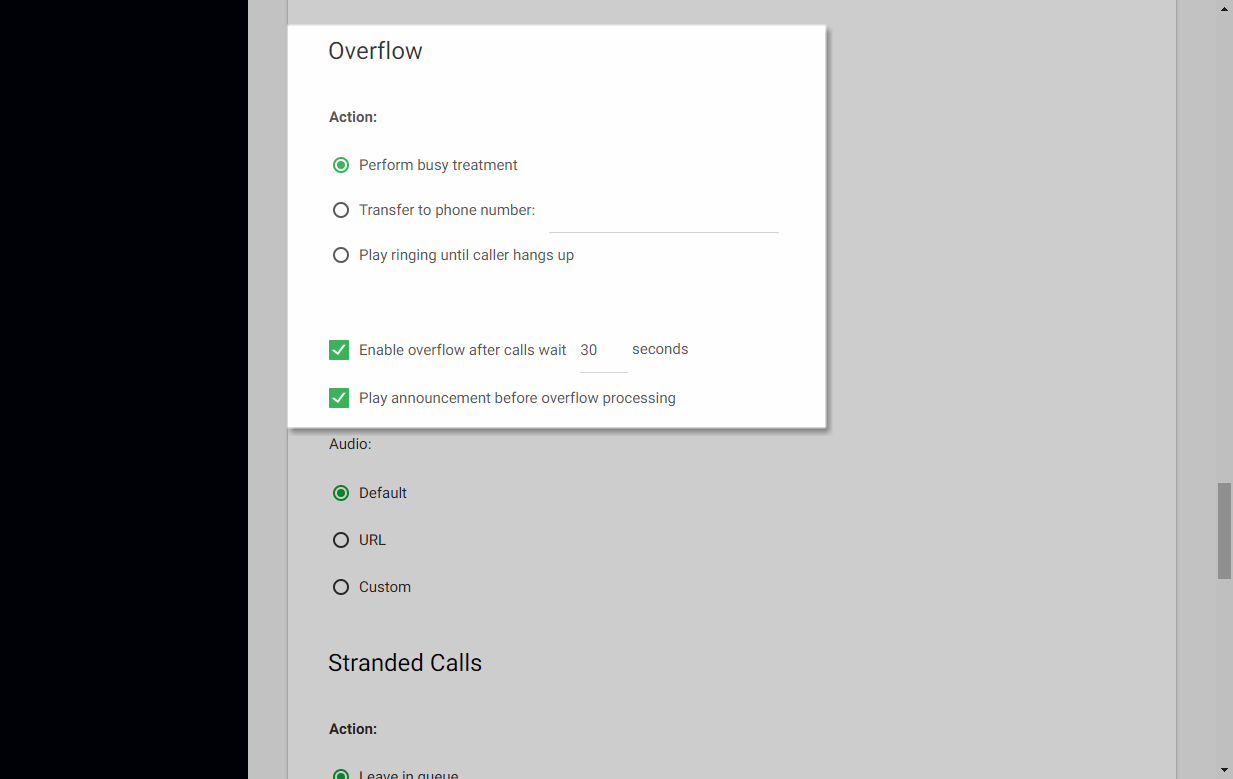
- Select the audio or video file. For the Audio or Video file, select from the following:
- Select Default to play the system default announcement.
- Select URL and then enter the URL addresses.
- To add a custom announcement, select Custom and choose a custom file saved in your Announcement Repository.
Note: You can upload up to four greetings. These will play in sequence.
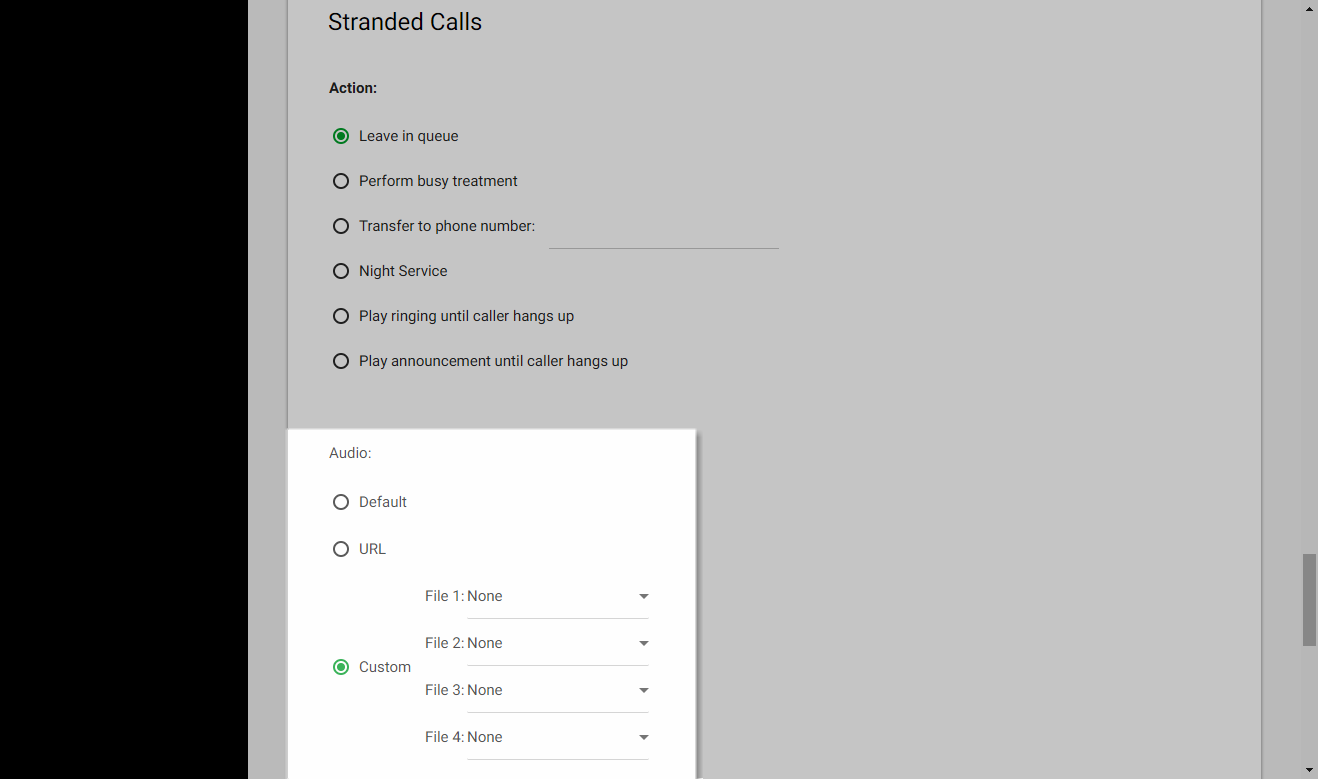
Stranded Calls
In the Stranded Calls feature section, you can configure the call center routing policy for calls stranded in queue when all agents have signed out.
- Configure the Action settings. Select from the following:
- Leave in queue
- Perform busy treatment
- Transfer to phone number (then enter phone number)
- Night Service (premium call center)
- Play ringing until caller hangs up (premium call center)
- Play announcement until caller hangs up (premium call center)
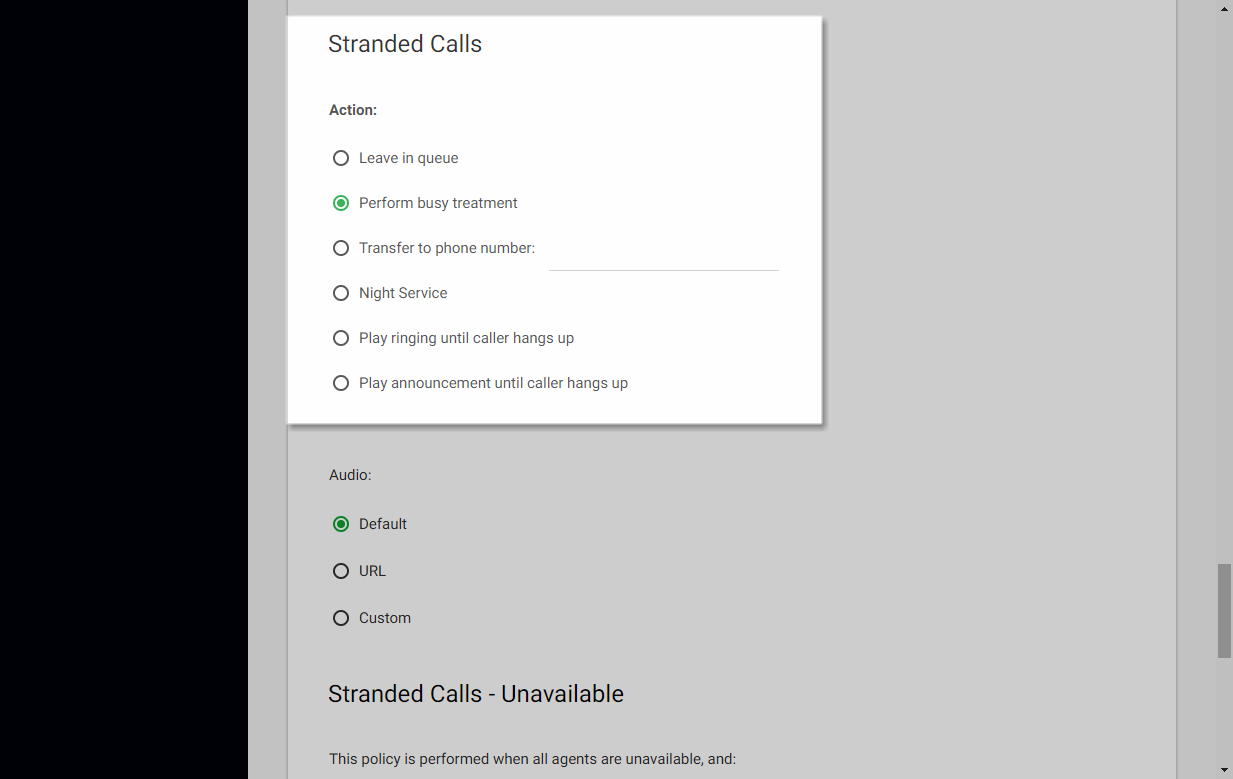
- Select an audio or video file (premium call center):
- Select Default to play the system default announcement.
- Select UR and then enter the URL addresses.
- To add a custom announcement, select Custom and choose a custom file saved in your Announcement Repository.
Note: You can upload up to four greetings. These will play in sequence.