
 Print and share
Cisco 9800 Series Quick Start Guide
Table of contents
Your Desktop Device
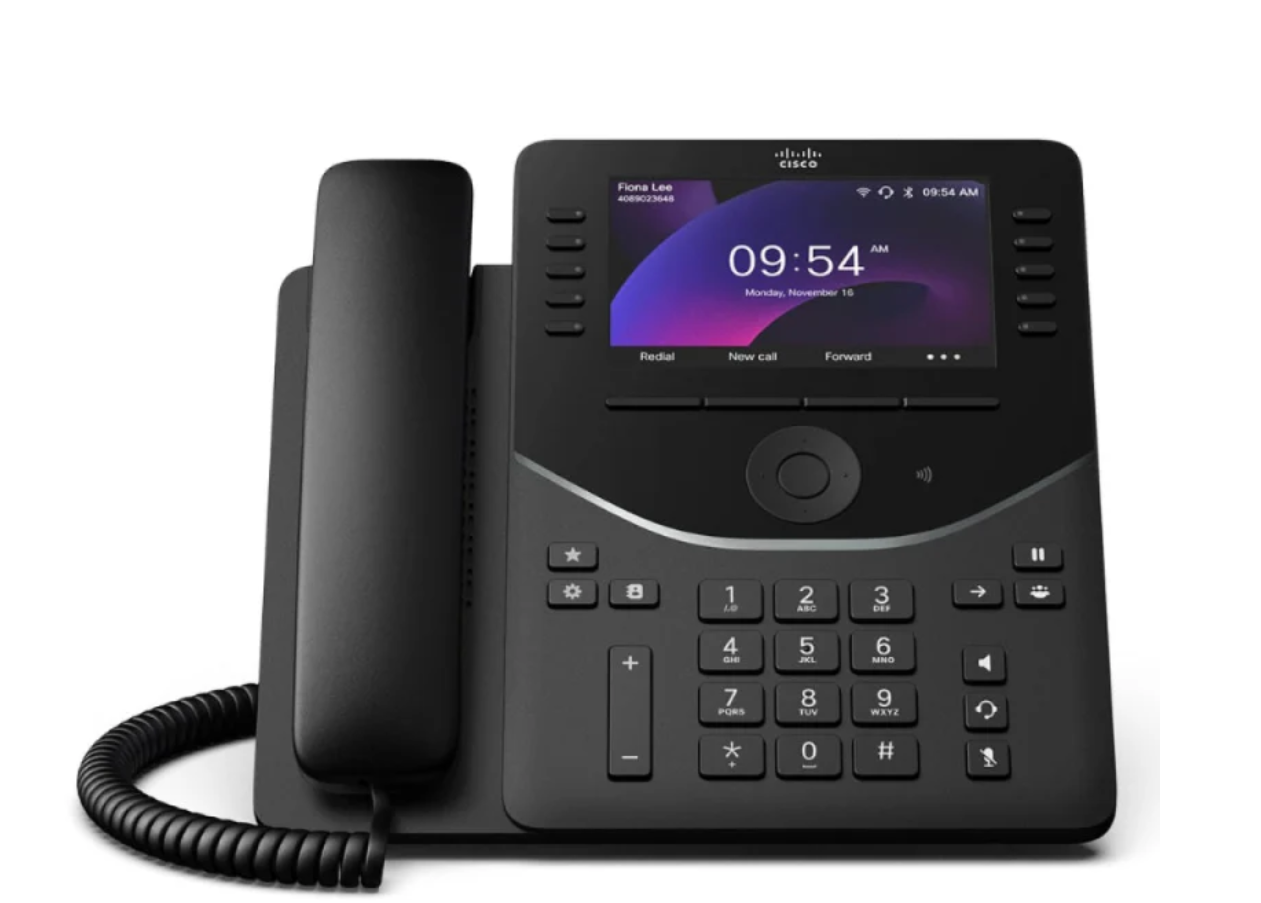
Display
The lines screen is the first screen that appears once the phone is powered on. This shows your phone lines and provides access to your directory.
Voicemail Indicator
The indicator is located in the center arc of the phone. The light flashes red to indicate new messages and other notifications.
Softkeys
The functions for the soft-key buttons appear directly above them on the display. Their functions are context-sensitive, meaning the functions of the softkey changes depending on your current activity. For example, if you are conferencing, the softkeys display functions related to the conference feature.
Navigation
All of the Cisco 9800 series phones have navigation keys. By pressing left or right, you can scroll through the options and lists on the display up or down. To select an item, press the OK button in the center of the four-way navigation arrows.
Headset, Speaker, and Mute Keys
These keys are located along the right edge of the phone and used as they are stated.
Volume Key
The volume key is located at the bottom of the phone below the dial pad. This key adjusts the volume of the handset, headset, speaker, and phone's ringer.
Transfer Button
This button will transfer active calls to another number.
Message softkey
This action gives you access to your voicemail messages.
Hold Button
This button will place a call on hold.
Line Keys
These buttons indicate the status of your lines and associated activity. The backlighting informs you when a line is idle, ringing, in use, on hold, or disconnected.
Favorites, Settings, and Contacts
- Favorites: Access Voicemail, Help Desk list, and message services, if configured.
- Settings button: Access the settings menu.
- Contacts button: Access directories.
Action button
Press the button to place a service call, such as an emergency call, if configured.
Calendar button
Tap the Calendar button to open your calendar.
Note: This button is only accessible if your administrator has set up the Calendar service on your phone.
Use Your Desktop Device
Place a Call
- First, dial the number and then pick up the handset.
- To activate the hands-free speakerphone, dial the phone number, then press the Speaker button or press the Dial softkey while the headset is resting on the cradle.
Answer a Call
- Pick up the handset.
- To activate the hands-free speakerphone, press the Answer soft key or press the Speaker button.
Dial a Number From Your Directories
- Press the Home button, and then select Directories.
- Proceed to Contact Directory.
- Select the contact, then the number from the Contact Information Screen, and then press Ok.
Dial a Number From Your Recent Calls
- Press the Home button, then select Directories.
- Proceed to Recent Calls.
- Press the Sort softkey to sort and order calls; Press Type to display only specific calls. Select a call record to call the person.
Hold and Resume
- From Lines, Calls, or Active Call view, press the Hold softkey or function button.
- To retrieve the call, press the More softkey and press the Resume softkey or Hold function button again.
Call Park / Call Retrieve
Call Park places a call on hold so that other users assigned to Call Park service can retrieve that call from any phone in the office.
To Park: Press the Park softkey. Enter the extension where the call will be parked, and then press #.
To Retrieve: Press the Retrieve softkey. Enter the extension where the call was parked, then #.
Transfer a Call
Announced Transfer: Press the Transfer button to place an active call on hold. Dial the number where you want to transfer the call. Once the third-party answers, announce the call and press the Transfer button.
Blind Transfer: Press the Transfer button to place an active call on hold. Press the Blind softkey (If you don’t see Blind, press the More softkey.) Dial the number where you want to transfer the call.
Mute
- Press the Mute function button to silence your phone’s mouthpiece and speaker.
- To unmute, press Mute again.
Voicemail
- Press Messages from the home view, then press the Connect softkey.
- Your phone will ring your voice portal. Enter your passcode, then #. Follow the voice prompts to listen to, delete, and save messages.
Call Forward
- Press the Forward softkey from the home or lines view.
- Select the forwarding type and enter the number to forward your calls to. Then press Enable softkey. Calls Forwarded will be displayed on the LCD screen.
- To turn off Call Forwarding, press the More softkey and then press the Forward softkey.
- Select the forwarding type and press Disable softkey.
Bluetooth
Note: Bluetooth is only available on the Cisco 9861 phones.
You can pair your Cisco 9800 phone with a mobile device or headset and use it to place, answer, and manage calls.
- On the phone, press the Home button.
- Select Bluetooth.
- Select Manage Devices.
- Select Scan.
The phone will search for available Bluetooth devices within range to pair with them. Locate and select the name of the headset to pair with it.
To reconnect a headset that was already paired:
- Go to Menu and select Bluetooth.
- Select Manage Devices.
- Choose your device name from the list of paired devices and press Connect.
WiFi
Note: Wifi is only available on the Cisco 9861 phone.
To connect to the Wifi:
- Press the Menu softkey.
- Navigate to Basic Settings.
- Click the Wifi option or simply press the number 8.
- When the WiFi menu appears, use the right navigation arrow to enable wifi.
- Choose Available Networks and press OK.
- Locate your network and press the Connect softkey.
- When and if prompted, enter the WiFi network password and press the Ok button. If successful, a connection success message will appear. If the connection has failed, please make sure you have selected the correct network and supplied the correct password.
9800 Key Expansion Module

With the key expansion module, users can:
- Expand phone functions.
- Easily track call activity on the color LCD screen.
- Quickly access more contacts.
Cisco Desk Phone 9800 Series and supported Key Expansion Module
|
Phone model |
Supported total number of KEMs and lines |
|
Cisco Desk Phone 9861 |
Supports up to 2 KEMs 130 lines (10 lines on phone) |
The following features are available:
- Line keys— Each button corresponds to one line. The light of each button indicates the state of the corresponding line as follows:
- Light off—Line is idle or not configured.
- Green steady—Line is in use.
- Red steady—Shared line or monitored line is in use remotely.
- Red flashing—Line has calls on hold.
- Amber blinking—Line has an incoming call. The LEDs also reflect the status of the extended features assigned to the buttons.
- LCD screen—Displays the phone number, speed-dial number (or name or other text label), phone service, or phone feature assigned to each button. Icons that indicate line status resemble (in both appearance and function) the icons on the phone to which the KEM is attached.
- Shift buttons—2 buttons. The button for page 1 is labeled as 1 and the button for page 2 is labeled as 2. The lights in each button indicate the state of the page as follows:
- Green steady LED—Page is in view.
- Off Light off—Page is not in view.
- Amber Amber steady LED—Page is not in view with one or more alerting calls on the page.