
 Print and share
Cisco 6851 – Quick Start Guide
Table of contents
The guide is for the Cisco 6851. This guide will cover the basics of your Cisco 6851 device.
Overview


- Call Indicator
- The LED indicator flashes to indicate an incoming call (red flashing light), or a new voice message (steady red light).
- Line and Feature Buttons
- Use the line and feature buttons to view calls on a line, access features such as speed dial, and to perform tasks such as resuming a held call.
- Softkey Buttons
- Used to enable softkey options displayed on the phone. These keys will change depending on the phone's current function. Answering a call will have different softkey options than when you are on an active call.
- Navigation Cluster
- The navigation cluster allows you to scroll through menus, highlight and select those highlighted items.
- Hold / Resume Button
- The hold / resume button allows you to place a call on hold. It also allows you to take a call from hold.
- Transfer Button
- The transfer button allows you to transfer a call.
- Conference Button
- The conference button allows you to create a conference call.
- Function Buttons
- Headset, speaker and mute keys. These keys are located along the right edge of the phone.
- Dialpad
- Used to input numbers and characters into the phone system.
- Volume Buttons
- The volume buttons allow you to adjust the handset, speaker and ringer volume of the phone.
- Application Button
- Use the application button to access call history, user preferences, phone settings, and phone model information.
- Directory Button
- Use the directory button to open and close the directories menu.
- Voicemail Button
- The voicemail button will autodial your voicemail mailbox when pressed.
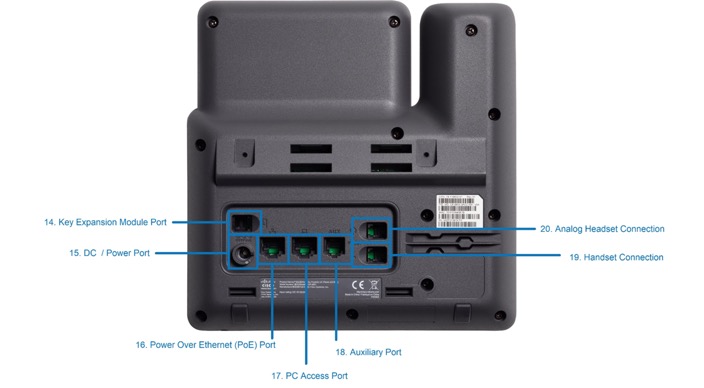
- Key Expansion Module Port
- The key expansion module port allows you to connect a key expansion module to your desktop phone.
- DC / Power Port
- The DC port allows you to use a power adapter if you do not utilize power over ethernet.
- Power Over Ethernet (PoE) Port
- Allows you to power your phone as well as receive data via a Cat5/6 cable. No power adapter needed, if using this port.
- PC Access Port
- Allows you to provide a network connection to your computer via your desktop phone.
- Auxiliary Port
- This port serves as a serial console port to access the phone's terminal.
- Handset Connection
- This connection allows you to connect the wired handset that comes with the phone.
- Analog Headset Connection
- This connection allows you to connect a wired headset to use with your desktop phone.
Key Expansion Module Port
A custom-built power port for the key expansion Module is next to the USB port on the right-hand side of the Cisco IP Phone 6851. Ask your provider about available key expansion modules for your phone.
Key Expansion Module
- Line Keys
Line buttons are located on the sides of the display. These buttons are used to view calls on a line or access speed dials.
- Page Keys
The page keys are used to switch pages of the line key options.
Using Your Device
- Placing Calls
- First, dial the number. Then, pick up handset. For hands-free speakerphone – dial number, then press the Speaker button or press Dial softkey.
- Answering Calls
- Pick up handset. For hands-free speakerphone, press the Answer softkey or press the Speaker button.
- Call Hold
- From Lines, Calls or Active Call view, press the Hold button. To retrieve the call, press Resume softkey or Hold function button again.
- Mute a Call
- Press the Mute function button to silence your phone’s mouthpiece and speaker, you will hear a single beep once pressed. To turn mute off, press Mute again, it will beep twice when pressed.
- Do Not Disturb
- Press the Settings button. Proceed to User Preferences and select Call Preferences. Navigate to Do Not Disturb and press the Ok button. Hit the Set softkey. Once set a banner will appear at the top of the main phone screen. To disable do not disturb, follow the previous steps.
- Three-way Calling
- Place the first call. Then, press the Conference button. Dial the number. The active call will be on hold. After the second call answers, press the Conference softkey again to join all parties in the conference. All parties will be disconnected when you exit the call.
- Press End Call to remove you from the call, but keep the other participants connected.
- Place the first call. Then, press the Conference button. Dial the number. The active call will be on hold. After the second call answers, press the Conference softkey again to join all parties in the conference. All parties will be disconnected when you exit the call.
- Transferring a Call
Announced Transfer: While on an active call, press the Transfer softkey or function button to place active call on hold. Dial the number where you want to transfer the call. Once the third-party answers, announce the call and press Transfer softkey or function button to complete the transfer.
Blind Transfer: While on an active call, press the More softkey and the press the Blind Transfer (BlindXfer) softkey to place active call on hold. Dial the number where you want to transfer the call and press the Call softkey to complete the transfer.
Transfer to Voicemail: While on an active call, press the Transfer softkey or function button to place active call on hold. Next, enter *55 and dial the party’s extension, then #. This completes the transfer.
- Call Park / Call Retrieve
- Call park places a call on hold so that other users assigned to call park service can retrieve that call from any phone in office.
- To Park: While on an active call, press the Transfer softkey and then *68. Enter the extension where the call will be parked, and then press #. Your call will now be parked.
- To Retrieve: Pick up Handset, press the Retrieve softkey. Enter the extension where the call was parked then #.
- Call park places a call on hold so that other users assigned to call park service can retrieve that call from any phone in office.
- Voicemail
- Press the Messages button. Your phone will ring your Voice Portal. Enter your passcode, then #. Follow voice prompts to listen to delete/save messages.
- Call History
- Press the Settings button. Then press 1. From here you can choose from: All Calls, Missed Calls, Received Calls, and Placed Calls. Use the navigation arrows to select your desired list. To make a call from an entry, scroll to the desired contact and press the Call softkey.
Voicemail Setup
- Record Name
- Press Messages from Home View or press Messages function button.
- Enter your PIN provided on your User List and Login Credentials. (Press * if you need to access another voicemail box.)
- Press #. Follow prompts to set a new PIN. Then, press #.
- Follow prompts to verify the new PIN, then press #.
- Follow prompts to record a name announcement, then press #. At the tone, say the name of the group or a brief two or three-word description and press #. (This is a name announcement and not one of the two main voicemail greetings supplied with the service.)
- You will be asked if you are satisfied with your name recording. If yes, press *. If no, follow prompts to re-record.
- Press 1 to access your voicemail box.
- Record Busy Greeting
A busy greeting plays when your phone is in Do Not Disturb mode or unplugged.
- Press 2. Then, press 1. Wait for the tone, and then record your “busy greeting.”
- Press # immediately after finishing.
- Press 2 to listen to your greeting or press * to get back to the previous menu.
- Record No Answer Greeting
- Press 3. Then, press 1. Wait for the tone, and then record your no-answer greeting.
- Press # immediately after finishing.
- Press 2 to listen to your greeting or press * to get back to the previous menu.